Good morning! I have a post up on the Cardmaker Blog today with a video, sharing a spotlighting technique along with some Copic coloring with one of my frame sets and Stately Flowers 6. Notice I approach coloring my more realistic images in a very similar manner as my whimsical ones like in A Year of Flowers 2. I hope you'll check it out!
You can find the post HERE!
Are you ready for a tip? While we are talking frames, Betty Neville wrote:
Congrats on your new book!! I was wondering if you could offer some tips or do a tutorial on how to get an even edge on the frame stamps. I have tried stamping directly onto the paper as well as laying the paper onto the stamp; and it is always a struggle to get it even. Thank you for designing such beautiful sets and for all your advice! :)
Good question, Betty! Here is the answer, from my archives!
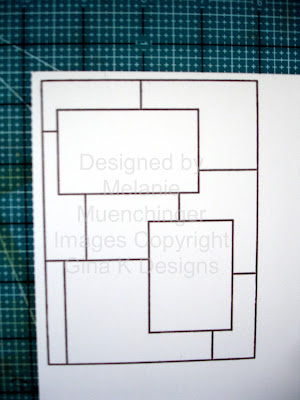
Here is a pic of me stamping the grid onto my CS I will be using on my project, you can just see the edge of the white paper peeking out. So I only have to cut on two sides after stamping, I make sure the line on the grid block that is lined up with the top of my image is parallel to the top of my CS, that way I know it will be straight. I also bring it down about 1/8" from the top and 1/8" over the side (It make look like its further over on the left, but it's the angle I'm taking the pic at)
 When I pull the stamp away, my CS is ready to cut on the right side and below
the image so it will be perfectly framed up on my paper. Stamping it
this way into the corner of a sheet of CS, I can get 4 mats from an 8
1/2" by 11 piece with very little waste. Love it!
When I pull the stamp away, my CS is ready to cut on the right side and below
the image so it will be perfectly framed up on my paper. Stamping it
this way into the corner of a sheet of CS, I can get 4 mats from an 8
1/2" by 11 piece with very little waste. Love it!
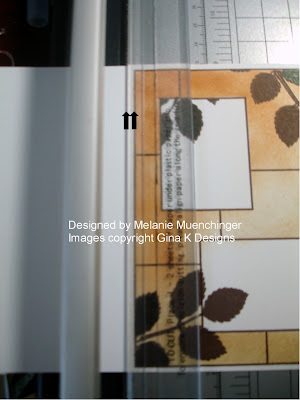
 Now, to cut! Your cutter may be a little different than mine, but see how the border of my stamp is parallel to the edge of the plastic grip and cutting track?
I put in 1/8" over, this way I will come out with a mat that has even
borders on all sides, AND, even if I didn't stamp it exactly square to
the corner, because the image is a rectangle, when you line it up to the
border of the stamp and NOT the bottom of the cardstock, all the sides
will be squared up. I love that! You will have a mat ready to adhere to
your A2 card front.
Now, to cut! Your cutter may be a little different than mine, but see how the border of my stamp is parallel to the edge of the plastic grip and cutting track?
I put in 1/8" over, this way I will come out with a mat that has even
borders on all sides, AND, even if I didn't stamp it exactly square to
the corner, because the image is a rectangle, when you line it up to the
border of the stamp and NOT the bottom of the cardstock, all the sides
will be squared up. I love that! You will have a mat ready to adhere to
your A2 card front.
Even though I demonstrated it with Inspiration Mosaic in this post, it works the same for any of my frame sets , since the frames all have a straight edge. Hope this helps! You can also trim the frame exactly on the border, like the sample in my video and then do some layered mats underneath if this doesn't work, don't start over. Finally, now our stamps are die cut, (before when I did this tutorial we had to hand cut them) so it is much easier to stamp them straight and parallel with your paper's edge. Just be sure it is lined up with a line on your block and you are good to go!
Are you ready for a tip? While we are talking frames, Betty Neville wrote:
Congrats on your new book!! I was wondering if you could offer some tips or do a tutorial on how to get an even edge on the frame stamps. I have tried stamping directly onto the paper as well as laying the paper onto the stamp; and it is always a struggle to get it even. Thank you for designing such beautiful sets and for all your advice! :)
Good question, Betty! Here is the answer, from my archives!
Here is a pic of me stamping the grid onto my CS I will be using on my project, you can just see the edge of the white paper peeking out. So I only have to cut on two sides after stamping, I make sure the line on the grid block that is lined up with the top of my image is parallel to the top of my CS, that way I know it will be straight. I also bring it down about 1/8" from the top and 1/8" over the side (It make look like its further over on the left, but it's the angle I'm taking the pic at)
 When I pull the stamp away, my CS is ready to cut on the right side and below
the image so it will be perfectly framed up on my paper. Stamping it
this way into the corner of a sheet of CS, I can get 4 mats from an 8
1/2" by 11 piece with very little waste. Love it!
When I pull the stamp away, my CS is ready to cut on the right side and below
the image so it will be perfectly framed up on my paper. Stamping it
this way into the corner of a sheet of CS, I can get 4 mats from an 8
1/2" by 11 piece with very little waste. Love it! Now, to cut! Your cutter may be a little different than mine, but see how the border of my stamp is parallel to the edge of the plastic grip and cutting track?
I put in 1/8" over, this way I will come out with a mat that has even
borders on all sides, AND, even if I didn't stamp it exactly square to
the corner, because the image is a rectangle, when you line it up to the
border of the stamp and NOT the bottom of the cardstock, all the sides
will be squared up. I love that! You will have a mat ready to adhere to
your A2 card front.
Now, to cut! Your cutter may be a little different than mine, but see how the border of my stamp is parallel to the edge of the plastic grip and cutting track?
I put in 1/8" over, this way I will come out with a mat that has even
borders on all sides, AND, even if I didn't stamp it exactly square to
the corner, because the image is a rectangle, when you line it up to the
border of the stamp and NOT the bottom of the cardstock, all the sides
will be squared up. I love that! You will have a mat ready to adhere to
your A2 card front.
Even though I demonstrated it with Inspiration Mosaic in this post, it works the same for any of my frame sets , since the frames all have a straight edge. Hope this helps! You can also trim the frame exactly on the border, like the sample in my video and then do some layered mats underneath if this doesn't work, don't start over. Finally, now our stamps are die cut, (before when I did this tutorial we had to hand cut them) so it is much easier to stamp them straight and parallel with your paper's edge. Just be sure it is lined up with a line on your block and you are good to go!
Hope this helps! So now you have seen me do it two ways: stamped down on to paper, or paper down on to stamp. I do both! Try and see what works best for you!
Have a great day!
Hi Melanie I could not leave a message on the CardMaker blog so I love and have most of your stamp sets. I wasn't sure how to use the Moasic set. Thank you for the video and a beautiful layout.
ReplyDeleteWonderful tips Melanie!!!
ReplyDeleteWow this is so simple yet extremely helpful! Thanks Melanie ;)
ReplyDeleteThis stamp is still one of my all-time favs!
ReplyDeleteThank you SO much for this, Melanie! I must have missed this when you originally posted it. You are brilliant - I would never have thought of stamping frames this way! This will be very helpful. Thank you again - much appreciated! :)
ReplyDeleteLove your designs.
ReplyDelete