Pages

Tuesday, July 29, 2014

Video: Fabulous Frame with Stately Flowers Series

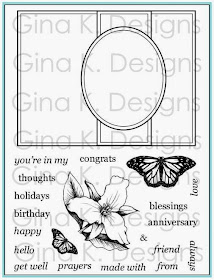
Hello!  Hope you had a terrific weekend!  In today’s video, I show you a simple layout to show off the flowers in my Stately Flowers series along with their names in my Fabulous Frame.  (Fabulous Frame is now sold out but we will be getting more soon, I promise!)

 This layout works with other images, too.  I show how to mask the cascading floral background an image from Stately Flowers 4 and color the rhododendron with alcohol markers. Please enjoy! Refer to card photo above for a closeup of my coloring.
Important: Although I used the rubber version in the video, THIS SET IS NOW SOLD AS A CLEAR PHOTOPOLYMER SET! :)

Supplies:
Gina K. Fabulous Frame, Stately Flowers 4 stamp sets
Gina K. Pure Luxury Heavy Baseweight and layering weight White, Lovely Lavender cardstock
Gina K. Black Onyx, Wild Lilac ink pads
Spectrum Noir markers: HB1, HB2, HB3, PL4, CG3, CG4 (Copics: V12, B66, V15,V09 YG23, YG67))
Gin K. White organdy ribbon, adhesive pearls, foam tape, adhesive, sticky notes for masking
Optional: Stately Flower 4 Studio cut file
 Trivia: Stately Flowers 4 was the first in the Stately series to include butterflies!

Monday, July 21, 2014

Video: CAS Frame and Borders


Hello!  Hope you had a terrific weekend!  In today's video, I show you how to add simple accents to the stamped Fabulous Frame with my A Year of Borders set . We'll do some masking and add some drop shadows with a marker as well. This clean and simple design could work for any occasion or season when you switch out the borders and colors. Please enjoy!

 Supplies:
Gina K. Designs Fabulous Frame, A Year of Borders
Gina K. Pure Luxury White, Kraft and Powder Blue cardstock
Gina K. Dark Chocolate and Versamark ink pads
Spectrum Noir markers: IG2, CR1, BG4 (Copics R22, C3, WG3)
Silver brads, 1/16" circle punch, scissors, adhesive foam, scratch paper for masking

Measurements:
Blue card base: 4 ¼" x 11", scored at 5 ½"
Kraft layer: 4 ¼" by 5 ½", then cut to size after stamping
White scrap:  1" x 2"

Monday, July 14, 2014

Video: Layering Stamped Frames


Good morning!  In today’s video, I show how you can layer two of my different frame stamps over one another to achieve a whole new frame and several new layouts! (Can you believe it? I almost can't either.) The oval stamp in Branching Out nests perfectly into the Fabulous Frame window. Additionally, use the birds, flowers and berries included in Branching Out to accent the stamped frames to suit the season and occasion.


  I love it!!  Please enjoy the video. 

Supplies:

Gina K. Designs Fabulous Frame and Branching Out stamp sets

Gina K. Pure Luxury Charcoal Brown and Tomato Soup Ink pads

Spectrum Noir markers: CG2, CR7, GB7 (Copics: R05, YG95, YR23)

Pure Luxury Kraft cardstock

Adhesive nailheads
 

Sunday, July 13, 2014

Red Poppies


Hope you had a good weekend!  Here is a card I made with Stately Flowers 1 when I was testing out some Spectrum Noir markers last month.  (I didn't want to post it until the stamps were back in stock.)  Isn't this poppy image gorgeous with these Gina K Journey of the Heart patterned papers?  Base is Pure Luxury Red Hot and I used some red grosgrain from a past StampTV kit.  To create this glowing effect, follow the exact same coloring process that I did with the blue markers in this video but use these for the petals: DR2 and DR3.  For Copics, use R35 and R27.  
Spellbinders die is from Timeless Rectangles.

Thanks for visiting!  
New video with Fabulous Frame posting tomorrow! :)

Thursday, July 3, 2014

Video: Square Frame and Faux Paper Piecing


Good morning!  In today's video, I show you how to adapt the popular and versatile frame in the Fabulous Frame stamp set to square cards, so many more options for your layouts!  
 
 I also share how to customize one piece of patterned paper to look like several different coordinating patterns with your colored markers.  (The new GKD Ang & Me pack has some great patterns for faux paper piecing!)  


Pair this technique with the frame and you have a paper pieced look without all the cutting and layering.   (I forgot to say in the video, be sure to save the side you cut off to add to another project!)
 Finally, add some butterflies with the coordinating Silhouette Studio cut file (free for a limited time on the StampTV Freebies page, we extended because of the backorder! :). You must be a StampTV member to download the file, but signing up is free. Supply list for card at end of post.
 
I threw just a touch of "Bring the Bling" on today as well!  This is a full size set like the one above, I just can't maximize this photo as much, just FYI!


 Supplies:

Gina K. Designs Fabulous Frame, Bring the Bling

Gina K. Pure Luxury Kraft cardstock

Gina K. Black Onyx ink pad

Spectrum Noir Markers: LG5, IB2, CT2 (Copics: )


Adhesive, foam squares, scissors


Kraft base: 4 1/4" x 8 ½”, scored at 4 ¼”

Wednesday, July 2, 2014

Something Blue

Fabulous Frame is humming along! I was sure it would be a hit with our customers since all the frames sets have been so popular in the past, but the response is really kind of blowing my mind!  Thanks so much!  Have you placed your order yet?  Anyone received their stamps?  I can't wait to see your ideas for it in our StampTV gallery. :)

Here is a warm up card I made after the set arrived. At that point I'd cut two sheets of white cardstock into 4 cards and made three in different orientations(which I already posted), so this was the final one with the oval at the bottom (I made the yellow card in Monday's video later). I masked and stamped the flowers in Grass Green into the belly band and sponged over it and then accented with some pearls.  I really like that look!  Something else different in this card from the ones previously shown, is I made the borders different colors.


Supplies: 
 Gina K. Fabulous Frame
Gina K. Pure Luxury White cardstock
Gina K. Black Onyx and Grass Green ink pad
Spectrum Noir markers: IG2, TB2, TB4, CG3, CG4 (Copics: C3, B24, G07, YG03, B21)
adhesive pearls

Really excited for my next video, love the idea and I'm choosing the papers and colors today!  Get ready for more versatility! :) Posting soon!