A woman who works with her hands is a LABORER; a woman who works with her hands and head, a CRAFTSMAN; but a woman who works with her hands, her head and her heart is an ARTIST. ~ Louis Nizer
Pages
▼
Tuesday, March 31, 2015
Triple Play Frame Tip Sheet
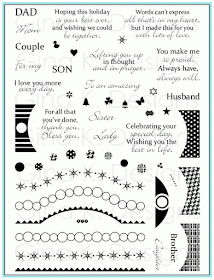
Just a few tips for Triple Play Frame to get you started! Several will be demonstrated in videos. (Some will make more sense seeing it in action!) Refer to photo of the set above when tips describes certain images and combinations. Links have been provided for coordinating sets.
Cut out the middle circles with a 1 1/4" punch or die. You can cut out the larger circles around that with a 1 1/2" punch or die.
Smaller hearts stamp perfectly into the smaller hearts in the border and nest into the larger hearts in the border leaving a small rim. Add interest to the border by two step stamping them in at random or in a pattern, and alternate coloring in the remaining hearts with different colored markers or pencils. Add highlights to the hearts' humps with a paint, glitter or gel pen.
Turn the frame in 4 different directions for 4 different layouts.
Create custom borders and background stamping the different small images.
Add the small seasonal elements to the middle of the small open circle to make themed stamped "brads" for the frame or other projects to coordinate with your designs.
Stamp the small images like a flower, heart or butterfly to substitute for the O in hope love and joy.
Use the large floral heart and butterfly with coordinating elements in Fabulous Frame Fillers for fancier coordinated designs in the Fabulous Frame or Triple Play Frame frames.
Make a mini landscape or bunch of flowers with the two and three step floral elements: stem (flexible, can be stamped to lean either way), small leaf for the stem, large fern, and three small flower silhouettes as toppers. You can also make them growing inside the circle frames or rooting at the corner or along the largest frame section of as a border. (This is shown in next video!)
Color in the borders for a more layered look. Use all one color for a monochromatic look use different colors for the outer frame, the belly band and the circle rims. You can even divide up the outer border by using a different color for the left and right side.
Leave borders uncolored for a more subtle, embossed look. Stamping the border in Versamark or tone on tone will be the most subtle but will still lend structure and design to your card and help in placement of images.
Emboss the frame with a heat gun and embossing powder to add dimension and texture and have the frame stand out.
Cut masks to keep with your set to have different open sections of the frame to stamp into, allowing making custom stamped backgrounds for each section: left side, right on one, inner circle openings on another, and finally inside the belly band.
Use any of the straight borders in Fabulous Frame Fillers and Fabulous Holiday Fillers with your Triple Play Frame masks to create dashed dotted etc borders that will go all the way across the new frame around the belly band or along the middle or bottoms of the largest section. Or, stamp it across the belly band section when covered with the mask to reveal straight borders on the short sides.
Stamp "brads" or small elements in between the circles as accents. Words can fit in between the round windows as well when the frame is turned portrait style.
Fill in the belly band and oval end cap in Fabulous Holiday Fillers with the new brad and button accents in Triple Play Frame.
Fill in the curved and straight border in Fabulous Holiday Fillers with all the new round accents in Triple Pay Frame, like the buttons and seasonal "brads".
Use Fabulous Frame Fillers photo corner images in the Triple Play Frames corners.
All the longer sentiments in the Fabulous Holiday Fillers set work in the largest section of Triple Play Frame, either centered or in the corner.
The small flower and leafy corner accent in Fabulous Frame Fillers first perfectly into the top and bottom sections of the belly band in between the three circle in Triple Play Frame.
All of the "For My" and relationship words "For my Mom" etc from Fabulous Holiday Fillers will fit in the circles in Triple Play Frame.
No coloring needed for these bold images, but lots of coloring oportunities if you want to add into the patterned details on the heart, butterfly, into the patterned hearts inside the deigned brads, border etc.
Create bodies for the large and small butterfly by stamping in the different smaller accents in the set (or from Fabulous Frame Fillers or Fabulous Holiday Fillers) or add using adhesive pearls or rhinestones.
Sentiments to make with just the words in this set:
hope
joy
love
peace
thanks
faith
wish
hugs
have hope
have love
have joy
have faith
have peace
big hugs
big wish
wish big
big faith
big thanks
big baby (hee!)
baby love
Use the asterisk or brads in between the words to accent and separate them. Doing this repeatedly makes fun borders along the top or bottom: love*love*love* or love*joy*peace* etc
Use the & sign in the Fabulous Frame set to pair any of these new words together.
Stamp one of the larger images in light ink, and then stamp one of the words over it in a dark ink like black or brown.
Use a sponge dauber or rock and roll a large circle stamp on a pad and stamp as a background to add one of the larger images or the words into to highlight it.
Use all these images in the many circles in the Fun Year Round Frame and vice versa, use the round images from Fun Year Round inside the Triple Play Frames three circle windows and to stamp into the large and small sections of the new frame.
You can also use the new bold images and words to enhance the graphic elements and letters in Lots of Letters and Lots of Letters 2 sets.
Use the small images to make straight or "up and down" borders by stamping them in a row end to end or small space in between.
Not just for Christmas, a number of different elements can be "hung" from the ornament hanger year round. Two step stamp in a button or seasonal circle to look like ornaments, or stamp in the large flowers etc. Anything with round edge works! Stamping them in a row makes a very festive border, alone on a CAS card or hung along one of the frame's inner borders.
So many different options for clean and simple cards with all the seasonal images used on their own, no frame required, no limit to what you can do with a few ink pads and clean white or neutral card base!
And more coming soon!
Friday, March 27, 2015
Video: Two Step Stamped Flowers and Reverse Masking
Good morning! In today’s video, I show you how to make a beautiful
layered card in minutes with Triple Play Frame using reverse masking and
two and three step stamping techniques. A 1¼” circle punch or die is a perfect
fit to pop up inside the frame’s three round windows! If you have no punch or die in that size,
simply stamp the frame and cut out the inner circles when you want a
coordinating cardstock or patterned paper as filler.
Supplies:
Gina K. Triple Play Frame stamp set
Gina K. Pure Luxury Passionate Pink cardstock (5 ½” x 8 ½”,
scored at 4 ¼”), Layering Weight White cardstock (4” x 5 ¼”) and Sweet Mango (4
¼ x 5 ½”, trimmed down to 3 ¾” x 5” after stamping)
Gina K. Dark Chocolate, Passionate Pink, Turquoise Sea, and
Sweet Mango ink pads
Acrylic blocks, scissors and scratch paper
Thanks for visiting and have a fabulous weekend!
Thursday, March 26, 2015
Inspiration Hop, Day 3: Delicate Damask
Good morning! Welcome to our final day fabulous
Inspiration Blog Hops this week! As you hop through the team's blogs, make sure to
leave a comment on each of them because we will choose a few random
comments and those stampers will each win a huge grab bag of Gina K. Designs
products! To see the full list of winners check the Big News Forum at
StampTV a few days after the hops.
Today I have a simple single layer card on Pure Luxury Kraft using my Triple Play Frame with Beth Silaika's Delicate Damask. Delicate Damask is a great basics set for making shabby chic accents and backgrounds. I used masks I made of the frame stamped on scratch paper and cut out to stamp the different damask patterns into the different frame sections: the largest damask on the right side and the row of damask on the left, both in the Gina K. Dark Chocolate ink, the smaller damask in Gina K. Kraft ink inside the circles, and finally stamping the hearts over them in Dark Chocolate ink. Aren't those delicate flowered hearts beautiful with the damask images? Then I added one of her greetings to the middle circle and a couple of the small damask accents in between and above the circles like embellishments, aren't those perfect to really bring further emphasis to the round windows and make it extra fancy? I used the Spectrum Noir BG3 marker to fill in all the borders to make them pop further. Just a few adhesive pearls to accent those little stamped bits. Easy peasy! Love the vintage look!
Ready for more inspiration? Just click on the links below for more from the Illustrators and Design Team!
Wednesday, March 25, 2015
Inspiration Hop Day 2: Elegant Florals 2
Good morning!The Cast and Crew for Gina K Designs welcomes you to another fabulous
Inspiration Blog Hop!As you hop through their blogs, make
sure to leave a comment on each of them because we will choose a few
random comments and those stampers will each win a grab bag of Gina K.
Designs products! To see the full list of winners, check the Big News
Forum at StampTV a few days after the hops.
Today I have a project where I used three of the images from Theresa's set Elegant Florals 2, stamped over the three windows in Triple Play Frame and colored for a spotlight effect. First stamp the frame, then add the flowers one a time over each circle, lining it up so the stem is at the bottom border and the most interesting part of the floral image goes right over that round window, love how that works out! I stamped the flowers and frame in Gina K. Moonlit Fog ink to make the outlines more subtle, but didn't bother to mask because I thought seeing the outlines intersecting through the pans added a lot of interest, almost like a garden behind a multi-paned window. Coloring in just what's inside each circle really makes each pop and is almost like looking through the lens of a magnifying glass. I colored the images with Spectrum Noir markers PS1, PL3, PP5, CG4, CG3, and then used the HB1 to color the "belly band pane" behind the circles. I used GG2 to color all the borders. Greeting is stamped in Black Onyx. Single layer card on Gina K. Pure Luxury Base Weight White! No cutting or adhesive, embellishments needed. :) Love it!
Ready for more awesome creations? Just click on the links below for more from the Illustrators and Design Team!
- Theresa Momber (Illustrator of Elegant Florals 2)
- Beth Silaika
- Cathy Tidwell
- Karen Hightower
- Kendra Wietstock
- Laurie Schmidlin
- Lee Murphy
- Melanie Muenchinger (you are here!)
- Sean Fetterman
- Tricia Traxler
Tuesday, March 24, 2015
Inspiration Hop, Day 1: Triple Play Frame
My first video with Triple Play Frame! I walk through the set and point out several features for starters, but in no way could I talk about what my plans are for every little piece!
This is *such* a simple card to make and takes just one ink pad, one piece of colored cardstock, and a few markers! I demonstrate it in a different orientation, plus a greeting and a few other minor changes in the video. Please enjoy! Supplies listed below.
Supplies:
Gina K. Triple Play Frame stamp set
Gina K. Innocent Pink cardstock (5 ½” x 8 ½”, scored at 4 ¼”)
Gina K. Dark Chocolate ink pad
Memento markers: Ladybug, Angel Pink, Pear Tart, Bamboo Leaves, and Faber-Castell Pitt White Artist Pen
Acrylic blocks
Next, here is a clean and simple design I made, without using the frame, on a Pure Luxury Kraft base. Images are stamped in Passionate Pink, Sweet Mango and Turquoise Sea and accents and sentiments stamped in Dark Chocolate ink. Emboss or score (or sketch ) a simple box around them and add some adhesive pearls to make it pop. If you want to incorporate the frame stamp in this design, just stamp each of the images in the frame's circles. :)
Here is another CAS card with the Triple Play Frame words and small elements. I love all the different greeting combinations that are possible and wanted to put several on clean white base. Adding the stamps in different inks for the O's add color and then the images at the bottom right play off of those. Simple, fast design!
I also incorporated the frame in my samples for our other brand new sets this release for our hops the next two days and I am so excited how they turned out! (You have not seen them yet!)
Looking forward to sharing more ideas in a tip sheet I am wrapping up (so
long, needs a lot of editing!) and in future videos (I have already
shot several. For those of you who already watched this, I will be
haring my next video early, don't worry you don't have to wait a week to
get a fix!) :)
The new set also coordinates with the patterns and pieces in my past Fabulous Frame Fillers and Fabulous Holiday Fillers sets, as well as my Fun Year Round set. I had to show you the sets in one post so you can see everything together!
You can add these straight borders in Fabulous Frame Fillers
to the long and short sides of the new frame when you mask. (Same for the borders in the set below!)Also, that little flower and leaf cluster that looks like a "V"? it looks terrific when you stamp it in the top and bottom and bottom sections of the pane between the circles. I need to make a sample showing that also!)
Notice how all those round and button elements from the new Triple Play Frame set will fit into the straight and curved circle border in Fabulous Holiday Fillers (stock is low, but it is in stock!), as well as into the open circle in the belly band and the oval filler you see above? Also, all these long holiday greetings will fit in the largest section of the new frame! Yippee!
Use your words from Fabulous Frame when you want a more traditional looking card, which has a more classic font.
I don't think I have done any videos for Fun Year Round yet. That has to change! Hopefully you can see how all the round elements in the new set will fit in my new frame and vice versa. Fun fun!
Be sure to scroll down to see the two clean and simple samples I shared in yesterday's post with Triple Play Frame in case you missed. :) I have so much more to share, cards that are so different from these but want some surprises for my upcoming videos! If you have any of the previous frame sets, you *have* to get this one!
Ready for more awesome creations? Just click on the links below for more from the Illustrators and Design Team!
- Melanie Muenchinger (Illustrator of Triple Play Frame, you are here!)
- Beth Silaika
- Cathy Tidwell
- Karen Hightower
- Kendra Wietstock
- Laurie Schmidlin
- Lee Murphy
- Sean Fetterman
- Tricia Traxler
Monday, March 23, 2015
You're Invited: Gina K. Release Party Tonight!
Good morning! The illustrators releasing new sets tonight have some sneak peeks for you before our party tonight!
As you stop by each, leave a comment on each blog. One lucky commenter from all of the blogs will win a HUGE grab bag full of fun paper crafting products!
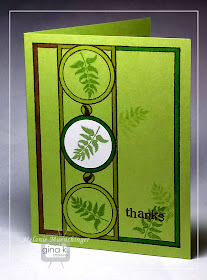
I am so excited to show you my newest set from Gina K. Designs we are releasing tonight, Triple Play Frame! You will so enjoy playing with the frame and *38* images and sentiments perfectly sized and planned for this frame. As always, the frame works as a 4 way sketch that works portrait or landscape style on your A2 sized cards. This layout with its three openings for any images, greetings or embellishments that you choose to showcase is so fresh and flirty, but can also make a very masculine card, like you see here with this fern.
The bold images also work for two and three step stamping for adding quick and bold pops of color to your cards, even without the frame. I made several different CAS designs in about 20 minutes yesterday and I can't wait to share them with you on the blog over the next few weeks! :)
The set also coordinates with the patterns and pieces in my past Fabulous Frame Fillers and Fabulous Holiday Fillers sets, as well as my Fun Year Round Frame set, for endless mix and match combinations, many of which you will see demonstrated in future videos! :) Video posted here in our inspiration hop tomorrow (or you can watch it today!) :)
We also have new sets from Theresa and Beth, so please visit their blogs for peeks of what is to come tonight at 7PM Central on StampTV!
Theresa Momber- Illustrator of Elegant Florals 2
Beth Silaika- Illustrator of Delicate Damask
and Gina might have a little something to show you this morning, too! (snippets on her blog!)
I hope you can join us at our release party to see more samples made the new sets, full set reveals, chat with the design team, watch Gina's video and play along by answering our contest questions to win some prizes! Chat with you tonight!
Thanks for stopping by and your feedback! Hugs!
Friday, March 13, 2015
Video: Sponged Bokeh in Minutes
Good morning! Bokeh is one of the hottest trends in
stamping, cardmaking and papercrafting, and you can achieve this look
quickly and easily with your sponge daubers! If you don’t have sponge
daubers try circle stamp in various sizes, like in my Lots of Letters or
Pretty Patterns sets. Be sure to stamp and stamp off in each color you
choose to create the different shades and hazy quality that is
signature to bokeh.
Lovely as a background to make your images pop, or used on its own with a stylish sentiment for a clean and simple card, you will love adding this technique to your repertoire! Please enjoy! I made the sample above with Stately Flowers 9, but in the demonstration I used Stately Flowers 4 because I had not yet colored the carnation from that set in a video.
Apologies for the sniffling and not being as articulate as I would like, I am getting a cold. :( And smudging my card right before I started rolling was no joke! I actually sponged on more circles to cover the boo boos (instead of trimming like I said I might, seemed like too much of a "cheat". I "made it work!") See? :)
Supplies:
Gina K. Designs Stately Flowers 4
Gina K Pure Luxury Heavy Base Weight White cardstock
Gina K. Black Onyx, Grass Green, Wild Lilac, and Blue Raspberry ink pads
Spectrum Noir markers CG2, CG4, HB2 (Copic suggestions: YG95, YG67, and B66, sorry I forgot to show the charts)
Sponge daubers, different sizes (OR, round stamps in different sizes, try Melanie’s Lots of Letters set) Pencil erasers work, too! or try the ends of wine corks for the small daubers!
Thursday, March 12, 2015
Mod Squad Challenge Blog!
Be sure to check out the Mod Squad Challenge Blog this week, Joyce Erb has thrown down the gauntlet and challenged you to make flowers for your cards as a focal point. (Is that up my alley, or what?)
I am sponsoring this week with a prize I got from CardMaker: the fabulous new special issue Beautiful Blooms, which features 50 projects and techniques for making flowers, out of all sorts of media! Many I'd never seen before and look forward to trying out! It is great reference tool and inspiration to have, over 100 pages!
I will sign my design in it if you like if you happen to be the winner (or not, won't hurt my feelings a bit!)
Good luck with the challenge. I hope you will give it a go!
New video will be posted early this week, I hope you like. I was sick (well, still am) when I recorded it, so go easy on me! :)
Have a great weekend and week!
Tuesday, March 10, 2015
Video: Pencils and Pressure
In today’s video, I will show you how to quickly add color to your stamped images with colored pencils on colored cardstock and how to give them a curled and 3D dimensional effect using a stylus and a mouse pad. Pencils are a fast and easy way to create fine detail and a textured look on your projects. Be sure to watch the whole video as I show a different portrait style orientation of the same design pictured above. Please enjoy! It may be difficult to see the dimension added in this top down video orientation view, but the way the petals open so realistically, it's a "wow" in real life! :)
I used my hibiscus from Stately Flowers 4 today. (I am so ready for the beach)
See all my Stately Flowers sets here.
Supplies:
Gina K. Designs Stately Flowers 4 stamp set (CLEAR)
Gina K. Pure Luxury Lemon Drop (4 ¼” x 11, scored at 5 ½”, and scrap for flower and butterfly) Black Onyx 3 5/8” x 5 ½”) and Layering Weight White (3” x 5”)
Gina K. Black Onyx and Blue Raspberry ink ads
Spectrum Noir Primary Colored Pencil set, blending stump and Gamsol (odorless mineral spirits)
Sponge dauber, scissors, adhesive, stylus and mouse pad
Thanks for watching and stopping by! Have a fabulous day!
Tuesday, March 3, 2015
Divalicious Birthday
Good morning! Did you get the new StampTV kit? Look at how terrific it goes with the Knit-wit Diva!
Isn't this birthday sentiment from the Birthday Essentialss StampTV Kit adorable? I love how the swirl creates a tiered cake shape and I noticed how perfect it would be in front of the seated Knit-Wit Diva! Make a wish! Just cut around it and pop up so she's positioned to blow out the candles. Colored with Spectrum Noir markers to look like one of my besties with a February birthday (and since I made it *weeks* ago for the release, forgot I made this specifically for her and gave her a *different* card last week when it rolled around! Oops! I'm ready for next year. Better put it in an envy with do not open til 2016 and give it to her now!) Cardstock is Gina K. Pure Luxury White and Black Onyx.
Have a fabulous day!!!
Monday, March 2, 2015
Video: Coloring with Sponges: Reverse Masking
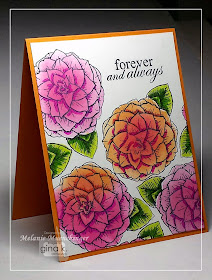
A wonderful and versatile go-to for backgrounds or a single image, this technique works great with the large scale floral images in all my Stately Flowers sets, as well as A Year of Flowers and A Year of Flowers 2. When you've already invested in ink pads that coordinate with your paper, you really don't need a lot of markers (unless you want them, of course!)
I used the camellia from my Stately Flowers 2. (I love the flowers and greeting in this set.) I am so ready for spring after all the wet rainy weather we've had the past few weeks, and was inspired by some lovely, springy prints in bright colors I saw at the mall recently! It was a good reminder you don't *always* need to have realistic shading as your goal; get a little artsy sometimes and be bolder. Have fun!
Supplies:
Gina K. Designs Stately Flowers 2
Gina K. Black Onyx, Passionate Pink, Sweet Mango ink pads
Gina K. Pure Luxury Sweet Mango (4 1/4" x 11, scored at 5 1/2") and White cardstock (4" x 5 1/4")
Spectrum Noir markers; CG3, CG4, CR10, BP4
Wink of Stella Clear Glitter pen, Scissors , scratch paper,
adhesive