Pages

Monday, December 27, 2010

A Grand Calibur Christmas!

Hope Santa brought you some fun things this Christmas! Here I am with one of my prezzies, the Spellbinders Grand Calibur, wooooo hoooooooooooo!

Although I use my Nestabilities on almost every creation, when I FIRST saw this new die cutter, I thought "For GINORMOUS dies. Maybe I don't *need* it..." and maybe you're thinking that, too, if you mainly do card making and aren't sure how much you'd use the larger dies...well, you NEED it!! Even if you never buy any of the Grand dies (but you will, and so will I!!) it is so, SO worth being able to run an 8" x 11" sheet of cardstock through and cut as many of the regular sized Nestabilities dies as you can fit on the sheet in ONE pass, then flipping them over and embossing them ALL at once on the second pass! Let me show you!

Here I placed 6 of some of my favorite large Spellbinders labels (One, Eight, Fourteen, Fifteen) and new beaded circles and beaded ovals (just got these beaded dies so you haven't sen me use them on a project yet, but oh my word! They are so gorgeous, love the detail!) on one sheet of White Pure Luxury cardstock. (I could have actually placed them more closely and gotten some fancy tag dies on there too, did later, but didn't take pics of that)

Now put your cutting plate down on top over the dies and hold the end as you run it through to keep the dies on the far end from sliding around. Here they are all cut below from that one smooth, rolling pass! It goes through so easily, lately I've been feeling like I need to go to the gym and work out a little more to get the plates cranked through my 'bug! ;)

Flip your stack over after cutting and transfer the cut dies to the base plate, facing up, and add the tan mat and embossing plate. Roll through the Grand Calibur once.

Remove the plate and dies, and ta da! Now you have ALL these beautiful embossed dies in about a minute or two! This would have taken forEVER with my little 'bug, I'd still be cranking! And I LOVE not having to crop down the paper to fit on a smaller plate as well as not having to make so many additional passes! It really is going to save so much time and energy and I am excited to have all these embossed die cuts ready to go when I sit down to stamp! So for the dedicated crafter, I think this machine is worth its weight in gold! Highly recommended (looks super cute on my desk too in raspberry!) and of course now I have to get back to you soon with a review of the Grand Dies, Labels One and Four are first on my wishlist!! :)


Did you see the Gina K snippets have started? I'll be back soon with a few cards my kids made for me, more Christmas pics, stories, and handmade cards from friends, plus some some more "Mugs and Kisses" samples before our previews start next Monday!

Thursday, December 23, 2010

Heads Up, Free Coffee on Saturday, Merry Christmas!

Here's another simple "Mugs and Kisses" card I made with the Basic Grey Jovial pack and a rhinestone flourish. TIP: When putting the label on the cup, trim off the edge before stamping your greeting, this way it will look like the oval is slightly turned away from the viewer.

So remember that beautiful honey nut latte from Thunderbird I showed you a week or so ago? Well, you can get one free (or any other coffee drink) on Christmas day, just had to share the news, this is copied and pasted from their email:


"FREE coffee all day?!

That's right: On Christmas day, we're giving away FREE coffee, lattes, mochas, cappuccinos, macchiatos, and any other coffee drink from 10 a.m. to 1 p.m. at BOTH locations! (1401 Koenig Lane or 2200 Manor Road) No catch, no tricks, no fine print. It's our way of saying "Dude, you're freakin' awesome!"

Really, THANK YOU for a great 2010, and we hope to see more of YOU and your posse at Thunderbird in the new year. Now come sip on some free coffee! "


Does that jingle bell rock, or what?? I know this might not sound totally convenient to go out for coffee on Christmas day, but we're lucky in that we live about 4 blocks from one of these locations, so it would be a nice little walking adventure after opening the presents! Maybe I'll see you there! ;)


Friends don't let friends miss fancy, free coffee!


Mugs and kisses,

Melanie

Wednesday, December 22, 2010

Happy Christmas Mail!

Had to come post a few beautiful cards I've received from friends, I'll be back to share more as I get them photographed and uploaded!

This first is from Kary Lim using Gina's "Blessed is the Season". She has a suck a knack for mixing prints and I love how she'll crop corners of paper with a scallops or a punch onto another pattern to make a collagey looking print, love those pearls, too! (and the inside was as pretty as the outside!)
The next is from Carla Suto, who used "Festive Frame" I love the glitter in the centers and the applique on the pine cones, it really makes the card! (Hee hee, I commented on this one in the STV gallery a few weeks ago, so she knew I liked it!)
The last is from Selma Stevenson, also using "Festive Frame", I love how differently they each interpreted the set to made the designs their own!

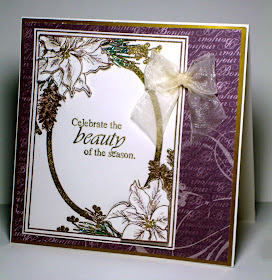
The glitter and embossing and way everything reflects the light on this card is just stunning, but also makes it hard to capture its true beauty in a photo. here's a closeup so you can see a bit of the shimmer (but still read the greeting!) She painstakingly layered up the poinsettias looks terrific, and isn't the purple, gold and white just regal?

Thank you so much for these cards!!! :)
I hope every one's mailboxes are overflowing with some handmade love (in addition to all those wonderful family photo cards that are also a joy to receive!) I sent out a lot of my own this year, but couldn't send them to every single person who has touched my life this year, unfortunately! I hope you know that most of the cards you see here, I really do create with YOU in mind, not because I always need something specific for a person or occasion, but in hopes that I can pass along some special tips or inspiration that can enrich your crafting and give you more mileage with your supplies. Although they might not physically end up in your snail mailbox, virtually every card I post is for YOU!
Hugs,
Melanie

Tuesday, December 21, 2010

Chai Love You Forever...

Good morning! Today I have some special "Mugs and Kisses" samples to share from one of my past guest designers Melissa Shultz! Melissa gets a "repeat" spot because she loooooooooooooooves coffeee, but ALSO because ages ago she wrote to me asking if I would pleeeeeeeeeeeeeease come out with a mug set! Well, I thought that was a fabulous idea because... I had already started one! :) (still loved hearing from her, I always know when I get requests for something I am already planing it's sure to be a big hit!) So anyway, here is the first card she did, made with Melissa's favorite new set. ;)
Chai love U! hee! A punny girl after my own heart (and I think the main reason she wanted big mug stamps so she could add her little jokes!); ) She snuck in a couple of my other sets on this card: The U is from "Just So Sporty" (there is also one in "Little Tees" if you're loking!) and the "Sugar" is from "Have a Cookie". That's' a fun way to add sugar without the cube, I love this!

The next card uses the girlier cup and boy (hee!) is it girly! Tiara and sentiment are both from "Little Tees". Aren't those sassy print and glitter fun?! Such a fun birthday card! That's how I like to start my birthdays, with a big cuppa that declares I am Queen for the Day!! *
Thank you Melissa for sharing some mugs that tickle the funny bone (I know that's what my favorite mugs do), chai love you! Let's go see some more "Mugs and Kisses" inspiration on Melissa's blog! (okay, I just checked it and make sure you aren't drinking while reading the post, spew alert for sure in the her frst sample's cute comic appeal! eek, I love it) :)
PS I haven't really had time with all the holiday preparations to make anything with the "Mug and Kisses" set beyond my "pretty" Christmas cards, but once January rolls around, bring on the funny!!! (Have a hippy, er, happy mug I stamped up and cut out a couple weeks ago, but can't find it on my messy desk to finish the card!)

* preferably FREE coffee, there are several places that do that on your birthday, you just have to do a little research! ;) (research worth doing, he heh!)

Sunday, December 19, 2010

More Christmas Mugs!

if you
were a mug...
which

would you be? :)
Mugs and Kisses, Melanie


Saturday, December 18, 2010

Mega Dose of Cupcakes: Cards and Review!

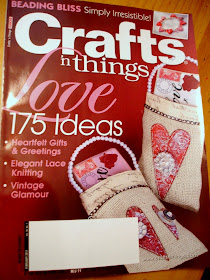
I hope you will check out this LOVE-ly new issue of Crafts 'n' Things, full of crafts, gifts and cards in plenty of time for Valentines day, plus a huge cupcake section, eek!

I have two cards featured in this issue for their cupcake section, the first using "100% Sweet" and "Sew Pretty".
And here is a card using "Candles on Your Cake" and "Fun Year Round".

There is also an online bonus recipe for a third card I made using "Versatile Verses" and "Fun Year Round". This was such an easy, fun design!
I do hope you will check out this issue, plenty more cupcake projects abound, including recipes and the cutest cupcake jewelry I have ever seen!

Next, if you happen to be about and about in Austin, I highly recommend making a trip to "Lick it, Bite it Or Both", these are NOT your average cupcakes! (and they serve homemade ice cream, too, which my kids gave the thumbs up, that day I just chose to "bite it"!) Check out this beautiful Choco Chris-Mint cupcake I had, perfect for the holidays, topped with crushed peppermint and filled with chocolate sauce! Other pluses: the place is gorgeous in pale aqua blue and brown, with markers and cupcake liners on the tables for you to get creative and decorate their walls!

We enjoyed reading some of the funniest little messages while we ate, like "Teachers love cupcakes (not apples)" etc! I loved how they also tint their vanilla frostings and ice creams this same beautiful shade of blue to match the decor!


Eat something yummy today! Too many fun things to savor this Christmas season to follow the diet too carefully!

Friday, December 17, 2010

Color Spotlight: Out of the Box style!

Chocolate makes everything better and has special place in my heart (hee!), I know you're with me on this!!
When I saw the Color Spotlight Challenge for the week, it made me want to create something love inspired for Valentine's Day, as well as use my new "Mugs and Kisses" set in a different way. This heart of white and dark chocolates just makes me happy! I planned several of the senitments in this set for Valentines, but Carolyn's sweet sentiment from "Dr. Feelgood" was the perfect finishing touch for this design! It had been too long since I last masked up some over-the-top, silly little creations, and I love how it turned out! Look how easy....

Start by stamping one candy about one third of the way up your 4" x 5 1/4" white mat. You'll also need to make two masks of the candy (since you'll be stamping over two candies at a time on the last row) on sticky notes or scratch paper, stamp on one layer then cut through two at once to save time!

Now cover the first chocolate and stamp two directly above it.

Remove the mask.

Continue up in the heart shaped pattern, stamping three across in the third row up, then 4 , then finally two in the top (5th) row, with one directly above each pair in the 4th row to create the little humps of the heart. Color and add a a little shadow ring underneath each with a W-3 Copic for dimension. I traced each of the piped M's (for "Mmm! or, maybe ..."Melanie", hee !!) with Sakura Glaze pen.

Although the challenge uses black instead of "chocolate", I colored the chocolates with 100 Black on the bottom and E49 Dark Bark on the top, so they are very, very dark chocolate!! Liners are colored with R38 and RV 02. Mat is Pure Luxury Black Onyx and base is Bubblegum Pink.

Hope you'll play along in the color challenge this week! Use the tag STVCSP6 when uploading your creation using this color combo to the STV gallery, good luck, I hope you win some free stamps!

So...this inspired to make another chocolate shaped creation that I will be posting soon, I'm on a roll now! Any guesses what it could be?

Thursday, December 16, 2010

Frisky Kitty!


I have been eagerly awaiting the January issue of CardMaker for months now, in it you will find (among many other fabulous designs from SEVERAL designers our Gina K team, woot!!) this little spinner card I made with Theresa's cute kitty from "Purrr-fectly Delightful" for Valentine's day! Rooowrrrr!! It is so fun to have an idea that is just purr-fect for an image! Be sure to pick up a copy for creation details on how to make this card and more holiday inspiration!
Color Spotlight Challenge tomorrow! Thanks for visiting today!

Wednesday, December 15, 2010

Gifts for you!

Thank you so much for sharing your hearts in the comments yesterday! In addition to reading abut all the good things in your life, it was so sweet to have almost every set I've created requested by someone!

I have several stamps sets to give out today instead of just one, I just had random.org pick the numbers, there was no way I could pick based on need, you are all so very deserving of a little "pay it forward"! So here they are, I need to all the winners to email me with their snail mail addresses ASAP, I will send you the set you requested in your comment:

Nicole said...
Beautiful card, Mel. I am most happy this year that it finally looks like my son's behavior is improving. We have worked with various services over the last few years (he turns 6 next month), and his behavioral acting out has been such a source of stress and pain. He is in a special program at the public elementary school (who I am very thankful for), and we are finally seeing him controlling himself and the joy that he is finding in being a "good boy" and succeeding. My heart about bursts when he comes home with another "green" day, and his cheesy grin and "two thumbs up."
And through all the work, I've found my calling and started back to school a year ago on my Master's degree, changing careers, to work with kids like Gabe as a behavior analyst. It's a scary time, with the economy, but I know God's hand is on this one, so I'm plowing ahead.
Thanks for your generosity. You know I love your poinsettias, and would love to have A Year of Borders. Happy holidays! May you continue to be blessed in the new year.

December 14, 2010 10:05 AM

Sandra said...
well as with many - we are all very grateful in our family for my husband being able to keep himself employed - he had lost his job almost 2 years ago, and as you know God works in mysterious ways - he has fallen into his current line of work - it has been wonderful for the family. With his old job we never saw him, we often ate as a family with out him ... his hours are more reasonable now - he starts earlier and his home earlier ... now we almost always eat as a family - and as a bonus - he usually cooks!
Thanks for all the inspiration Melanie (or should I say J hehe)!
I am still pining for "Wild at Heart"
Enjoy!
Sandra

December 14, 2010 8:45 PM

and finally,

Victoria said...
Without a doubt my best gift to myself this year was a sudden understanding of how to get fit and how to fit it into my life. I've lost almost 40 pounds and am 15or so away from my goal weight. This gift has given my family a happier, more active and energetic mom, wife, sister and friend.

I would just swoon if I won Mugs and Kisses. EVERYONE I know is a huge coffee freak and this set would come in real handy!

December 14, 2010 4:13 PM

Congrats, ladies!

I will be doing lots more blog candy in the new year. I get lots of stamps and freebies for my publishing work and have almost the entire Gina K collection of stamps now, so in the future I will be passing along lots of my earnings to YOU! My 3 year blogaversary and 3 year anniversary illustrating for Gina K Designs, are both right around the corner, so look for some fun stuff to celebrate! :)


If you didn't get the free set today, please take advantage of the generosity and many opportunities that Gina K provides to earn her stamps for free, through weekly challenges and our sneak peeks, she loves putting our images in the hands of customers who will enjoy them and post lovely creations with them in the STV gallery, as well as passing know how much they love our products! We are grateful it's not just our team providing the inspiration and eye candy, there are thousands of you who make the STV gallery what it is, and that's fabulous!! It takes a village of stampers to teach and inspire an even bigger village!!

A verse on my heart this morning is part of the focus of a women's conference I am attending in January in Austin, "Beyond Imagination":

"No eye has seen, no ear has heard, and no mind has imagined what God has prepared for those who love him." 1 Corinthians 2:9

Please pray and meditate on this verse today and ask God to reveal his special plans for you! Cast off doubts or worries about who think you are and ask Him to reveal who He knows you are! All things are possible!

Hugs and blessings!!

Simple Poinsettia

Here is a simple design I made with the poinsettia from "A Year of Flowers". After coloring it with R37 and R59 I cut it out, added a pearl to the center and popped it up on a die cut sponged with Antique Linen ink. Card base is Pure Luxury Red Hot, I added a strip of Basic Grey Jovial down the center (great way to use your scraps!) and as a final touch snipped apart the little medallion from the Spellbinders renaissance pendant set into quarters and then used two of thep ieces to make these fancy little embellishments for the sides. You like?

I will be back shortly with the announcement of the blog candy, I have not yet drawn the winner but I read every comment and it brought me such joy to know how abundantly blessed you have all been this year! I'm praying about you and your family's health, it makes me all the more thankful we have not dealt with any major health issues in our family, but I know those days will come and I will remember your strength and grace through those trials and how the Lord blesses the faithful. Thank you for the encouragement too about my blog, I am so glad to know it means so much to so many!

Helping out for my sons' year end school parties this morning (making cards, what else?!) but I will return soon with the announcement!

Hugs! Thanks for visiting!


Tuesday, December 14, 2010

The Gift!


"A Year of Borders" is now officially my BIGGEST debut stamp set to date! Wowee, this totally flew off the shelves (I don't think they even made it onto the shelf actually, straight from baking into your packages!), hip hip hurray! Thank you SO much for patronage of Gina K Designs and our stamps! I just have to tell you that the more I surrender my life and business to the Lord, the more I am blessed. The more I focus on my family and put Him in control, the more I am rewarded, in so many ways! God is good! Please remember the gift of Jesus to the world in this busy Christmas season.

I made the card above with the poinsettia border, colored with Copics and traced with a red glitter pen, and stamping the greetings from "Seasonal Sayings" in cranberry into the white CS panel embossed with Labels 14. Designs like this made my Christmas cards go so much faster without all the layers but still looked super fancy! It has many similarities to the peek I did for the border set (which lists the same Copic colors), but went a lot quicker! Lattice punch along the bottom, base is Lipstick Red and flowers and fancy corners punched from Good as Gold are embellished with adhesive pearls.


I would like to give away a gift to one of you today! Please tell me below in the comment section the best gift in your life this year (or one of them) and what stamp set you would MOST like from my collection, your choice! You can click on the tab at the top of my blog to see all the sets. Be sure to leave the NAME of the stamp set you want in your comment!! I will post the winner tomorrow, so don't wait to leave one! And be sure to check back!


Thanks for visiting!

Monday, December 13, 2010

Sketch Spotlight #6

Good morning! I hope you had a terrific weekend! Time for another Sketch Spotlight Challenge to start the week! For today's card, I combined the teacup from "Mugs and Kisses" with the flowers from "Buds and Vases", isn't that sweet in the cup? These mugs are the same size and scale as the containers in the vase set, so have fun mixing and matching. (hey, you could even drink your tea from jar, Texas style!) All DP is from the DCWV Mariposa pack, butterfly is cut out from the print I used for paper piecing the cup. I used two Copics slightly darker than the DP to shade the sides. Flowers are stamepd on white CS and popped up. The little tag was created with the oval label image and happiness greeting from "Mugs and Kisses". Corner is a Fancy Punch and I also used an orange Pure Luxury Button (love the peachy, pearlized finish on this one!) and adhesive pearls to embellish it. I substituted the oval for a Labels Eight die cut from Ocean Mist, sponged with Tumbled Glass ink. Card base is Sweet Corn.

Here is the sketch, please use the tag STVSKSP6 when you upload your sample to the STV gallery. Be sure to check out Gina's video and samples from the our other illustrators using today's sketch! Hope you play along for a chance to win some free stamps!

Have a happy day! Thanks for visiting me!

Friday, December 10, 2010

STV Color Spotlight #5

Happy Friday, are you ready for the weekend?! Get yourselves ready for another Color Spotlight challenge with Gina K and the team! Today's colors are....

I thought these colors would be gorgeous with my "Festive Frame" set, so I stamped the frame in black on Pure Luxury White, and colored wit with Copics V15 and V17 for the blooms). I added gold adhesive nail heads, then cut it in half, notching out a portion an snipping around the pine cone so I could overlap the images, lining up the border to make a square mat. (I didn't have to make a sqare card here, but don't think I've tried it with this frame yet, so I figured "hey, let's see..!") :)

I adhered the two halves to a square Fresh Asparagus base and die cut a Petite Scalloped Circle for the label image from Theresa's "The Giving Tree" inked up in Memento Grape Jelly. I did a little sponging and added a holiday greeting from "Mugs and Kisses".
Depending on how you cut and color it, the transition is pretty seamless (for instance, I added some swipes of green to make more pine needles on the left side after adhering), but you can also use some embellishments or cover the the seam with ribbon. I like this a lot, will do it more often!
Hope you'll try this color challenge this week! Be sure to use the tag STVCSP5 when you upload to the STV gallery, and be sure to check out Gina's video and samples from the rest of the team, I hope you win some free stamps! :)

Wednesday, December 8, 2010

Blast from the Past with Brenda Turner!

Hello!!
Well of course, Brenda is no blast from the past herself, she is found uploading fantastic Gina K Designs creations almost daily in our STV gallery, but it has been some time since she guest designed for me with "Square Pegs" for me, I am very happy to have her sharing some new inspiration for this set today! I love anything with buttons (you know, "cute as a...") and she made this adorable little card with hanging ornaments , using the ornament toppers with the button images instead of the bold or line art circle, so sweet! Branches are from Gina's "Winter Wonderland".
Thanks Brenda for inspiring me, I need to mke a bunch of quick gifts and tags this week and this set will totally help me check off that box! ;)

Let's go see another project on Brenda's blog, shall we?
Have a great day, thanks for visiting!

Mugs and Kisses Inspiration: Double Time

Good morning! I have a few cuppas to get you going!:) This first sample uses the same Cosmo Cricket Jolly by Golly print piecing on the mug from yesterday but with very different colors and layout. The brown and ivory on this first card in the Basic Gray Jovial print and stitched ribbon and removing the blue layer takes it from crisp and cool to warm and homey! Base is Pure Luxury Red Hot.
Tip: When you are you going to die cut large shapes from cardstock, instead of using the smallest scraps you have to fit the die, center the die into a mat sized to fit a card, this way, you cut once but have two pieces you can use, a focal point AND a pretty frame for another card. The Snowflakes embossed layer worked like a two-for-one!
SO here is the oval cut out from the mat above, I sponged with with Antique Linen and Vintage Photo. I love the Cosmo Cricket print on this cup! The ornament layer behind is Basic Grey Jovial again, some of the prints in these two packs are really terrific together! I also used my Scor-Bug to pierce a row of dots above and below the DP, this is a great way to add a qucik detial to cardsto make them fancier ( no one has to know how quick it goes! shhh)

Last, I snapped this pic a couple months ago when I was out for coffee with a friend at Thunderbird's in Austin, I knew it would be a sweet treat to add to a post after "Mugs and Kisses" was released! Isn't that gorgeous, have you ever seen that done before?! Well, it was new to me, a very talented barista* makes coffee a piece of art, almost too pretty to drink! (But of course, I did, honey nut latte, yummo!)
Have a glorious day, stay warm!!
Coming up, a guest designer blast from the past!
*wonder what that gy could do with ink?? It's like the shaving cream technique in a cup! ;)

Tuesday, December 7, 2010

Snuggle up...

Good morning! Had your coffee or tea yet?
Today's card uses the Basic Grey Jovial pack for piecing the "his" and "hers" mugs from "Mugs and Kisses", but this layout and idea with the XOXO and sugar could be an anytime card, great for love,Valentine's or anniversaries with different prints instead of just a holiday card, it's a couple card! Keeping the layout simple really keeps the focus on the "wink" of the sentiments and impossibly close mugs! After stamping them out onto two different coordinating papers and adding some color and shading, cut them out and snip under the handle on each side. Now with that opening you can link the two like they are arm m in arm, so sweet and playful with these greetings!

Tea tags and sugar cube are popped up, base is Pure Luxury White, greetings and labels are stamped on white also and sponged with Antique Linen.
TIP: Since the mugs are slightly turned toward yyou with their handle forward rather than straight out to the side, when you stamp a label on them or add a cut one, have it go over the opposite edge (cutting off or masking the sidee) rather than centering it. This adds to the 3 dimensional look!
Have a GREAT day! Be sure you give and get some sugar! ;)
Hugs,
Melanie

Monday, December 6, 2010

Sketch Spotlight #5

Good morning, happy Monday! Time for another Sketch Spotlight Challenge from StampTV and Gina K Designs! Here is Sketch 5:
The diagonal in the sketch sketch inspired me to make this candy cane striped paper for my "Mugs and Kisses" sample today, as well as that cool Candy Cane Cuttlebug folder she demoe'd a couple weeks back! This was fun to do and used up my scraps, let me show you! (and be sure to scroll all the way to the end of this post there's alitle surprise hiding under that mug!)
You know all those 1/2" strips of white you have left over after cutting white 4 x 5 1 /4" mats for your A2 cards? Well, I cut a red mat corner to corner, then adhered 4 strips with Scor-Tape leaving some wide AND narrow stripes of Lipstick Red peeping through to resemble a candy cane pattern.
Then I flipped it over and cut the ends off. I left mine hanging over about 1/16" of an inch, you can really see all the layers this way, but you may prefer to cut it exactly.
I really like this look! And here you can see that my popped up focal point was hiding a little coupon tag I made with sentiments from "Mugs and Kisses" on Kraft cardstock. it just slides out, stays snugly in there without adhesive between the layers. Ribbon is Pure Luxury and mug is pieced with Cosmo Cricket Jolly by Golly.
I also didn't want to hide to much of that paper I slaved over (wink!) so I stamped "Christmas" from "Seasonal Sayings" onto a piece of vellum paper. The glue dots adhering it are hidden by the red buttons. (And I'm totally diggin this color combo: White, Lipstick Red, and Little Boy Blue, with a touch of Kraft)
Hope you can play along with us this week, you could earn free stamps! Be sure to upload your card to the STV gallery with the tag STVSKSP5! Excited to see what you make!
Praying your week is off to an excellent start, see you tomorrow!

Sunday, December 5, 2010

Beginning to look a lot like Christmas!

Hello! We went to cut down our tree today at a nearby farm, pics of that soon! I am taking a short break from decorating the house (all my elves abandoned me after the first tub of ornaments!*) to share a quick and elegant Christmas card design with you...
There are only two layers on this card, which uses "Seasonal Sayings"** and two little poinsettias bunches I clipped out of "A Year of Borders". Stamping out several of the borders I was able to cut the separate flowers on a bunch of different cards, I love it! TIP: Placing the Petite Oval inside the Labels Eight die I was able to emboss the two shapes in one pass through my Cuttlebug, both dies at once, this saves a LOT of time in mass production skipping the cutting part (which I would have to then emboss, adhere , blah, blah, blah). Isn't that oval inside the label pretty? Click for a close up to see those embossed edges better) I popped up the flowers bunches I'd colored with Copics and added some glitter and Stickles. Cardstock is Pure Luxury White and Red Hot.


* I do think Paul is hanging the lights outside (either that, or watching golf out in the shop...)
** I LOVE this jumbo greeting! I cut the sentiment in half to stack the greeting like this, try it!

Friday, December 3, 2010

STV Color Spotlight #4

New stamps now available!! :) Here is a card I made for this week's StampTV Color Spotlight Challenge, using Innocent Pink, Brown and Ivory.
I stamped the mug onto Basic Grey Olivia paper, this floral pattern is one of my favorites in the pack! Then I used R27 Copic to color over the inside of the cup and the dish, and R02 on the sides of the cup and handle. So the cup and saucer are all ONE piece, no extra piecing, just color right over the patterns! I cut out and popped up a little of lump of sugar and the tea tag, each stamped on white, I also stamped a heart onto the tag.

I think "hi, sweet tea!" is such a fun greeting for your significant other or your bestie!
The background is embossed with a Cuttlebug folder, I think this swirly border is SO fun with this set, has a steamy, magical feel to it! I used Innocent Pink for the bottom half to look like it's sitting on a tablecloth and rubbed some white ink over the pink to make the embossing pop out a little more. Isn't the silver spoon a classy embellishment? You can put this on the card anywhere, at any angle you need a little sumthin'....Cardbase is Pure Luxury Chocolate Brown and ribbon is 5/8" Chocolate stitched.


Please upload your card using the tag STVCSP4 to the STV gallery, hope you'll play and maybe win some free stamps!
Have a tea-rific weekend!!