Wednesday, December 26, 2012

Super Sale at Gina K. Designs!

Have you heard?!  For the first time, we are retiring some stamp sets at Gina K. Designs!  That means super saving for you this week, select sets at 40% off!  Check out our team's Pinterest Board which we will continue to update throughout the week with more inspiration for these beloved sets and help us wish them a fond farewell!  If any of these have been on your wish list (or at these prices, even on your "maybe" list!) don't miss the chance to get them now! :)

It is hard to say goodbye to some of these sets, but they've been well loved and we have so many new fun things on the horizon, but none quite like these, so if you've thought about it, or want to gift someone with one, these are a steal!  All the animal sets coordinate, too, very fun making scenes with them.  So I'm learning to let go!!  Some I still use VERY frequently are "Have a Cookie" and "Mugs and Kisses"  for cocoa, coffee or to "hold" my flower images!  
And sentimental favorite Just So Hippy, my very first set from Gina K Designs!  and Jumping for Joy for my zebra!! And...you get the picture!  They all have wonderful memories :)

Hope you had a fabulous Christmas!!  Still a busy day here, but I will comeback and share more stuff as soon as I am able!

Thursday, December 20, 2012

Just a few more days!!


Just finishing up some last minute Christmas cards today, I had a few that were partially finished that just need a little something to complete the design!  This card (White Pure Luxury) I stamped right after my Lots of Letters set came, but I was a little bored with just the letter and pattern design and put it aside. 
I pulled it back out today (checking someone else on my list!) and added one of the little snowmen from the Free with Three set Snow One Like You, much better!  So even though you can make a complete card with the letters set (clear or rubber), don't forget to use your stamp images to enhance those cool Lots of Letters patterns!

Ink colors are Memento Rhubarb, Pistachio, New Sprout, Toffee Crunch and Bamboo Leaves
Image colored with matching Memento markers and a few Copics.

Hope you all have some fun plans for the holidays and are able to find to relax and enjoy.  I have to say, the shopping, decorating, baking and everything that gos with has been pretty manageable (some of it thanks to FlyLady* reminders, although I have been slacking a bit on my routines this month) , I am actually about to pit my feet up and watch a movie before the kids get out of school (and will be off from for next 2.5 weeks!) Her habit this month is pampering so I am going to fulfill my mission today, per FlyLady's request!   Find some you time to o what you love!  Hugs!!

*Have you signed up yet? It's a free online personal coach and it is fabulous!

Wednesday, December 19, 2012

CardMaker Blog Hop: For You, From Me

Good morning! Welcome to my first hop with the CardMaker Blog Team! Tanya and Brooke challenged us to make last minute gift card holders this month and I am so excited to see what everyone is sharing today.


  A dear friend (wink! I *know* she's reading) introduced me to a tradition of sending an ornament as a gift for Christmas.  Although the ornament is only out for a few weeks, I get so much enjoyment from pulling out the decorations each year for our tree and hanging up the ones she's chosen for me over the years, just melting my heart thinking of my friend, then getting glimpses of them throughout the Christmas season as I walk through the room! So here is an ornament that will hold a gift card which the recipient can still use after the shopping is done!

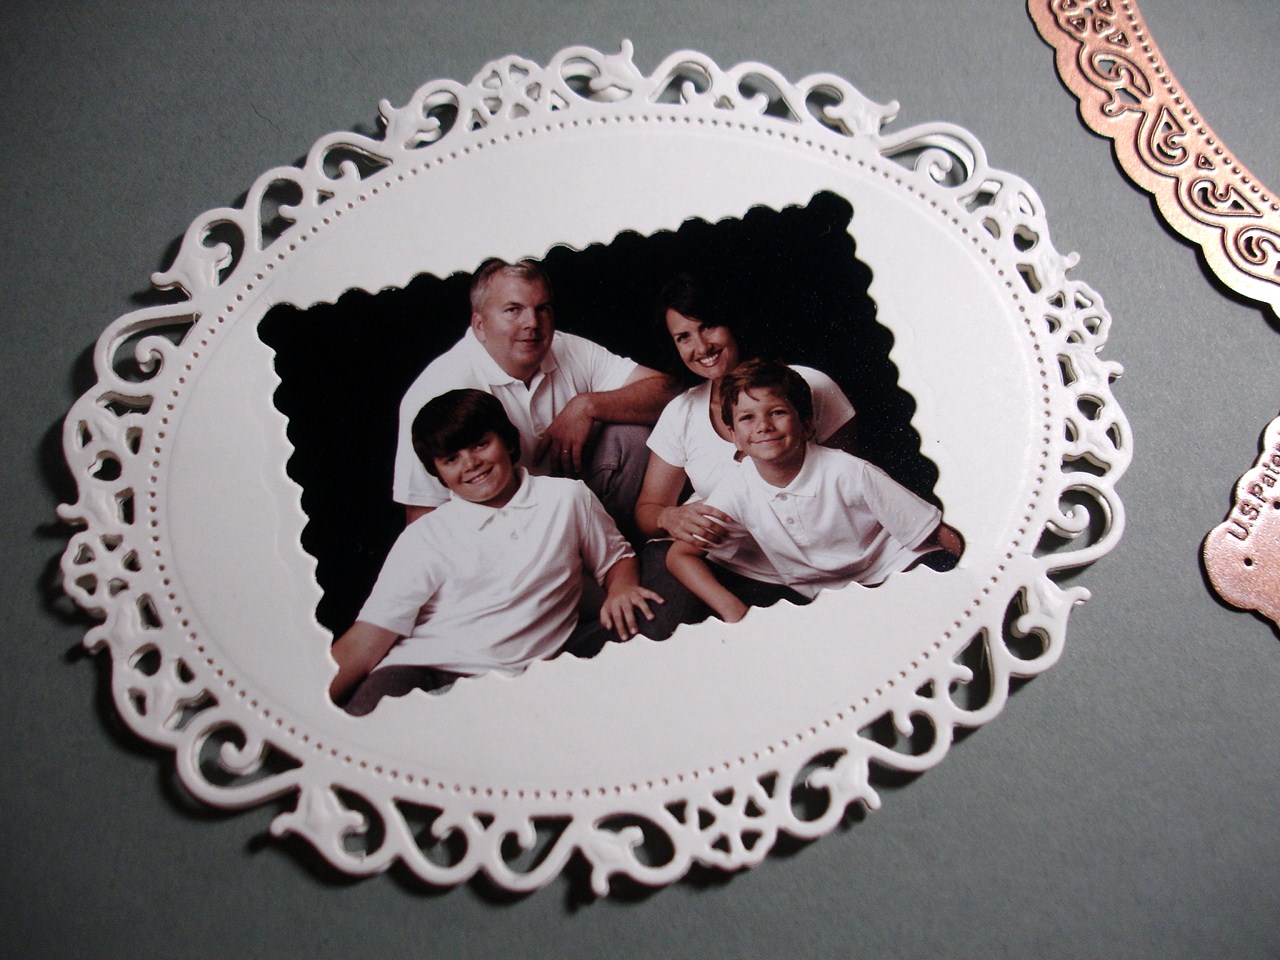
I chose some super fancy Nestabilities (because nothing with ornate details like these could ever look "last minute"!) to cut out the front and back of my ornament and to cut the window for the gift card and photo to show through.  This small Romantic Rectangle die (2 7/8" x 1 7/8") nests perfectly in one of the larger Floral Ovals (5" x 4"), so you can cut them out in one pass.  TIP: Hold your various dies over the the gift card to make sure the die you choose is slightly smaller than the card in order to select the best shape and size die for the project before you do any cutting.  Cut and emboss two (using White Pure Luxury Base weight, you'll want a heavy cardstock for those tiny cut outs, which will also be sturdier to last more than one Christmas!) and then place your gift card over one opening.
 
Place Foam Squares (Scrapbook Adhesives 3L) along the bottom and sides of the card, these keep the gift card from falling out and ensure you have room to put it in.   
Don't put any along the top so you can get the card out.    
 
Then I used my gift card as a template to trim around my wallet sized photo, knowing it would fit perfectly behind the frame but not stick out the sides if I made it the same size as the card. 
Use permanent adhesive to put the photo directly behind the opening on the second die cut, as this will remain in the ornament.  

The back of the photo will be covered with colored cardstock (Gina K Pure Luxury Cherry Red) and I added a little white panel I printed with our name and date over it.  
Stick the two sides together.
 
The personalized panel is revealed when you remove the gift card and what you'll have is a two sided ornament for next year.  As an afterthought, I stamped and embossed a little flourish from Border Bling with some Crystal EP for some shimmer, but it definitely would have been better to do this before adding my photos and the Foam Squares (TIP:  If you you end up doing some stamping or embossing after, cover the opening with the rectangular die cut piece you already cut out, that really helped in not making a huge glittery melted mess of my photo!)   
 
I also added a few adhesive pearls.  Last I punched a hole through both sides with my Cropodile and tied some dotted ribbon through.  Ready to hang (or send!  This is on my tree for getting a photo for this hop but it is now in the mail!! (By the way, I am so sad I don't have a single photo of my friend and I together! wahh! So the whole family will have to do...)  
The recipient will need to untie the ribbon to get the gift card out.
 
I think I will surprise the boys with some of these (more macho and kid friendly that this, of course!) as I love making ornaments with their photos from that I can see year after year. (that's William as a toddler playing with the nativity scene behind it, 2nd Christmas!)  How fun it would be to hang some gift cards and send them on a hunt searching all over the heavily decorated tree to find the one with the newest photo and a little spending money at a favorite store!  

Hope you enjoy this idea!  So many ways to make them, a new one each year, that becomes a beautiful collection over time.

Enjoy hopping for my last minute gift card holders from the CardMaker team!!  Ready to get inspired myself and take some notes on what else to make this holiday season!


AJ 

  Thanks for visiting!

Thursday, December 13, 2012

Happy Holiday Hop Winner

 The winner of the Happy Holiday Hop came from Michelle's blog!  Drumroll, please...
 
Lagene said...
Great card, love these circles!

Wednesday, December 12, 2012

12-12-12

Dont let this rare date pass you by! 
Gina K posted an awesome one day sale, check it out!  
$12 off the latest StampTV kit?? 
Another fun mystery package for only $12?  
5 clear sets for $12 a piece?!
Yowza!  
Happy shopping! 
Today only!

And don't forget to enter our Happy Holiday blog hop below! 
Winner announced in the morning!

Tuesday, December 11, 2012

Becky and Melanie's Holiday Hop!

This blog candy giveaway is now closed. See post above for the winner.
  
Good morning!  Becky and I thought it would be great fun to team up for a little Holiday Hop today! We are showcasing Becky's new set, "Warm Woolen Mittens" along with Becky's new cut file "Grand Banners" and "Grand Banners - Winter Sentiments" and my newest set, "Lots of Letters" (clear  and rubber) today, along with a few of my designing friends' recent faves from me! Joining us are some dynamic designers that will knock your socks off with their beautiful work today!  Make sure you visit everyone's blog to leave a comment and be entered to win a clear "I do!" and "Beyond Baskets" stamp set! We will draw a winner randomly and announce Thursday morning!
Now on to today's projects!

 Today I have a sample using both Becky and my newest sets, Warm Woolen Mittens and Lots of Letters! I love how this design turned out and hope it gives you lots of ideas for other ways to frame the letters than the ones I included in the set, like, mittens, for instance! I stamped the outlines of the mittens in Memento Espresso Truffle, and because I didn't have any masks ready, I just went ahead and made them overlap, and colored in the little areas with a Blue Copic, just like the loops in the scripty greeting (and over parts of the knit pattern for accents), isn't that fun?! Then I centered a letter on each mitten to start my greeting, cut them out and popped them up, and added Becky's cute sentiment below. 

TIP:  Stamping out the Lots of Letters alphabet to create just shorter, large words on a card is a *great* way to incorporate them with part of another greeting, rather than spelling out a long one. Mixing fonts and letters sizes this way gives you cards and sentiments such a fresh feel.  I used a Spellbinders Matting Basics B die to trace a border with a marker and then added the little faux stitch detail to connect the greeting to it.  Card base is the beautiful new Powder Blue Pure Luxury!

 Next, I have a very simple card with Lots of Letters and the coordinating Pretty Patterns set (clear or rubber). This fun circles border looks terrific with circle framed letters (punched with a 3/4" circle and popped up), and I will be making some personalized cards and gift sets for the holidays.  Inks are Memento Teal Zeal, Summer Sky, Sweet Plum, Bahama Blue and cardstock is Powder Blue and Pure Luxury White.

 Finally, I had to share this card (because I love it so!) using the magnolia from Stately Flowers 3. It's one of my favorite images in the series, and I made it for a movie inspired challenge (favorite films, can you guess?*)  This is like the triple panel stamping technique, but way easier if you have Spellbinder Matting Basics dies!  Stamp just one piece of CS with the magnolia in hot pink.  Now place three nested rectangle dies from the set on top, centering each and run through your cutting machine. Leave the dies in place and sponge peach ink on top with a sponge dauber. Remove dies and cut two mats 1/8" larger from Passionate Pink to layer under smaller stamped mats.  
  Adhere to a Just Peachy Pure Luxury base.  I used one of the smallest dies in the set for the greeting and stamped the flower again on Ivory (in that same pink) and added just hints of color with Copics (E93, YG00, YG63) and cut out.  I stamped it one more time on Fresh Asparagus cardstock in Bamboo Leaves and cut them out to layer underneath the flower.

Here are the sets I used today:


 Happy holidays and happy hopping!  Don't forget to leave comments for more chances to win some stamps!
Designer Hop-
Becky Oehlers (Illustrator of Warm Woolen Mittens)  
Thanks for visiting today! And thanks to my fabulous guests!

*Steel Magnolias, using Shelby's wedding colors "Blush" and "Bashful"

Sunday, December 9, 2012

BUNNIES!!

It's a feeding frenzy! We are weaning the bunnies this week, a couple at a time.  Oh, the sweetness they have brought to our home the past 5 weeks. :)

Hope you had a wonderful weekend!

Friday, December 7, 2012

More Word Window Inspiration

 Hello! Here is a quick card I made a couple weeks ago but had not shown yet, wanting to give you some inspiration for how you can collage style stamp the different images in the Lots of Letters set. It's a fun way to make your own patterned paper or put together a custom color palette you enjoy. Here I used Memento Tangelo, Love Letter, Bamboo Leaves and Teal Zeal and a different round image for each color.
I used a 5 circle long piece from the Lots of Letters Word Window-Circles Studio file to stamp the Miss U greeting (letters stamped in Teal Zeal) and divided the words with a button attached with a glue dot.  I popped up the greeting and mounted all on a Pure Luxury Ocean Mist base, pierced around the sides with the Scor-Bug embosser and Scor-Buddy.

Originally, I stamped a larger mat, but decided to trim it down and I really like how it turned out putting it all the ay to the top edge and then adding the rounded letters to the bottom of the straight frame, gives it a lot of energy! 

Have a fabulous weekend!

Wednesday, December 5, 2012

Day 3 Inspiration Hop: Perfect Plaids and Snow One Like You

Good morning!  The Design Team for Gina K. Designs welcomes you to another fabulous Inspiration Blog Hop! Gina and the Design Team will inspire you with many beautiful ideas, and as you hop through their blogs, make sure to leave a comment on each of them because  a few random comments will be chosen and those stampers will each win a grab bag of Gina K. Designs products! To see the full list of winners, check the Big News forum at Stamp TV a couple of days after the hops. 

First up with we have Perfect Plaids (clear or rubber) from Tami Mayberry.  You know I love two step and pattern building stamps!  I stamped this pattern using two of the plaid builders and Memento Angel Pink and Espresso Truffle.  Cardstock is Pure Luxury White, Kraft, and Innocent Pink.  I cut out the word window for "baby" with the Studio cut file from Kraft CS and stamped in the rings and letters from Lots of Letters.  I used a Matting Basics B die to emboss the frame on my card base and added some button accents with glue dots.
 And then, (because Carolyn nudged me how cute a t-shirt would be with the plaid!) I stamped up a Onesie from Wee Tees to add to the card with the same stamped plaid pattern. (Thanks, Cammie!) TIP: Stamp the Onesie first since it is available in rubber, then stamp the plaid so you can can stamp the pattern straight.


Last we have the Free with Three set: Snow One Like You (clear or rubber), free this month only with the purchase of any three sets valued at 19.95 or more.   Here is the card I made for our release party, a scene like this is simple to make!
 Stamp the birdhouse first.  Mask and then stamp the snowman as though he's swinging out from around the pole.  Color.  
Emboss a Spellbinders Matting Basic B frame onto the card base.
  
Next I cut a wavy curve in some scratch paper and slid it under the die into the embossed area.  Sponge on Summer Sky ink

 Pick up the wavy mask, flip over and move up a bit to make second hill. Repeat sponging until you have the desired effect.  Just add snowflakes!
I embellished the snowflakes and housetop with some adhesive rhinestones.

Thanks for visiting today! Please enjoy hopping for more inspiration with these two amazing sets with the rest of the 
Gina K. Designs team.

Illustrator and Senior Designer