Showing posts with label A Year of Borders. Show all posts

Monday, July 23, 2012

Cut Files a' Comin'!

So how pumped is everyone after seeing Gina's video of the Silhouette Cameo in action? I am just giddy knowing there are cut files coming for all your favorite Gina K stamps, aren't you?!! So I haven't blogged in a week, because ever since I've been creating cut files for the store for my stamp sets, squeal!! So here we go: a photo a day for every day this past week I missed blogging!

First up, Pretty Patterns meets the Silhouette! SQUEEEEEEAL!!!!!
I have done some experimenting with my stamps on the different files, since some of the sets I am working on came out before we had the clear option and I'm happy to report that the close die cutting of the rubber stamps makes it super easy to stamp them inside these cut outs, perfectly lined up! I stamped all these from Stately Flowers 4 using rubber stamps ( I have both the clear and rubber version of this set, and ahem, couldn't find my clear set on my messy desk!! )

And here I am showing how to line it up just position the stamp over the cut cardstock until you can't see ANY white cardstock, whihc means you are lined up, and press down.

Now I ALSO have a few sets I wanted cut files for that I received in rubber, way BEFORE Gina K Designs was die cutting stamps! (ahh, how far we've come!) So I knew this might make it trickier, but look! Ink up your stamp facing up, here you can see my rough cutting the rubber on A Year of Borders, aren't you glad we die cut now?! (Please note: if you order this set now in rubber, IT WILL BE DIE CUT)
Flip over your cut border and carefully lay it on top of the image. Carefully run your fingers over to hit all of the image. (You may want to top it with a piece of scratch paper or pad of sticky notes to press and keep the cut out fro sliding around) Presto! Perfect!
Anyway, I couldn't be happier with the results I am getting with all my stamps, whether they are clear or rubber, die cut or not! Having said that though I think moving forward the easiest way for most people who intend to use stamps with the cut files will probably find clear the easiest. Just wanted to share the good news so you can purchase with confidence and expect great results!
And finally, I also plan to make MASK files that will cut BORDERLESS, so you can use them for masking OR when you don't want a rim around the edge, here you can see two versions of this image cut with a 1/8" border around, and also exact size, these were both cut with the Silhouette Cameo and stamped after! With a rubber stamp! (Do you recognize which set it's from??) :) Imagine having 10 of these all cut for you for an over the top fabulous arrangement! DO YOU LOVE?? So that is just one more option for you!

Thanks for visiting today! What stamp sets are YOU most excited to be able to cut??

Friday, August 26, 2011

Falling with Kary

Today we have another beautiful "A Year of Borders" project from Kary Lim. This time she snipped the leaf border into small sections to create a wreath, isn't that lovely? The button and twine is the perfect embellishment and the doily die cut from the woodgrain paper behind it adds such luxury by filling it out and suggests a tree or a door. The white faux stitching is the perfect homespun touch and I love the one little cluster she used to balance the greeting. isn't that pretty how the white stripes in her orange DP strips match her hand drawn stitches? Below are Kary's creation details...

"For the autumn wreath card, I coloured the leaves & acorn with Copic markers (leaves E31, E35, YG00, YG13, YR02, YR04, acorn E35, E37, E31) and cut them out in sections to fill around the doily die-cut piece (I used pop dots to adhered the leaves for some dimension). I placed an orange button with Baker's twine on top of the wreath. I cut 3 strips of orange lined patterned paper in slightly different widths and attached it to the bottom of the card. In between the thinnest strip, I used my Scor-buddy to make two score lines. I added a chipboard sticker sentiment just underneath the second scoreline, and another section of the leaves & acorn just above the thickest strip for interest. To finish off the card, I added some white dash lines all around the card. (All patterned papers are from Jillibean Soup's Apple Cheddar Soup 6x6 pad). A tip : after cutting out the leaves, I used my darkest brown marker (E35) and run that along the edges so the white edge does not show)"

Stunning card Kary, thanks for the inspiration in all the wonderful details you are so good at creating! :) Please go see Kary's blog for another beautiful creation with this set, this time with flowers!

Are you all ready for fall now? I am! I know it is coming, even though it doesn't feel any cooler, I've noticed my car now says the temperature is 94 instead of 104 when I go pick up the kids!

Thursday, August 25, 2011

She's back!: Kary Lim

I'm sure you remember Kary's beautiful "A Year of Borders" creations when she was guest designing, I've invited her back to share a few lore seasonal projects with this year round set, thanks Kary! If you didn't have the opportunity to make it the beach this summer (I know those of you who just experienced winter probably did NOT!) or at least some fun in the sun! Either way, this card using the shell border will take you there!I always love on circles on a card, and using this large scale polka dot print to frame the individual shell groupings she snipped from the longer border is fantastic! Her coloring always takes my breath away :)

Here are Kary's details:

For the summer card, I coloured the shells borders with copic markers (I used E01, E02, E11, R81 (starfish), E31 & E35). On a piece of kraft cardstock, I covered the top section with patterned paper, leaving a 1 inch at the bottom so the kraft cardstock shows. Where the patterned paper meets the kraft cardstock, I placed the shells with pop dots. (The stamped strip is not long enough to cover the whole card, so I cut out a section of another strip & it's very easy to connect them). I placed three cut out shells & corals with pop dots on three circles of the patterned paper, and the sentiment chipboard just above the shells border. Then I tied some Baker's twine along the bottom of the card. To finish off the card, I rounded the top corners of the card. (Patterned paper & chipboard from Bella BLVD)

Be sure to leave Kary some love on her blog, she has another sweet project with this set! I will be sharing another card she created, this time for Fall, very soon! Have an excellent day!

Thursday, May 5, 2011

Plaid from Texture

Good morning! Today I have a masculine card I made with "A Year of Borders" and "Follow Your Dreams", with the new "Timeless Textures" stamps from Gina K Designs working overtime as a plaid background, let me show you how easy!
I was so glad Gina provided some of the textures in large blocks for kissing or long strips like this one for making borders and patterns, here is the first step creating a checkerboard pattern of brown stripes, a grid line block makes getting the stripes parallel and perpendicular to each other easy, just line it up and go! I always start in the middle and work my way out to either side so the pattern will be centered.


Now clean your stamp and go back in between the brown rows with green, looks just like real plaid right?


I'm excited to make these backgrounds in different colors, and how perfect for Father's Day coming up! Here is the card again, my favorite detail is the skinny strip of Green Apple CS I tied through the corner, just poke 4 little holed with your piercing tool, thread through and tie!
Card uses Forest Branches Cuttlebug Folder and In the Navy, White, Kraft, Chocolate Brown and Green Apple Pure Luxury Cardstocks. This sketch is a bit outside my comfort zone, but doing the shell border (which I stamped in brown and accented with just a few earthy Copics to match my papers) straight across or vertical was looking a little ho hum to me, so I snipped it in half to change it up. (Not sure if I LOVE it, but definitely more interesting than what I had!)

Thanks for visiting!

Saturday, March 19, 2011

A Tisket, a Tasket...

..."A Year of Borders" basket! Kary Lim has another lovely project or us using the "A Year of Borders", this time, she stamped the butterflies border on the diagonal to create a sheet of paper she could make her 3-D project from, isn't it darling? I love the little label accent she made and then check out the sides and top!
She cut strips of the flower paper she created from her project the other day to make these layered bows! the artistry is in the details and these delicate touches (and the contrast of the pink to the blue and green so the project isn't so mathcy-match, it also ties in thoe yummy raspberry wrappers!) is SO inspired! My tip: If you don't have time to colors all the borders in, just stamp in a colored ink like powder blue and then spend your time coloring a little tag like this for it. No, it won't be *quite* as awesome as this but you'll still have a beautiful little presentation! Don't not attempt something this fun because you think it will take too long! ;)
Kary's creation details:
"The basket was made from 8.25x8.25" of paper. I stamped the butterflies all around the sides of the basket and coloured them with copics BG10 and YG03. Added a little Diamond stickles on the butterfly images. The little bows were made from the stamped papers with the flower borders from yesterday. I didn't have any Easter eggs (which I think would be perfect) so I filled them with my fave chocolates."

Thank you Kary for working your magic again with this set and showing us how you can take a handful of yummy chocolates to another level and create a handmade gift that has people saying "Wow"! How adorable would this little basket be to store other things in when the Ghiradelli is gone? (I know I couldn't throw it away!) Kary made another beautiful project using the butterflies on a card, using the SCRAPS from this project, please check it out here!


Finally, thank you everyone for all the love for my new "Bring the Bling" set, I hear from Gina it is flying off the shelves, yeah!! :) I am so excited about this concept and eager to start using it on my cards (in subtle and not so subtle ways!) ;) I can't wait to see tons of "well dressed" cards popping up in the STV gallery using these little touches of bling and seeing what creative uses you have for them! Just FYI, most of the new amazing embossing powders Gina added to the store to use with the set have already sold out, but don't worry, she has already ordered more so they should be added back in very soon! I have some of the beautiful black sparkle and red sparkle on its way to me so I look forward to showing how these look on projects! Did you all watch the bling video Gina did? I didn't want it to end, love how many things she packed in there! :)


My plan is to share my "Bring the Bling" tip sheet with you tomorrow and then Monday we will restart our inspiration hop, three more days of projects for all the new sets and then I will sharing some more guest spots, stay tuned

Tuesday, March 15, 2011

Special Guest Appearance by...

Kary Lim!!! I KNOW you remember her gorgeous work with "A Year of Borders" at the beginning of wnter and I made sure before her "reign" ended she'd be coming back with some seasonal samples for us throughout the year! Spring is upon us, I am enjoying a fun and busy Spring Break with my boys and SUPER BUSY getting ready for our release party on Thursday!!* So it is a real blessing to have her beautiful work today since I can't share anything I am working on for a few more days, AND I have not gotten to play with "A Year of Borders" in a few months, so this is a treat for me too! Talk about inspiration, this card is like a breath of fresh (Spring!) air!

Kary's creation details:

"I wanted to show how pretty the border flowers are, and how one can use it to make your own pattern paper. I cut a strip of white cardstock 3 inch wide, and stamped the flowers diagonally. Then I did some colouring with copics ( I used R81, R83 & R85 for the flowers and YR02 for the flower centre, & YG03 & YG17 for the leaves). The 3 rolled flowers are also made from the stamped piece of paper. "

I am just bewitched by these beautiful rolled flowers: the stamping inside makes for perfect coordination and just takes the whole project up a notch beyond if they were just solid color, I love! (And did you jot down that marker combo, I'm in heaven!)

Fantastic design, Kary, thank you again! Be sure to leave Kary some love! I *believe* we may even be getting a bonus project from her tomorrow! :)

*How are you liking all the snippets? Figured out whose is whose? ;)

Wednesday, February 9, 2011

How Fabulous!!

I received this beautiful card in the mail from Nicole, who wanted to thank me for the "A Year of Borders" set she won, how sweet!!

I absolutley love how she cut the little groupings of butterflies to adhere them to the wavy curve she made from the black gathered ribbon, isn't that beautiful? I gotta try this! DP is Basic Grey Curio, lovin these colors and lovin' the glitter! The circle design is so pretty and punching out the negative butterfleis to bring the black and design around the top is the perfect touch!


Thanks, again, Nicole! No, YOU are fabulous!! :)

Tuesday, December 14, 2010

The Gift!


"A Year of Borders" is now officially my BIGGEST debut stamp set to date! Wowee, this totally flew off the shelves (I don't think they even made it onto the shelf actually, straight from baking into your packages!), hip hip hurray! Thank you SO much for patronage of Gina K Designs and our stamps! I just have to tell you that the more I surrender my life and business to the Lord, the more I am blessed. The more I focus on my family and put Him in control, the more I am rewarded, in so many ways! God is good! Please remember the gift of Jesus to the world in this busy Christmas season.

I made the card above with the poinsettia border, colored with Copics and traced with a red glitter pen, and stamping the greetings from "Seasonal Sayings" in cranberry into the white CS panel embossed with Labels 14. Designs like this made my Christmas cards go so much faster without all the layers but still looked super fancy! It has many similarities to the peek I did for the border set (which lists the same Copic colors), but went a lot quicker! Lattice punch along the bottom, base is Lipstick Red and flowers and fancy corners punched from Good as Gold are embellished with adhesive pearls.


I would like to give away a gift to one of you today! Please tell me below in the comment section the best gift in your life this year (or one of them) and what stamp set you would MOST like from my collection, your choice! You can click on the tab at the top of my blog to see all the sets. Be sure to leave the NAME of the stamp set you want in your comment!! I will post the winner tomorrow, so don't wait to leave one! And be sure to check back!


Thanks for visiting!

Sunday, December 5, 2010

Beginning to look a lot like Christmas!

Hello! We went to cut down our tree today at a nearby farm, pics of that soon! I am taking a short break from decorating the house (all my elves abandoned me after the first tub of ornaments!*) to share a quick and elegant Christmas card design with you...
There are only two layers on this card, which uses "Seasonal Sayings"** and two little poinsettias bunches I clipped out of "A Year of Borders". Stamping out several of the borders I was able to cut the separate flowers on a bunch of different cards, I love it! TIP: Placing the Petite Oval inside the Labels Eight die I was able to emboss the two shapes in one pass through my Cuttlebug, both dies at once, this saves a LOT of time in mass production skipping the cutting part (which I would have to then emboss, adhere , blah, blah, blah). Isn't that oval inside the label pretty? Click for a close up to see those embossed edges better) I popped up the flowers bunches I'd colored with Copics and added some glitter and Stickles. Cardstock is Pure Luxury White and Red Hot.


* I do think Paul is hanging the lights outside (either that, or watching golf out in the shop...)
** I LOVE this jumbo greeting! I cut the sentiment in half to stack the greeting like this, try it!

Friday, December 3, 2010

STV Color Spotlight #4

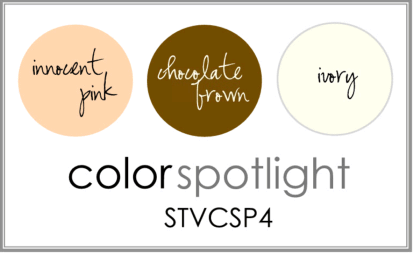
New stamps now available!! :) Here is a card I made for this week's StampTV Color Spotlight Challenge, using Innocent Pink, Brown and Ivory.
I stamped the mug onto Basic Grey Olivia paper, this floral pattern is one of my favorites in the pack! Then I used R27 Copic to color over the inside of the cup and the dish, and R02 on the sides of the cup and handle. So the cup and saucer are all ONE piece, no extra piecing, just color right over the patterns! I cut out and popped up a little of lump of sugar and the tea tag, each stamped on white, I also stamped a heart onto the tag.

I think "hi, sweet tea!" is such a fun greeting for your significant other or your bestie!
The background is embossed with a Cuttlebug folder, I think this swirly border is SO fun with this set, has a steamy, magical feel to it! I used Innocent Pink for the bottom half to look like it's sitting on a tablecloth and rubbed some white ink over the pink to make the embossing pop out a little more. Isn't the silver spoon a classy embellishment? You can put this on the card anywhere, at any angle you need a little sumthin'....Cardbase is Pure Luxury Chocolate Brown and ribbon is 5/8" Chocolate stitched.


Please upload your card using the tag STVCSP4 to the STV gallery, hope you'll play and maybe win some free stamps!
Have a tea-rific weekend!!

Sunday, November 28, 2010

Week 4 with Kary Lim

Hope you all had a fabulous Thanksgiving! More about the holidays later, got another guest spot with Kary and then we start our new release sneak peeks!

I have only "played" with the new border from "A Year of Borders" that matches "Wild at Heart" once so far, so when I opened Kary's latest creation I squealed with delight to see how gorgeous the tiny border flowers snipped apart look popped up over the larger "Wild at Heart" frame, I love the mix of sizes together! Don't these little blossoms creeping out of the corner just make it come to life? And the tiny pearl in the center of each is such a sweet touch!
Here are Kary's instructions:

I stamped Wild At Heart frame stamp onto white cardstock with pink ink (Versamagic Pixie Dust) then embossed with clear embossing powder. Then stamped the flower border using a darker pink (Versamagic Pink Petunia) and clear emboss it. Cut out the flowers, and added pearls on the centres. The large flower piece was added onto card base with foam squares. Then I used a metallic silver pen and drew a frame on the card base. Then adhered the cut-out flowers onto the card w foam adhesive as well as the sentiment. I sponged the sentiment with the pink ink and added some pink faux stitches around it (using Memento Angel Pink).
Let's go see another beautiful "A Year of Borders" creation from Kary!

Friday, November 26, 2010

STV Color Spotlight #3 AND Shopping special!

Hello! Hope you all had a fantastic Thanksgiving! Today, not only do we have a color spotlight challenge, but Gina has also issued a Black Friday Coupon, good through Sunday, I know you'll want to take advantage of it!! Spend $35 and get any one of these 6 Gina K sets below (some of my favorite and most often used of hers!) FREE, your choice which one! You can also place multiple orders of $36 or more to choose more sets!
Yes, yes I used the butterflies AGAIN, but I HAD to when I saw the sets in the special, combining my "A Year of Borders" with "Take Flight" , one of my favorite butterfly sets ever! I love all the possibilities having the large butterfly adds to the butterfly border and vice versa! This week's color challenge is Ocean Mist, Green Apple and White, so I used these for my mats, and then stamped the border in aqua, inking up just one in black before stamping. I colored that one, then stamped the large butterfly in Memento Black colored with Copics B00, B02 and G99, and cut it out to pop up.
Crystal Stickles (which is perfect for this color challenge, iridescent with blue green sparkles!) and a trial of adhesive bling add add shimmer to this card and wind around this beautiful sentiment from "Take Flight". As you can see, these sets are a match made in heaven, but with the special on top of that you really can't miss! Just for example, buy "A Year of Borders" and a pack of each of these two colored cardstocks in the challenge (or anything for an additional 11.05) and you'd be getting this perfectly coordinating "Take Flight" set for FREE! :) What a deal!

So have fun shopping! And we hope you find time to play the color spotlight challenge this week, you could win free stamps! Be sure to use the tag STVCSP3 when you upload your card to STV using these colors to the gallery for a chance to win!
Gotta run, SO much stamping to do for our release next week, can't wait to share the snippets and sneak peeks!