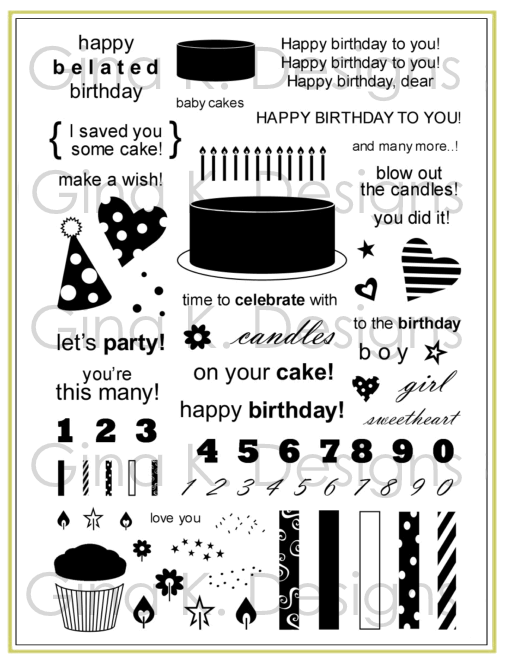
This set is now available for purchase from Gina K Designs! The bold, line art, and patterned images in "Candles on Your Cake" are designed to allow for very graphic looking projects as well as softer, elegant projects, it's all in the colors, patterns and embellishments you choose. It includes all the elements you need to create a fabulous birthday card for an adult, teen or child, right down to the numbers and greetings. These birthday motifs are timeless and will never go out of style, and you'll never need to search for a patterned birthday paper again, just make your own!
Trimming Tips
1. Trim around the large and medium sized candles so you have a rectangle. Now make one straight vertical cut in between each candle but do not trim anymore, this allows you to puzzle them back together perfectly for a straight border.
2. Do your numbers the same way. You may also opt to leave the Numbers together and then just ink up only the number you want and stamp.
3. Do NOT attempt to cut out the smallest set of candles (without the patterns) apart from each other! This little row is intended to quickly stamp onto the large cake two step style or make quick borders on your cards or to make a birthday patterned ribbon.
4. Trim the "time to celebrate with, candles", and " on your cake!" all together in a rectangle so three lines, then make one horizontal cut between each so you can stack them back together on e on top of the other on your block in three rows for perfect spacing, then stamp your number after awards
5. Cut the birthday song together in ONE piece, then make one horizontal cut above the last line "HAPPY BIRTHDAY TO YOU!" This keeps them properly centered and with enough room in between for a small name or your own handwriting, or you can place the last line further down on your block before stamping to allow for larger stamped or die cut letters to spell the name, or just use the last line on it's own for the front, inside, or envelope.
6. Cut the little group of 4 dots together as just one piece. This is a two step stamp that allows you to add a different colored dots to the open spots on the party hat. Notch out once side so the stamp looks like a "C", this makes it easy to stamp over the stamped hat and get it aligned without needing a positioner.
The Numbers
Use the different numbers to show how many candles are the cake, either by stamping "time to celebrate with 8 candles on your cake" or by stamping the number onto the one of the cake tiers or cupcake top and adding the flame of your choice like those chunky number candles.
Use the chunkier numbers for a masculine feel or with larger bolder prints and the script number for a more delicate, feminine look.
Stamp them in a row then circle it with a marker , add a chipboard arrow or frame the number of your choice with a punched or die cut frame.
Stamp the number for the birthday day year collage style in different colors on plain cardstock or DP or to make a background.
Create the year for a graduation cake 2010, with some festive stars and "You did it"!
The Cakes
After inking up the cake in the color frosting of your choice, run a black or dark marker around the platter edge to make that stand out.
Kiss patterns onto them by inking up background, borders or any stamp with an interesting design and press it onto the bold cake, then stamp. (Ex houndstooth from "Vintage Backgrounds" in brown to make a "mancake", hee hee!) If it has a very chunky design this may be all you need to do, but if it's more delicate [pattern the cake will need to be stamped in a lighter color first, then kissed with the pattern in a darker color over it (Ex: stamp light pink bold cake, then stamp darker pink kissed lace background over it.
Create a reverse mask by stamping the cakes on scratch paper, cuting them out, leaving the outside and then stamp patterns into the hole.
Great for the emboss resist technique!
Cover with Crystal Effects for a glossy iced look or Liquid Applique for a puffy, frosted look.
Line the top and bottom with Stickles or Liquid Applique like you are piping icing trim, you'll feel like a real cake decorator.
Dot on or doodle with a glitter or gel pen to create your own frosted designs.
Use the tiny star flower and dot images to stamp a pattern along the side of the cake.
Stamp the small cake on top of the larger one to make a stacked cake.
Add a row of adhesive pearls or rhinestones along the top and bottom.
The Candles
The candles can be use for fast, large scale borders. You can add the flames or leave them without to look like decorative stripes.
Top them with heart, star or flower instead of the shaped flames for a different look.
Ink them up all in one color or use markers to give them different colors.
You have a solid candle for stamping patterns onto.
You have a line art candle for stamping onto DP and paper piecing or to stamp over any of the other solid or patterned candles for a two step look. Use a stamp positioner for perfect alignment if you want it be perfectly filled in, or just eyeball it for a more whimsical look.
Stamp them in a straight line the way they are positioned in the set for a more graphic look, or tilt them toward and away from each other, for a fun, wonky look.
ink up all the candles in the smallest set for a very filled out, well earned birthday cake or only ink up as many candles in the center as you need 3, 4 etc and stamp onto the cake. You can do this with the medium sized patterned set, as well.
The Flames
You have a plain, heart, flower and sparkly or firecracker flame candle topper in large and small sizes. Have fun adding these to the candle tops to suit your theme or recipient, make them all the same on one project or mix them up. outline with Sakura Stardust or Glitter pens for real sizzle!
For perfect alignment to the candle top, stamp the candle first, center the wick over the mid line of your grid line block and stamp the flame centering that mid line over the candle.
The Cupcake
Use the different sprinkles to two step stamp the top. Color the bottom or stamp onto DP for a pretty, festive cupcake liner.
Stamp or cut out the smaller candles to put on top or use the numbers.
This cupcake coordinates with the cupcake and sprinkles in "Square Pegs" (expect reversed, the other has a line art top and solid bottom) Enjoy mixing and matching the cupcake different elements or use them together. The style also matches "Hip to Be Square" and lots of images are adds ons (ex the present, use the babuy face to make bay birthday card, etc. Most images in the new cake set are sized to fit the square panes of the Hip frame.
The Greetings
These will all fit in most small rectangle circle or tag die or punches.
The majority of the greetings will fit inside the brackets around {I saved you come cake}, so ink up the brackets only, then add the greeting of your choice inside, perfect for small tags.
Stamp the birthday song on the front or inside your card. If you put it on the front, fun to add "and many more!" inside!
For a belated birthday, stamp {I saved you some cake!} inside.
"You're this many!" is super sweet for a baby or children's card.
use the let's party to create your own invitations.
Use "boy", "girl" or "sweetheart" with "happy birthday!" or "to the birthday"
Skip the cake and use the greeting for a masculine, not so cutesy birthday cards, use the plain candles to go with! :)
Most of the greetings will fit on the side of the large cake to for a fun look.
The Patterns
The candles hearts, hats and flames have some similar themes: stripes, spots, swirls. incorporate just one pattern on your project(striped hearts and striped candles, or spotted, heart and hat and spotted candle etc) for a very clean matchy-match look, or mix them up for more variety, OR grab the ones that work with your DP the spotted images with polka dotted DP , swirly patterned ones with swirly DP etc.
Not just for birthday...
Several of the greetings and images allow for other holidays:
Use "babycakes" or "sweetheart" or "love you" for a valentine, baby, or friendship, or anniversary cards.
Use "You did it!" for anything other than a birthday you are celebrating, winning the big game, graduation etc.
Use the numbers and flame toppers to make an anniversary card "40 candles on your cake" etc
"Time to celebrate" with a two tied white cake would be perfect for a wedding
Embellishment ideas:
Glitter dots and colored brads add lots of pop!
Pearl and rhinestones for elegant cards
Pop up the trimmed out stars, hearts, or candles.
Punch out the hearts and stars with shaped punches, they fit most punches on the market, just choose one slightly smaller than the image which will create a beautiful border when you punch.
Flocking or Flower Soft on the top and/or bottom of the hat.
Stamp ribbons with the candles or smaller images to match.
Color ideas:
Use muted colors for baby cards, bolder for kids, high contrast for teens, and earthier ones for men... (Do I need to tell you what colors ladies like? ) ;)
Add more dimension to the solid images by swiping a darker colored marker along one side or bottom of your inked up image before stamping or color right over your already stamped image with a marker or colored pencil.
Choose 2-5 colors for inking up your images from a patterned paper that you love, either one you are going to use on the card or just to determine your color scheme, sure to be a hit and happy with the results!
Fun Stuff!
Cut out your stamped cake and create a pop up for the inside of you cake along with the birthday song and blow out the candles make a wish.
Stamp the cake with lit candles and "Blow out the candles!" on the front...on the inside stamp the cake and with the candles again , but omit the flames this time and add "You did it!" (hee hee!)
Stamp the large cake on the front. Now stamp the cake inside, mask it and stamp your favorite animal or person image over it , like it's popping out of the cake! add "HAPPY BIRTHDAY!" you can also make it a two-tiered cake on the front, then when you have you animal or person coming out have the top layer on it's head like a hat...
Projects:
Cards, of course!
Scrapbooking the many events you celebrate
Festive gift wrap, bags and tags
Party favors, supplies, and decorations
Custom invitations
Decorated frame for a birthday photograph, makes a wonderful keepsake or gift
Stamping a special shirt or hat for the birthday boy or girl to wear on the big day
Birthday charm bracelet using Polyshrink
Thanks for all these great tips. I have been waiting for your tip sheet before I put the scissors to my new set. Now I am ready to go at it. Thanks, Melanie.
ReplyDelete