Showing posts with label Fun Year Round. Show all posts

Friday, February 17, 2012

Card Candy and Candy Winner

Good morning! Thanks everyone for entering the Spellbinders blog candy and letting me know what is most helpful and enjoyable for you to read here, I will certainly use your feedback as I move forward! The winner of the dies, randomly drawn is

Joan V said...

Your posts are educational and inspiring for me. Everyday I try to read and learn something new, in this craft area. Love your designs that you have done for Gina K. I would love to know how you draw and submit your designs to get made into rubber stamps.

I have been a follower for a good while. Thanks for the chance.

Congrats, Joan! Please email ASAP wih your addy, thanks! To the rest of you, you know there'll be more candy soon, stay tuned!

Now for a simple CAS cards with punches. This is a card I made in a flashfor my son's 4th grade teacher Mr. Reese's birthday. While I don't know if these are his absolute favorite candy to eat were it not for the name, he definitely likes to associate himself with the brand and refers to his students as "Reese's Pieces" (their field trip tie dye shirts are of course brown , yellow and orange!) it's pretty cute!I used a Pure Luxury white base and popped up several circles I punched with a 1/4 inch punch, form Pure Luxury Chocolate Brown, Sweet Mango, and Wild Dandelion. Don'tcha just love circles? I have both circle dies and punches in almost every size, they certainly go with everything! This would be a fun way to make an M&M card for your sweetie, kids birthday, etc, in different colors. Now, so it's not just blobs of color (and you want a touch of the unexpected and wink of the candy), I notched out the bottom circle with a scalloped circle punch to create the nibble and rounded the card base with a small corner rounder punch. Greeting is from my Fun Year Round set and stamped in Memento Rich Cocoa.

Enjoy! Hope your day is SWEET!

Saturday, December 18, 2010

Mega Dose of Cupcakes: Cards and Review!

I hope you will check out this LOVE-ly new issue of Crafts 'n' Things, full of crafts, gifts and cards in plenty of time for Valentines day, plus a huge cupcake section, eek!

I have two cards featured in this issue for their cupcake section, the first using "100% Sweet" and "Sew Pretty".
And here is a card using "Candles on Your Cake" and "Fun Year Round".

There is also an online bonus recipe for a third card I made using "Versatile Verses" and "Fun Year Round". This was such an easy, fun design!
I do hope you will check out this issue, plenty more cupcake projects abound, including recipes and the cutest cupcake jewelry I have ever seen!

Next, if you happen to be about and about in Austin, I highly recommend making a trip to "Lick it, Bite it Or Both", these are NOT your average cupcakes! (and they serve homemade ice cream, too, which my kids gave the thumbs up, that day I just chose to "bite it"!) Check out this beautiful Choco Chris-Mint cupcake I had, perfect for the holidays, topped with crushed peppermint and filled with chocolate sauce! Other pluses: the place is gorgeous in pale aqua blue and brown, with markers and cupcake liners on the tables for you to get creative and decorate their walls!

We enjoyed reading some of the funniest little messages while we ate, like "Teachers love cupcakes (not apples)" etc! I loved how they also tint their vanilla frostings and ice creams this same beautiful shade of blue to match the decor!


Eat something yummy today! Too many fun things to savor this Christmas season to follow the diet too carefully!

Thursday, July 29, 2010

It All Starts with Pretty Paper...(plus a challenge)

Here is some "faux paper piecing" I did with some punches and October Afternoon "Report Card" DP, which inspired the design and colors of this card. I love the pattern, thought the navy, olive and ivory combo was both classic and fresh, and the repeating flower, dot diamond pattern (not a technical term LOL!) would work really well with the elements I had in my "Fun Year Round" set. After stamping the frame in Vivid Inky Blue, I punched circles out of the DP and Pure Luxury Fresh Asparagus and In the Navy in sizes ranging from 3/4" to 1 3/4". Then it was just a matter of placing them around the frame, making the colors weave back and forth around the card. The circles sometime were exact fits or just bigger, which still looks paper pieced! :) I added just the "happy" from the "oh happy day!" greeting in the bottom and stamped a few large and small flowers in the Inky Blue and olive. An olive button as a final touch gave it dimension and texture.

Go through you papers today and find a pattern that speaks to you!

It's almost Friday! )

PS A challenge throw down for a chance to win my new set coming out next month from Gina K Designs! Read all the details here on StampTV, you have until Saturday night to enter! Please play!

Tuesday, July 27, 2010

Week 4 with Sharri! (the Incredible Shrinking Woman)

This week Sharri gets shrinking, with Polyshrink that is! Inspired by the possibilities with Fun Year Round and shrink plastic, Sharri has three simple projects today! Sharri describers in her own words below how to make all three!
For the card, I stamped the circles on the frame and was contemplating what to do with the centers when I remembered I had picked up some shrink paper at a stamp and scrapbook show last year. This shrink paper can be used in a inkjet printer so took a chance and stamped the circles on the shrink paper with Memento's inks, punch out the circles, shrank them in the oven and attached them to the card with score tape. I love how vibrant the colors turned out! The sentiment is from Gina's Punchy Words and was cut out with a Pinking Circle Nestibility.

Card Supplies:
Stamps: Fun Year Round, Punchy Words
Paper: White, Kraft, In the Navy Pure Luxury papers
Ink: Paris Dusk, Danube Blue, Summer Sky, Desert Sand
Other: Shrink Paper, Pinking Circle Nestibility

After seeing how well the memento ink worked on the shrink paper, I got the idea to make a key chain. I stamped the frame and circles on the shrink paper and let the ink dry. Because the shrink paper is white in color and you can faintly see through it until it shrinks I wanted both side to have the pattern so...After the ink was dried, I cut the frame out, flipped it over and stamped the frame and circles again on this side. After the ink dried on this side, I punched a hole toward the top center and shrank it in the oven. After it was cooled, I attached the key ring. I really like how it turned out and already have some more started. :o)
Key chain Supplies:
Stamps: Fun Year Round
Ink: Memento Dandelion, Rhubarb Stalk, Lady Bug, and Angel Pink
Other: Shrink Paper, Key Ring
The bookmark was very easy to make. I punched a flowers using two different sizes of the Marvy Flower punches, stamped the circles in the center of the smaller ones, attached a button and attached the flowers to the extra jumbo paperclip using score tape and foam pop dots.

Bookmark Supplies:
Stamps: Fun Year Round
Ink: Memento Rhubarb Stalk and Rich Cocoa
Paper: DCWV Crafty Stack
Other: Buttons, Foam Pop Dots, Score Tape, Extra Jumbo Paperclip

Tuesday, July 20, 2010

Week 3 with Sharri Seffens

When I first opened Sharri's sample for the week, I was so taken at first with how CaYUTE the little "Fun Year Round" elements look in these pinking circle Nestabilities die cuts (Sharri, I think you just sold me a set of dies!) I didn't even realize I was staring at a gorgeous tiered cake made from these DP layers! Just two rectangles in the sketch plus a few embellishments and you are ready to celebrate! This is a design I want to CASE again and again in different patterns and colors! Simple and simply brilliant!
The greeting is from "Candles on Your Cake", she says this is for a baby birthday; I get that from the sweet pastels (love this two tone look with these images in these colors) but I think these fun and elegant prints would make it perfect for a lady of any age! (Look closely and the blue pattern on the bottom layer with the green and blue concentric spots and dots I bet was the inspiration for these little stamped die cuts she created!) The tilted banner gives it a lot of energy and the sponging around the die cuts give each a soft glow.

Here is the card recipe, straight from Sharri:


This is a 5 1/2" x 5 1/2" card. I used the pattern papers from Basic Grey's Lilykate to make the shape of a tiered cake and decorated with the fun circle and flower shapes.

Card Supplies:
Stamps: Fun Year Round, Candles on Your Cake
Ink: Memento - Dandelion, Pear Tart, Summer Sky
Paper: Gina K - Green Apple, Little Boy Blue, White
Other: Spellbinder's Pinking Circles & Scrap Mart Custom Dies, Ribbon, Pearls

Now let's go see Sharri's next project!

Sunday, July 18, 2010

Throwing You a Curve

Hello! Just playing with some of my new goodies I bought from the last Gina K Designs release: buttons, ribbon, Spellbinders Scalloped border petite die and the Seeing Spots folder!
To make the stems I curved the line in the Fun Year Round set, it is so long it's really flexible to bend and shape it as you see fit! Then I stamped the little bubble bursts and punched them out, centering the Marvy Flower punches over the images, and added a button to each center with a glue dot. I made the little leaves from trimming off a petal punched from green toward the middle in a "v" then popped them up! I am SO glad I threw this ribbon in my cart, I could have thrown several more colors on this card and t would have matched them all! Probably will have to go back and buy all the other stripey colors... :)
I used this greeting a little differently this time, just inking up one of the "thank yous" from the round greeting in the set and stamping it so it curves around the punched flower, this tiny sentiment in an unexpected spot makes it extra playful.
Cardstock is Pure Luxury Turquoise Sea, Sweet Mango, Grass Green and Lemon Drop. I selected these colors because of a recent color challenge on StampTV, but then just had to throw the yellow in at the last minute!

Hope your week starts out great!

Saturday, July 17, 2010

Single Layer Mahalo

This card literally took about 5 minutes! I wanted to create a scene with no layering so I stamped the frame from "Fun Year Round" onto Pure Luxury Base Weight White and then stamped in Theresa's palm tree, island and greeting from "Aloha". See how the circles help with placement, as well as spotlighting and grounding the images? I also added the little sea gulls from my "Gifts from the Sea". Last I placed a reverse mask of the frame over it (stamp frame onto scratch paper, cut out the inside and save the window) to do my sponging with the tan, pink and orange and colored the tree in with Copics. (The sponging could have been better I admit, but I was in such a hurry that day! Hope you can relate LOL!) I like the post card feel of this card without any DP or layers of colored card stock...has a "wish you were here" vacation vibe :)

Have a terrific weekend, I have to crank out some serious projects for this next week, some hops and a special somethin somethin for Splitcoast, stay tuned!

Thursday, July 15, 2010

Piu! Piu! Thank you! Piu Piu!

Do you know what piu piu! is? It's that sound my kids make when they are playing Star Wars or chasing each other around with pretending to shoot things laser guns: "piu, piu!! piu-piu!!" Get it now? (If you got it without me explaining, I'll bet money you have little boys!) I don't really know how to spell that sound effect so help me out if you can come up with something better! Anyway, this past weekend we had a laser tag birthday party for my son Jonathan, fun was had by all! (I, ahem, won.*) Although I can't decorate cakes like Janice does, I do like to order a huge yummy sheet cake from Costco** each year but skip having them decorate it, I just put my own spin on it to suit our themed party (see this post for the Diego cake a couple years ago, that was a fun one!)

Anyway, this past weekend we had a laser tag birthday party for my son Jonathan, fun was had by all! (I, ahem, won.*) Although I can't decorate cakes like Janice does, I do like to order a huge yummy sheet cake from Costco** each year but skip having them decorate it, I just put my own spin on it to suit our themed party (see this post for the Diego cake a couple years ago, that was a fun one!) Jonathan and I had blast (hee!) piping on some glitter gel laser beams together in blue and green onto the cake then adding a large water gun from the dollar store and a bunch of glow sticks coming out of the cake, the 8 year olds boys just went nuts for this! (If it had been up to me we would have done just a few less frosted beams and glow sticks, but the birthday boy wants what the birthday boy wants! ) Wish I could have gotten a better pic, especially after we lit the candles (the lights wouldn't go off completely in the party room!), I lined them up in front of the gun like the gun lit it, he loved that!

We needed to make a bunch of nice thank you cards for everyone after it was over so I took inspiration from our game and the cake that day to come up with fun and easy design, great for boys, using Fun Year Round, can I just say again how great it is to have that extra line in the set?! ;) I stamped the line in red and turquoise on three sides, not bothering to mask, like they were bouncing off the walls of the maze and added some of the large and small elements from the set to look like little explosions ! I made 10 of these cards in a flash, just punching out the greeting with a 1 1/4" and 1 3/8" circle punch. Card stock is Tempting Turquoise, Black Onyx and Red Hot. There are so many other cool, spacey color combos you could use or take the colors from your party supplies to coordinate.


Laser tag, anyone?


* Which was very fortunate because I might have talked a biiiig talk to everyone before the game started that I would, LOL! My wining strategy: hide upstairs where you can snipe and keep the gun on rapid fire the whole time; who cares if your final accuracy percentage stinks, fire off the most rounds and you'll win! ;)


** Their cakes are the best deal ever!! $16.99 for a an iced, decorated and filled sheet cake that serves 40, moist, delcicious and icing that's not too sugary

Wednesday, July 14, 2010

Week 2 with Sharri Seffens

I love this card Sharri made today sooooooooooooooooo muuuuuuuuuuuuuch!
I'd been thinking using just a cut corner from the "Fun Year Round" frame would be super cute on a card, but Sharri's 5 1/2" square card using both top and bottom corners along with this super cool sketch with the large offset circles and repeating circles prints and embellishments is just over the top awesome, don'tcha think?!! Just adore the colors and energy, just seems to move like clockwork!
Here are Sharri's card making deets:

I stamped the frame on a piece of Basic Grey's Eva paper in burgundy and cut off the ends of the frame making sure I cut along the rounded circles. They look like bigger corner pieces which I love. Can't you see them used on scrapbook pages, mini books etc? ("Yes, I can, Sharri!! and more, thanks for the great fresh inspiration!") :) I made different sizes of flower buttons and popped them up inside the circles. To make the buttons, I stamped the flowers then stamped the buttons with Versamark over the flowers and heat embossed with clear and Iridescent Ice embossing powders. This made them really shiny or sparkly. I punched them out with circle punches and then added thread to the middles. For the larger flower buttons, I used the matching button image from "Square Pegs".
The other pattern papers are also from the BG Eva pack and the cardstock is Gina's Wine With Everything and Fresh Asparagus.

List of supplies:
Stamps: Fun Year Round, Square Pegs (button stamp)
Ink: Versamark, SU - Bravo Burgundy, Pale Plum, Pretty in Pink, Regal Rose
Paper: Basic Grey - Eva, Gina K - Fresh Asparagus, Wine with Everything, White pl
Other: Burgundy Thread, Circle Punch, Circle Nesties, Pearls Ribbons

Now let's go see what else Sharri made!

Monday, July 12, 2010

Blog Candy: Love Joy Peace

Happy Monday, hope you had a great weekend! Today's card uses a fun color combo I don't think I have done before: navy*, lavender, violet and white. I love this non-traditional Christmas mix!
I stamped the "Fun Year Round" frame in Vivid Inky Blue on Pure Luxury White and then filled in a few areas outside the circles with different shades of purple Copics. Next I stamped the bubble burst and snowflake elements in blue, purple and lavender. TIP: to make the elements inside look more layered, mask the surrounding circles before stamping, see how the little heart in a circle is behind the larger one? It may be a little difficult to see in the pic, but I filled in some of the little spots inthe flakes with a Stardust pen, gives wonderful silver shine! I added some adhesive metal dots and rhinestones to the centers of the flakes for some sparkle and popped up the circle punched greeting centered over the large circle in the lower corner. The circles in the frame insure perfect placement opportunities for all your greetings and embellishments! Frame is layered on Pure Luxury In the Navy and Lovely Lavender. I really enjoy making more graphic, modern Christmas cards like these!


How about some blog candy? I have one copy of my new "Fun Year Round" set to give away. Leave me a comment below, I will randomly choose and post a winner tomorrow. Followers and subscribers can leave TWO comments! Not following yet? Go ahead and add me to your Blogspot or Google reader today and get two chances to win!

Thank you for visiting today! I look forward to finding some time after finsihing all my kids' activities to go through the CSS color challenge hop and hopefully make a card for the challenge myself! :)

*the navy may look a little black, but this combo looks so fresh in real life! I just can't figure out how to make my navy look more blue in pics (without distorting the other colors, of course!)

Saturday, July 10, 2010

"Fun Year Round" Tip Sheet

Here is the beginning of my tips and ideas for "Fun Year Round", I will probably need to do a Part 2 as I have more time to experiment and make examples for the ideas below, I just didn't want to delay posting this any longer!
Mount the trimmed frame on a 6x6" block, which Gina K carries here. Align the top of the frame with a line on the block. See this post for a pic and instructions for how to stamp it perfectly into a corner with out needing a positioner and only have to trim on both sides, faster and less waste of paper!


Stamp focal points, from the set or other images, onto round die cut and place over the frame.


Create masks to keep with your set: one where you trim out the entire inside of the frame so you can place this window over your stamped frame and then stamp or sponge inside of it and remove your mask, see this post. Punch out circles of various size, keep the circles to place over areas you don't want to have a stamped image in, but also save the negative part, so that you can center a round window over a circle on the frame and stamp something it it, then remove the mask.


The circles have been thoughtfully arranged with your greetings and other stamp images in mind! You can flip this frame 4 different directions for vertical or horizontal cards and you will have a large or small circle waiting for you to add your sentiment or image in a pleasing spot that follows the rule of the thirds.


The tiny circles in the corners are perfect for adding a little brad, eyelet or button.


The circles range inside from 1/2" to 2", so Circle Nestabilities are terrific for layering, paper piecing, or creating masks.


Create a paper pieced look by just punching circles of various sizes from DP or colored cardstock and then placing them over the stamped circles in the frame.


Center small images inside the small circles, large ones over the large circles. Offset them for a little more whimsical feel or stamp several of the images from the set into one of the larger circles.


Stamp onto colored paper with a coordinating ink for a more subtle look or dark or contrasting ink for a stronger look.


Stamp over DP to frame up parts of your prints in circles or to create a different look to the print, make a vintage one more modern or whimsical, etc...


If you are adding a die cut focal point over the frame, place it in the center of a group of circles like the circles in the frame are radiating out from it, or place it over a spot where two or three circles intersect.


Punch out a larger area of the frame to reveal a stamped greeting or sentiment inside your card.


Stamp the frame and then create a scene with your stamps or stamp large images over it, then use the different circle with the spotlighting technique coloring in just certain parts of the images framed up in the circles, or color them all but use slightly different colors. This will give a fun magnified or "bug-eye" effect!


Punch small circles or flowers out of the frame to reveal the mat underneath like I did in the sample below, I used a Cropodile and 1/2" circle punch. You can then stamp another round or flower element inside this cut out area.

Frame up round embellishments in the circles on the frame, large and small buttons, brads, paper or punched flowers, pearls, rhinestones, etc.


Color in the different circles with different colors to create a multi layered look, or color in the areas around the circles inside the frame to really make the circles pop. each image has coordinating smaller images that you can 2 step stamp inside the larger image in another color. It is easier to stamp the larger element first and then the smaller element inside. use the matching one of r mix and match the different elements.


The flowers and "snowflakes" fit the Jumbo and Extra Jumbo Marvy Flower punches. The jumbo will be a perfect fit and the Extra Jumbo will provide a rim around the image or be perfect for creating mats for the smaller jumbo punched elements.


The snowflakes also look like the middle of flowers when you stamp them over the flowers. You get two very different looks by lining up the 6 pointed images, or offsetting them so that the second stamp image falls between the 6 points of the first stamped image. Try both. Similarly, you can get two different looks when you line up the Marvy punch to punch it out exactly or turn it a few degrees so they end overlap the punched sides, try both ways!


Stamp the round greetings over the larger flower or snowflakes elements or stamp the smaller images or button images inside. Stamp these in Stazon Ink onto buttons or circle punches.


Create terrific patterns using the smaller elements without the frame. Make your pattern symmetrical by using the line provided in the set, following instructions in this post.


Small elements make beautiful tags and borders, and are perfect for stamping into the inside of your card or flap of your envelope for perfect coordination.


The small elements also are perfect for stamping on the backs of you card like a logo where you sign your name.


Create a photo collage by punching out circles in various sizes from photos, magazines, post cards, etc and placing them over the stamped frame.


Use the long line to create interesting geometric backgrounds, by either stamping at random or diagonally to have them cross like Gina did here, make stripes by stamping them parallel, perpendicular for a grid or checkerboard, and in different colors for plaids, etc.


Okay, more later, that should get you started!

Wednesday, July 7, 2010

Week 1 with Sharri Seffens

Hello, and welcome to our first week with Sharri Seffens designing with "Fun Year Round"! :) Sharri created this beautiful 5.5" square card layering the new frame stamped in red on white and layered with the different stamps and buttons in these fun colors to match the different Basic Grey Cupcake DP! The patterned number paper for a birthday and large and small polka dot and circle prints were perfect with the stamps!


She also used my "Square Pegs" and "Candles on Your Cake", taking a greeting, candle and cupcake from each, the style of these three sets coordinates perfectly and the round elements will make any birthday card that much more fun!

Stamps: Fun Year Round, Square Pegs (Cupcake), Candles on your Cake (Sentiment)
Ink: Vivid - Red, SU - Yoyo Yellow and Pacific Point
Paper: Basic Grey - Cupcake, SU - Pacific Point, Gina K - White and Red Hot PL
Other: Ribbon, Buttons, Scalloped Circle Punch, Cuttlebug EF, Rub on Paste, Liquid Applique, Glitter


I love it, Sharri, great sketch and design, can't wait see your next card with it! But before we hop over to Sharri's blog, a little more about Sharri herself:


Describe your style/what you think you do best: I really do not think I have a set style. When I sit down to make a card, my mood usually determines the style I go with and changes for each card I make.

FAVORITE TECHNIQUE: Oh my gosh! Where do I begin! There are a lot I love like cracked glass, polished stone, paper piecing and sponging or brayering to create a scene.

COLORS/COLOR COMBO: One of my favorite color combos is pink and brown. Another combo I love right now is aqua and soft sand or aqua and kraft.

FAVORITE EMBELLISHMENTS: My favorite embellies are ribbons, buttons, prima flowers and pearls.

FAVORITE GINA K SET BY MELANIE: Seriously all of Melanie’s sets are a favorite. There is no way I could pick just one as a favorite! I love how all of her set can be mixed and interchanged with each other! I just adore Hand in Hand, Just so Hippy, Just so Hoppy, Sporty Accessories and I love all of her frames and flowers sets…see they really are all a favorite!

FAVORITE GINA K SETS (FROM ANY ILLUSTRATOR) Oh my, another hard question! I love Asela’s Friendship’s Garden and Flowers for Daisy; Nina’s Lovely Labels and Vintage Borders; anything of Theresa’s; Gina’s Botanicals, Take Flight, Quite a Catch, The Kindred greetings, Tropical Flowers, Thanks A Million; Rupa’s Spring has Sprung, Easter Blessings: Tami’s Stars; Carolyn’s Framed Flowers…see! It’s hard to choose just one as a favorite!!!

CRAFT SUPPLIES I CAN’T LIVE WITHOUT: Definitely my Nestibilities, Embossing Folders and of course my copics!

I’VE BEEN STAMPING FOR (HOW LONG): I started stamping about 8 years ago after my youngest daughter was born. I was invited to a Stamping Up! party and once I saw how easy and fun I was hooked.

I GET MY INSPIRATION FROM: I find so much inspiration magazines, nature and pictures but the majority of my inspiration comes from surfing the internet, visiting blogs, SCS, and Stamp TV.

Tell us about your FIRST stamping experience!! My first stamping experience was a Stampin' Up party that a friend invited me to. I had never stamped before but when I saw how easy and fun it was to make a card I was hooked. I ended up buying a Christmas Stamp set and made my own Christmas cards that year.

Tell us about your most memorable stamping experience!! My most memorable stamping experience is actually a gift I made for a very good friend of mine. It was for her baby shower and I made her a star book using Melanie's Just so Hippy, Just so Hoppy and Hip Hop Accessories stamp sets for the pages in the star book. Kelly actually cried when she started looking through it.

THE MOST IMPORTANT THINGS I’VE LEARNED ABOUT STAMPING/CARDMAKING ARE: The stamping community is huge, supportive and full of such talented people who are so willing to share and teach what they know. I have found so much inspiration and learned so much from this community.

SOME OF MY STAMPING/CRAFTING GOALS ARE: I am very lucky to have been able to cross a couple of goals off my list this past year. Two goals that I have on my list and am sure many other have, are to be published and to be a permanent member of a Design Team.

ADVICE FOR BEGINNERS: Have fun and enjoy yourself. But most importantly, believe in yourself, what you can do and accomplish.

FAVORITE THING TO MAKE THAT AREN’T CARDS: I love making treat holders, scrapbook pages, and mini albums. I also like doing other crafts like crocheting and floral arrangements.

SOME OF MY STAMPING/CRAFTING ACCOMPLISHMENTS: Being chosen to be in the spotlight by Gina K; being a part of one of Stamp TV’s Center Stage Spotlight Design teams and continuing on as an Alumni; a Challenge Hostess on Stamp TV; a guest designer for Theresa Momber and now guest designer for Melanie, which an honor for me!

CHALLENGES I LIKE TO PARTICIPATE IN: I like to participate in the Stamp TV challenges. When I can I try to do the Card Positioning Challenges and other challenges on some of the blogs that inspire me. I would do a lot more challenges if I could squeeze a few more hours into the day. Lol!

TELL US SOMETHING ABOUT THAT MIGHT SUPRRPISE US! I am a quiet/shy person which may or may not be a surprise to some people. But this story surprises a lot of people when I tell them because I am so quiet.
When my husband and I had been dating for about 5 years, all of our friends started to ask when we were going to get married. My husband always responded saying the senior partner has to do the asking…yup, I am older than my husband and so for Christmas that year I bought him an engagement ring and proposed Christmas morning. He of course said yes and we were married the next year on 9/11, exactly 6 years to the date we met. *


WHAT I DO WHEN I’M NOT STAMPING: I work full time and am a Business Analyst for a major insurance company. When I am not working or stamping, I enjoy reading, walking, biking, movies and most of all, I love to spend time with my daughters and husband.

A FAVORITE QUOTE: "Faith is taking the first step even when you don't see the whole staircase." -- Martin Luther King Jr.

I just love reading these responses from my guests each month! Now let's go visit Sharri, ready, set GO!

*"Wow!", says Melanie!!

Saturday, July 3, 2010

Button, button...

So how many new jars of Pure Luxury Buttons did YOU buy the other night? (I think I started with four...started! I believe I have red, orange, yellow, turquoise on the way! Soon to be followed by blue, pink, purple, green, masculine...)
Buttons are too beautiful and fun to hoard, they must be played with! Fun Year Round is the prefect backdrop for adding an assortment of buttons in contrasting colors and various sizes, and even adding one of its round greetings to a button with Stazon! Until my new buttons arrive (I'm crossing my fingers for Tuesday, we'll see!), I am working on using up my Basic Grey Cupcake mix here! After I adhered all the buttons with glue dots, I chose coordinating Copics to fill in the tiny spaces in between the circles, making the color bounce around, for instance putting red in corners opposite a red button, etc. This is a single layer card stamped on Pure Luxury White in Memento Black ink. This card just shouts happy!


I made this card for Theresa's "In the Round" challenge to use 9 more circles, be sure to play and upload your card this weekend to StampTV, you could win a free set of stamps! :)

Friday, July 2, 2010

New Gina K sets now available for purchase!

I hope you were able to catch part of the Gina K release party last night! My son Jonathan turned 8 yesterday so we were out having our own celebration for most of it, but here is one of the cards Theresa posted for me while we were out, thanks Theresa! It has the "Fun Year Round" frame stamped in Black on Pure Luxury White, with Theresa's flowers from "Aloha", directly over it. No masking! Stamping the large one at the bottom and the smaller ones at the top opposite corner balance the design, and all the different circles create wonderful spotlighting opportunities, I colored each bit of the flower in slightly different shades as I moved from bubble to bubble. The many lenses kind of gives you a compound bug's eye view, which I love!
TIP: When coloring "white flowers" use a very pale green near the center to emphasize the pure whiteness of the petal, I use Mignotte Copic, or a very pale aqua to outline the edges, this keeps them from looking like you just "forgot" to color your flower petals! Alternating the different colors to the circles surrounding them is like a playful bunch of beach balls, I just think it goes wonderfully with the festive, tropical theme of her set! Finally I layered it onto Passionate Pink and Lemon Drop and then added some white paper flowers with yellow brads for more texture and dimension.

I hope I make it to Hawaii myself one day! :) Have a terrific 4th of July weekend with your families as we celebrate our Independence! Safe travels!

PS My tip sheet for this new set will be posted shortly; as usual, it is pretty long!

Sunday, June 27, 2010

Day 1 : "Fun Year Round", "Aloha", and "In Stitches"

Welcome to our first day of previews! Starting off with my set "Fun Year Round", my newest frame set will give you more options than ever before! As calm and tranquil as the squares and rectangles were in "Inspiration Mosaic", these new overlapping circles in "Fun Year Round" just burst with energy, ready to be filled with any combination of the 23 round, year-round elements in the set, like an explosion of fireworks, bubbles etc! Think water in the summer, snow in the winter, flowers in the summer. The different sized circles are also perfect for framing up sentiments, your other favorite stamp images, or flowers or other round embellishments, I can't wait to show you all the possibilities!

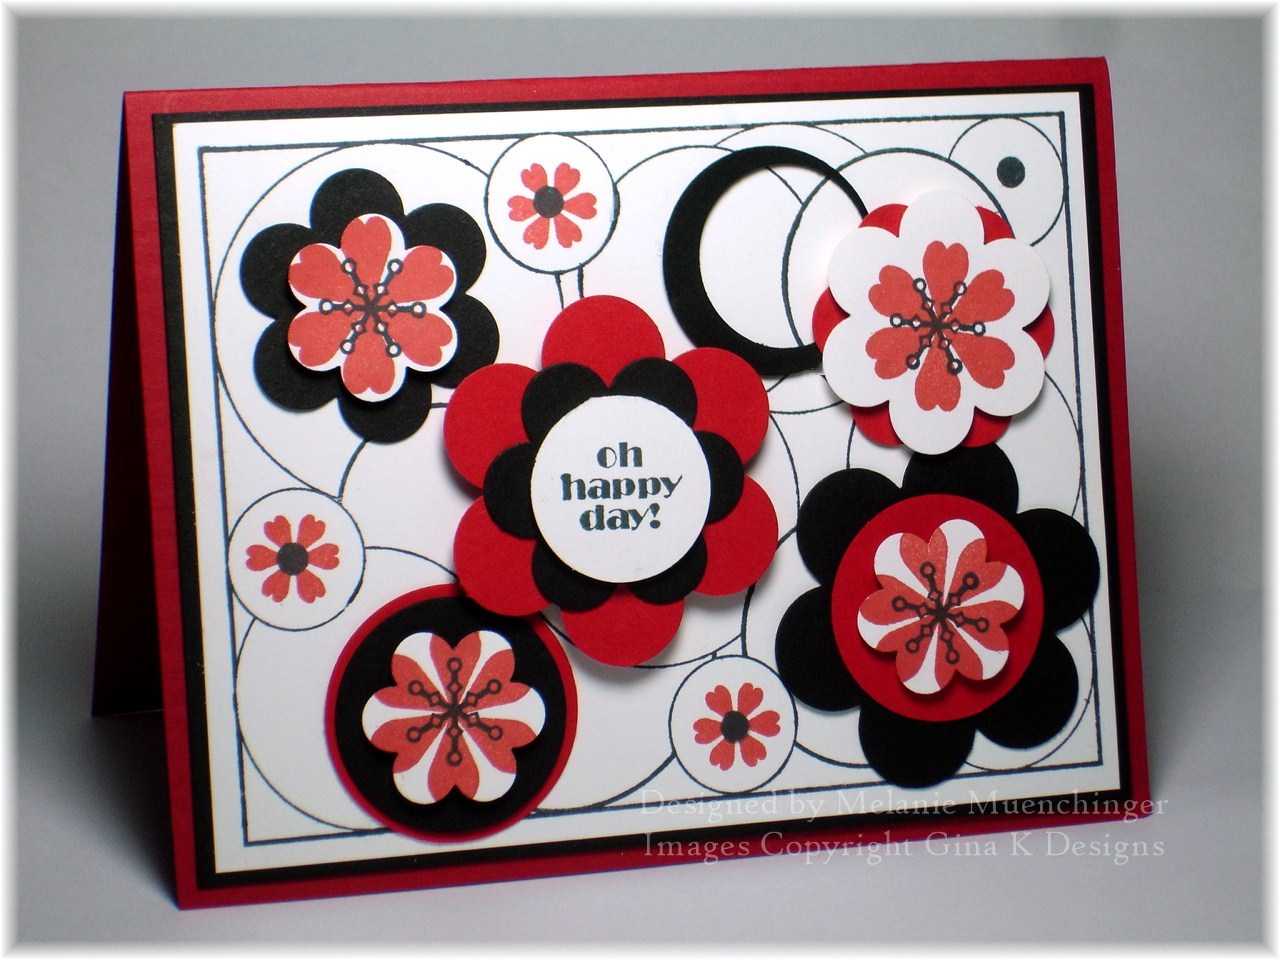
Here I just stamped the frame in black on white and filled in a few of the smaller circles with some red stamped flowers with black centers. Next I stamped out some flower (or "snowflake", depending on what color you use !) elements in red and black onto white and punched them out with the Marvy flower punches (jumbo punch for perfect fit, larger for layering), then layering them on larger red and black circles or flowers. There are so many ways you can 2 step stamp these different images, as well as how you choose to punch them out. Place them over the circles in the frame, layer onto coordinating card stock and your card is finished!

This next card uses the same set without the frame, just the round elements and the long line included in the set, to help make symmetrical patterns when you want (although random ones will look great too!). You will have a blast creating very simple or very ornate patterns in whatever shapes and colors you choose! First I started with a mat 4 x 5 1/4" and then centered it over the lines on my Scor- Mat. I adhered the line to the grid line block and stamped rows and columns at the black lines on the Scor-Mat, in aqua ink to create a grid. As you are stamping, just line up the white line on your block over the line on either side of your card stock on the Scor-mat.

Then stamp elements into the cross hairs (or inside the boxes for a different look), here I used the large bold flower in aqua and the smaller matching one (not pictured) in turquoise, skipping every other box to leave space for a different color and image.


Next I added this bubble burst stamped in Vivid Butterscotch, I LOVE this image (and there is a smaller one too), so fun!
Last I stamped this little button to the middle of the bubbles in Vivid Brick Red. That's it, the pattern is done!

After making my pattern, I punched out two Marvy flowers in Turquoise Sea and Ocean Mist, these punches match the flower images, and added the round greeting on white to the middle.


Next up we have Theresa Momber's "Aloha". Full of gorgeous tropical images to color, creating with it will feel like a trip to the beach! This little barefoot sentiment she added reminds me of the little baby foot prints I make with my hands for my kids at the pool so I thought it would be fun to create a sandy backdrop with that in ink on my card. It's very simple to do...
First, make a fist and ink up the outside of your hand in a Vivid Tuscan Tan ink, then stamp onto Soft Sand card stock.

Now ink up your finger tip and make five little toes, reinking each time, using the most pressure for the big toe and the least for the pinky toe.

Repeat steps with the other hand, and wash up before you get ink all over your project! I stamped a little bit of my speckle image from "Gifts from the Sea" over it to give it a sandier look, then added the sentiment over the feet in black. Images are colored with Copics and popped up. Below is a closeup to show how you can use the very tip of the brush end of a brown Copic with quick flicking strokes to give the coconut a nice, hairy texture, and also some paper piecing I did on the umbrella with DCWV Citrus. I distressed the Soft Sand edges and layered onto Black Onyx and Turquoise Sea.

Our last peek today is made with Tami Mayberry's new "In Stitches". In this set, you get twelve great trims that can be used for adding faux stitches to your card or creating patterns, I've done both on this sample. I stamped out the flower trim in both yellow and orange, one inch apart, again using my grid line block and Scor-Mat as a guide. Next I added the green loopy stitch and finally the black dotted one.
Then I used the dash dot stitch across the top and on my ribbon panel and envelope to look like, even I , sew on cards! ;) This set doesn't come with greetings but will go with any, so I used the round thank you sentiment from my "Fun Year Round" set around a real button and layered it over those Marvy Flower punches again (green, yellow and blue size) in Wild Dandelion and Black Onyx, see how the flower in that stitch matches these punches, too? (I'm a little obsessed with them right now!) Love it! her'es some of the new ribbon you'll be able to buy in wraps from Gina K Designs, can't wait, this is one of my faves!


For even more samples with the stamp sets being previewed tonight, check out these designer's links:

We'd also like to invite you to attend our Release Party this Thursday, July 1st starting at 7 pm central on StampTV! There will be challenges, contest questions, and more samples from our designers on all the new stamp sets being released this month! We'd love to have you join in on the fun! Thank you for visiting, see you tomorrow!