Today's project takes a $2 frame and some family pics I took and "Photoshopped". I found two pics of my boys on different days marvelling at a butterfly, and a walk they took together on the beach. (After editing, I added some stamping and unique matting later, so please stick with me through the next few pics to see what I did and the final result!) :)

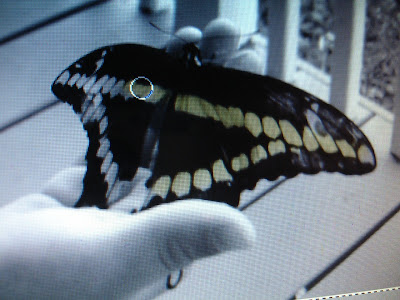
Here is my original pic, opened up in Microsoft Digital Image Pro 7. I take my pics with Sony digital camera. Jonathan was almost 5 in the pic, he'd just found a huge butterfly on our front porch.

Then I clicked on "Effects" and then "Black and White". I love black and white photos, you really focus on the shapes and "the moment"!

Now I'm going to use a tool under "Effects" called the "Colorize Brush", this allows you to tint certain areas of your photo in the color of your choice. Unlike the Paint Brush, this adds
transparent color
over your image so you still see detail rather than just a big stroke of opaque yellow.

Select your color and drag your mouse across the areas you want to tint. Although I don't use a lot of yellow in my projects normally, it's such a happy color and I wanted to keep the integrity of the butterflies true color (both happened to be this buttery yellow) I will tie this color into all three photos, very appropriate for these golden moments!
Now to crop it! I selected the same size as my frame opening and dragged it around until I had both of the most important elements inside, his little profile and the butterfly.

After printing them out and trimming (I use Kodak photo paper and an hp printer), I wanted to create some vellum mats that would kick this frame up a notch to look like frosted glass panes and highlight parts of my images. (You know those expensive ones you see at Restoration hardware of Pottery Barn?) Here you can see I chose two Nestabilites dies, a classic rectangle and a square, doesn't that look cool having the two geometric shapes offset like that? (I placed the full peice of vellum on top, then placed my dies over that to figure out exactly where to cut) I love this spotlight it creates on his face, it's before he lost that beautiful "little boy roundness" to his features and those beautiful little curls (his hair is pretty straight now, sigh!) It's okay the openings cover up parts of his head and the butterfly, just get the important stuff in there! :) I stamped "free..." from my "
The Best Things in Life" set in
Memento Tuxedo Black ink. (Heat set or blot to make sure the ink's dry before moving so you don't smear it when stamping on vellum.

Below is my finished project hanging in the powder room of our master bath. It's a small space so it was hard to get the colors to photograph exactly true. "
The best things are shared... free... priceless..." I love how each picture is matted differently, it's so unexpected, rather than a centered rectangle in the middle of each, (but the right angles in all the cut outs makes them all very harmonious, throwing in oval or circles cut outs with these would have a very different effect.) TIP:
Save your cut outs, you can do some cool layering things with all these perfectly cut vellum squares and rectangles in another proejct (I'll share some ideas with them later!)

Here is a closeup of my beach boys. There wasn't any yellow in the original, but I tinted William's t-shirt and the tie dye burst on Jonathan's back with the same yellow. See how I offset my square cut out here to allow tons of my room for my quote below, but you can still make out their footprint trail and cast shadows behind it...

A closeup of Jonathan's...

and one of my sweet William, taken just a few months ago. This one I cut with my largest rectangle die.

I hope you enjoyed this photo tutorial. I was so pleased with how artsy, expensive-looking, and
personal this turned out! Hope it inspires you to try dressing up your favorite photos with a little creative (strategic!) editing, stamping and papers before hanging them up!
Projects like these would also make great gifts for friend and relatives, just ask them to email you their favorite photos! You can do this!!
 Here is my original pic, opened up in Microsoft Digital Image Pro 7. I take my pics with Sony digital camera. Jonathan was almost 5 in the pic, he'd just found a huge butterfly on our front porch.
 Then I clicked on "Effects" and then "Black and White". I love black and white photos, you really focus on the shapes and "the moment"!
 Now I'm going to use a tool under "Effects" called the "Colorize Brush", this allows you to tint certain areas of your photo in the color of your choice. Unlike the Paint Brush, this adds transparent color over your image so you still see detail rather than just a big stroke of opaque yellow.
 Select your color and drag your mouse across the areas you want to tint. Although I don't use a lot of yellow in my projects normally, it's such a happy color and I wanted to keep the integrity of the butterflies true color (both happened to be this buttery yellow) I will tie this color into all three photos, very appropriate for these golden moments!
 Now to crop it! I selected the same size as my frame opening and dragged it around until I had both of the most important elements inside, his little profile and the butterfly.
 After printing them out and trimming (I use Kodak photo paper and an hp printer), I wanted to create some vellum mats that would kick this frame up a notch to look like frosted glass panes and highlight parts of my images. (You know those expensive ones you see at Restoration hardware of Pottery Barn?) Here you can see I chose two Nestabilites dies, a classic rectangle and a square, doesn't that look cool having the two geometric shapes offset like that? (I placed the full peice of vellum on top, then placed my dies over that to figure out exactly where to cut) I love this spotlight it creates on his face, it's before he lost that beautiful "little boy roundness" to his features and those beautiful little curls (his hair is pretty straight now, sigh!) It's okay the openings cover up parts of his head and the butterfly, just get the important stuff in there! :) I stamped "free..." from my "The Best Things in Life" set in Memento Tuxedo Black ink. (Heat set or blot to make sure the ink's dry before moving so you don't smear it when stamping on vellum.
 Below is my finished project hanging in the powder room of our master bath. It's a small space so it was hard to get the colors to photograph exactly true. "The best things are shared... free... priceless..." I love how each picture is matted differently, it's so unexpected, rather than a centered rectangle in the middle of each, (but the right angles in all the cut outs makes them all very harmonious, throwing in oval or circles cut outs with these would have a very different effect.) TIP: Save your cut outs, you can do some cool layering things with all these perfectly cut vellum squares and rectangles in another proejct (I'll share some ideas with them later!)
 Here is a closeup of my beach boys. There wasn't any yellow in the original, but I tinted William's t-shirt and the tie dye burst on Jonathan's back with the same yellow. See how I offset my square cut out here to allow tons of my room for my quote below, but you can still make out their footprint trail and cast shadows behind it...
 A closeup of Jonathan's...
 and one of my sweet William, taken just a few months ago. This one I cut with my largest rectangle die.
 I hope you enjoyed this photo tutorial. I was so pleased with how artsy, expensive-looking, and personal this turned out! Hope it inspires you to try dressing up your favorite photos with a little creative (strategic!) editing, stamping and papers before hanging them up! Projects like these would also make great gifts for friend and relatives, just ask them to email you their favorite photos! You can do this!!
Absolutely gorgeous boys, and a gorgeous framed piece!
ReplyDeleteThis is such a gorgeous piece, thank you for the tutorial, too.
ReplyDeleteWhat a treasure...the boys, the pictures, and of course, the art you created!
ReplyDeleteJan
What a wonderful project - just beautiful moments captured and then so creatively enhanced. ikki
ReplyDeleteI so rarely do anything with my photos but I feel inspired to try something like this - its just so beautiful. Thank you for sharing something so simple but so effective.
ReplyDeleteli-marie
AMAZING! I LOVE it! I'm saving this tutorial to favorites... I'm sure I'll be using it! My brain is churning and I've already got two photos of Marcus and Jessica together in mind that I wanted to do something special with. Karl and I both wanted to do something special with those photos to give to Karen.... I'd better get to work (and order your stamp set too!) LOL
ReplyDeleteBTW, your boys are so cute and the photos are awesome. How did you get the butterflies to sit on their hands?
Beautiful!
ReplyDeleteYour two boys are so cute and the moments you have captured priceless!
Thank you for sharing this wonderfully simple, but elegant idea.
I have a new grandbaby and this would make a wonderful gift for my daughter and her husband.
You inspire us to go way beyond 'the'box'!
Marilyn
This is absolutely beautiful. Thanks for the tutorial! debb
ReplyDeleteThis turned out beautifully! Thanks for sharing the idea for the vellum framing - love it!
ReplyDeleteMelanie, I love how you used vellum over the picture and cute openings for the parts of the picture you wanted to emphasize.
ReplyDeleteThis is such an incredible project! Thank you for sharing your life with us!
ReplyDeleteI love this project. The end result is really elegant. Thanks for sharing this great idea.
ReplyDeleteWhat absolutely beautiful photographs and boys! Love the effect you did on the pictures.
ReplyDeleteOh, Melanie, what a great idea. Thanks for sharing.
ReplyDeleteWhat a beautiful keepsake! Thanks for your always inspiring creations!!!
ReplyDeleteWOW!!! What a unique idea! Melanie, you are so blessed with your amazing talent! This is totally gorgeous and your tutorial will be so easy to follow. I will definitely give this a try! TFS :)
ReplyDeleteWonderfully creative! Absolutely gorgeous! You do NOT disappoint!
ReplyDeleteYour picture frame is absolutely gorgeous!!!!!!! You are such an inspiration!! Thanks for sharing.
ReplyDeleteWow, that is wonderful...
ReplyDeletelove it - great idea!
ReplyDeleteWow, what a gorgeous outcome! I love it. Your boys are beautiful!
ReplyDeleteThis was just beautiful Melanie. Thanks for sharing the idea and the steps. It would be a much more personal gift for someone for any reason.
ReplyDeleteWow! This is so gorgeous.
ReplyDeleteI love this!! Great job - and great step by step photos!!
ReplyDeleteBeautiful frame, thanks for the tutorial!
ReplyDeleteThis is a beautiful piece. Only one comment - I would have traded the placement of the two outer photos as this would make both boys facing toward the center. Helps the viewer's eye move around the piece instead of leading them away.
ReplyDeleteDdd
wow! This is gorgeous! What a special gift to give or keep! Ü
ReplyDeleteThank you for that awesome tutorial, Melanie! What a great project. I love black and white photos. I've never colorized any, but it's a great effect. The pictures of your sons are precious.
ReplyDeleteEven though money is tight right now, Karl liked the idea of using your stamp set and tutorial to make a frame set of Marcus and Jessica, that we ordered your stamp set today! I can't wait to get it and make it. Of course I have to make two - one for me and one for Karen. shhhhh.... don't tell her what I'm up to! LOL
ReplyDelete((hugs))!!
Wow, I could do this! I'll have to play with some photos though! Thanks for the inspiration!
ReplyDeletei LOVE this! the cutouts are very clever.! i'm going to change a few pictures to b&w and try this out. i have the perfect weight vellum already.
ReplyDeletetfs, sandyh
sandyha@comcast.net
*******THUD*******
ReplyDeleteYa lost me..........I'm down for the count!!!!!! Seriously....seriously....you think **I** can do this??? I don't know......this is just so spectacular!!!! You know you should set up a booth and just do this I swear you'd be wealthy by nightfall!!!! Stunning!!!
WOW! This is incredible! I really need to learn my PSE better! I wanna do stuff like that!
ReplyDeleteOh wow, what a gorgeous project! I LOVE the idea of using the vellum.
ReplyDeleteYour framing is wonderful. Great looking subjects too! Thanks for sharing.
ReplyDeleteThis really is fabulous! Love that you showed us how! :)
ReplyDeleteI was out of town with a very SLOW connection all weekend so I had to go back to comment on this project. It is just FABULOUS!!
ReplyDeleteOh Mel, this is GORGEOUS!!! Thanks for the tutorial. I was in you neck of the woods last week, a little trip to Archivers!
ReplyDelete