I think I got about a hundred requests for how to color skin or
hands! Here we go, I'm only
using three
Copics: E00, E21 (these are both in Box A) and W-1 (from Box D)

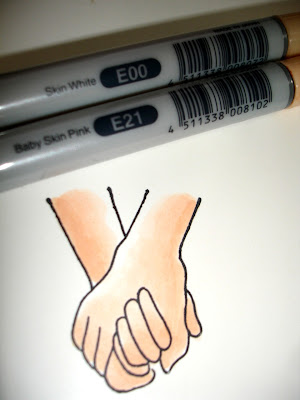
I start with my lightest color E00 Skin White,
working in circles, leaving the top side of the front hand and top inside of the back hand white. As you can see , this is a really light
Copic! I'm coloring this image as if the light is coming kind of from above, front and center...

Some areas of this pic look lighter than the first, it was still a little wet when I took the pic, the color lightens, just so you know! :) Then I did a second coat with the same color in areas I want to be darker: the
very bottom of both hands, about half way up
where the fingers would bend up and be"exposed to the light", and the thumbs, right side of the front wrist and left side of the back arm.
I've had people ask me: how to make the arms/hands look like they are two different people when they have the same skin tone? good question! Typically in art things in
front are lighter, and
darker as you move to the background, so I just add an extra layer of color onto the arm of the hand behind...
now I'm going over the very far right of the front hand and far left of the back hand with a flesh tone in small circles a few shades darker than my first, following the shape of the outline. The shades are similar so you don't need much blending, but if you see a line, just pick up your lighter flesh tone again, here E00, and go over that area in
small circles they blend very seamlessly this way.

Last I outlined the underside of the hands just following my outline with W-1. That's it!

Now
here's a fun way to frame them up, I mentioned it in my tip sheet, but haven't shown a sample of it yet! I
particularly love how the little V between their arms is kind of like the top of a heart, so I folded a
piece of scrap CS and cut out a heart , just like we did in school and placed my negative cut out over the hands, lining up the "V"s. The I traced the inside with my black pen.
 When
When I cut it out, the heart will look like it was part of the stamped image, I really like the sweet way this spotlights the hands! Below you see I layered it onto Pretty in Pink CS, trimmed
around it with small scalloped scissors and popped it up on
dimensionals...The DP is
DCWV All Dressed Up. I added some adhesive metal dots to make the bracelet and an inexpensive heart charm I got at Hobby Lobby (attached with a glue dot)

I hope this helps you with coloring the hands (and other images that "show some skin"
LOL! ) and shows you don't need a lot of blending or a lot of different colors!
I will have another hand tutorial coming up soon using the child holding the adult's finger and different skin tones, I haven't
experimented much yet with other flesh tones because I only had these two that came in my
Copics Box A for so long, but Box D, which I now have, has several! :)
I want to make a Valentine for my son William to give to the one of the women at the nursery at my gym he especially loves, Kiersten, she is African American and has the most gorgeous skin color, just a beautiful lady inside and out!
I'll make some other versions of that Valentines for the cards4kids, of course, don't forget to read about the RAK request and contest in this post! (where you can also see the finished sample) :)
 I start with my lightest color E00 Skin White, working in circles, leaving the top side of the front hand and top inside of the back hand white. As you can see , this is a really light Copic! I'm coloring this image as if the light is coming kind of from above, front and center...
 Some areas of this pic look lighter than the first, it was still a little wet when I took the pic, the color lightens, just so you know! :) Then I did a second coat with the same color in areas I want to be darker: the very bottom of both hands, about half way up where the fingers would bend up and be"exposed to the light", and the thumbs, right side of the front wrist and left side of the back arm. I've had people ask me: how to make the arms/hands look like they are two different people when they have the same skin tone? good question! Typically in art things in front are lighter, and darker as you move to the background, so I just add an extra layer of color onto the arm of the hand behind...
 now I'm going over the very far right of the front hand and far left of the back hand with a flesh tone in small circles a few shades darker than my first, following the shape of the outline. The shades are similar so you don't need much blending, but if you see a line, just pick up your lighter flesh tone again, here E00, and go over that area in small circles they blend very seamlessly this way.
 Last I outlined the underside of the hands just following my outline with W-1. That's it!
 Now here's a fun way to frame them up, I mentioned it in my tip sheet, but haven't shown a sample of it yet! I particularly love how the little V between their arms is kind of like the top of a heart, so I folded a piece of scrap CS and cut out a heart , just like we did in school and placed my negative cut out over the hands, lining up the "V"s. The I traced the inside with my black pen.
 When I cut it out, the heart will look like it was part of the stamped image, I really like the sweet way this spotlights the hands! Below you see I layered it onto Pretty in Pink CS, trimmed around it with small scalloped scissors and popped it up on dimensionals...The DP is DCWV All Dressed Up. I added some adhesive metal dots to make the bracelet and an inexpensive heart charm I got at Hobby Lobby (attached with a glue dot)
 I hope this helps you with coloring the hands (and other images that "show some skin" LOL! ) and shows you don't need a lot of blending or a lot of different colors! I will have another hand tutorial coming up soon using the child holding the adult's finger and different skin tones, I haven't experimented much yet with other flesh tones because I only had these two that came in my Copics Box A for so long, but Box D, which I now have, has several! :) I want to make a Valentine for my son William to give to the one of the women at the nursery at my gym he especially loves, Kiersten, she is African American and has the most gorgeous skin color, just a beautiful lady inside and out! I'll make some other versions of that Valentines for the cards4kids, of course, don't forget to read about the RAK request and contest in this post! (where you can also see the finished sample) :)
thank you for posting this, I was wondering how to shade today. I am still learning and will be buying the hand in hand set the next time I got to gina k's store.
ReplyDeletePlease keep posting about blending I am still learning, and love the help.
Thanks for doing this. I LOVE that set! I want to join the next copic caio club!
ReplyDeleteThanks for the tutorial!
ReplyDeleteJan
Melanie, your tutorial is great. You sure make me wish I had copis.
ReplyDeleteThe card you've made is stunning.
TFS
Fabulous tutorial. Thanks for sharing.
ReplyDeleteNettie
Very helpful! Thanks!!
ReplyDeleteThanks, I have a lot to experimenting to do!
ReplyDeleteThis is a fabulous tutorial! Thanks Melanie!! I think I need to invest in this stamp set! I love it!
ReplyDeleteThank you so much for this very helpful tutorial. I love the way your card turned out. I especially love the charm bracelet! It's the perfect touch.
ReplyDeleteJanet
Oh, Mel ... Thank you for posting this. I am actually putting together a folder of each of your sets and including your tips pertaining to each one in each.
ReplyDeleteThe hand-in-hand set is the very next set I plan to buy ... now, all I need is a picture of how to cut it out, so I can actually use it!!
This is awesome, Mel!! I love the fact that you provide so much information for using each set ... that even a newbie like me can follow!!
Judy
e-wording some of those classic 'sayings' - How about this one... A Copic in the hand is worth two in the bush. LOL Okay - I'm feeling a bit goofy at the moment - thanks for putting up with me! ;)
ReplyDelete(It doesn't help that my word verification was tombrofo! LOL)
i wish i was you! and talented like you! :)
ReplyDeletethanks for the tutorial!
Great tutorial!! thanks for sharing.
ReplyDeleteHugs
Brooke
I love the tutorials on coloring and shading.....I'm still practicing!! I think my biggest problem is I keep wanting to color in all the area and not leave enough white areas to use for shading.
ReplyDelete