Showing posts with label Nina Brackett. Show all posts

Tuesday, March 22, 2011

Inspiration Hop Day 3, "Perfect Pennants", Cute as a Bug", and "Lovely Labels 3"

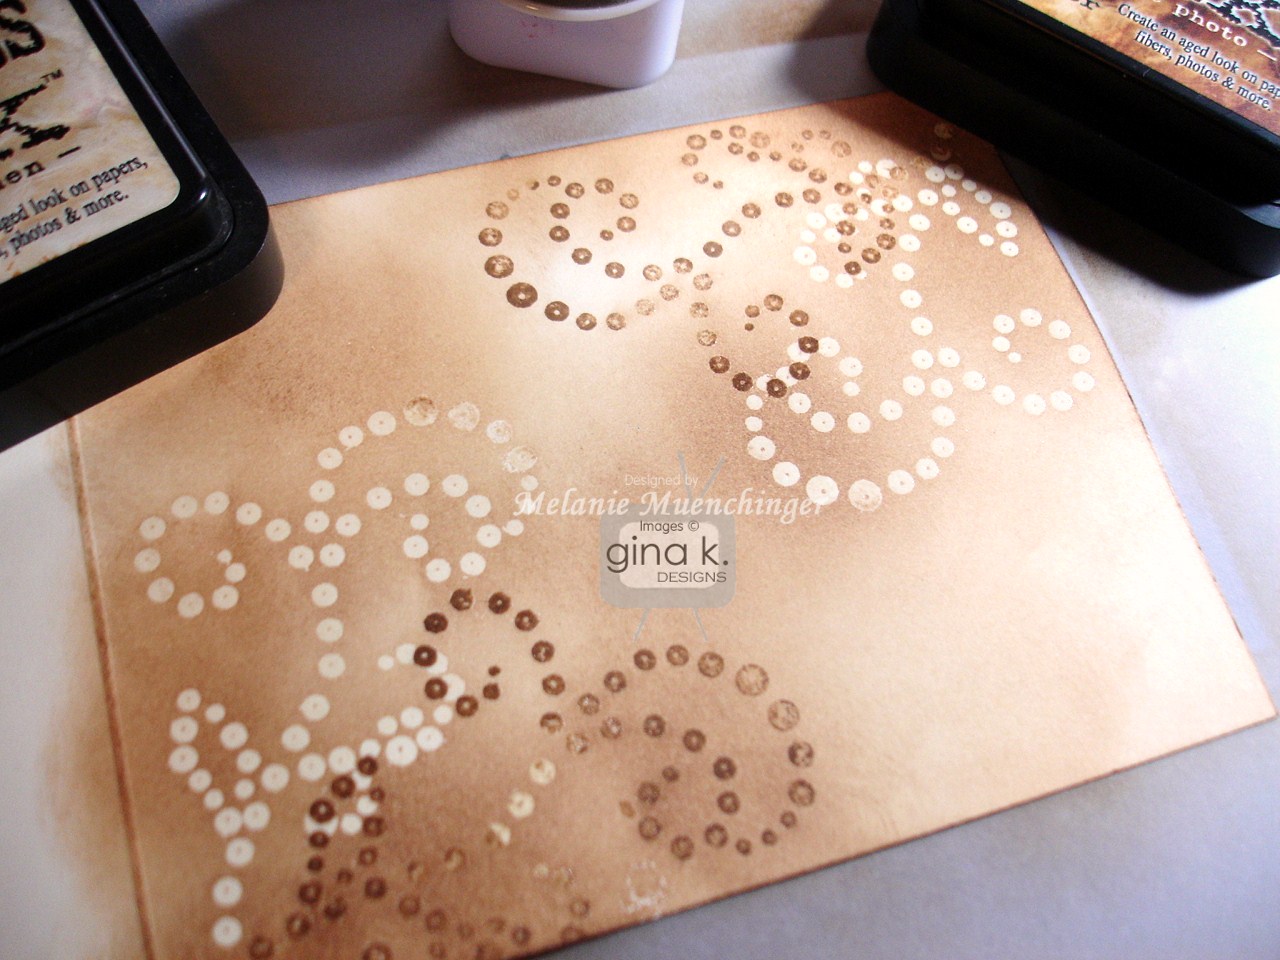
Welcome to Day 3 of our Gina K Designs Inspiration Hop for our March sets! first set we are sharing today is Nina Brackett's "Lovely Labels 3". I stamped this label and greeting with Vintage Photo Distressing Ink on Pure Luxury Ivory CS. I made the background paper which I think goes very well with these vintage style labels using "Bring the Bling" and distressing inks, let me show you how to create this look with the emboss resist technique!

First ink up the large flourish in both Antique Linen and then Vintage Photo rolled on the edges and stamp into both corners of your ivory mat. Clean your stamp and ink the flourish up again in Versamark and stamps again in both corners, offset from the first flourishes so they branch out the opposite way, but will still have some overlap. As you can see, I left a teensy bit of the dark ink on my Versamarked flourish. That's okay. Gives it a nice patina! Add clear embossing powder and heat.

Now take your jumbo sponge dauber and sponge Antique Linen and Vintage Photo over your embossed araeas to distress the and make your embossing pop. Leave some light areas, you can always add more ink but can't take it away! Isn't that two tone effect with the bling gorgeous?
Here it is matted on another layer of Ivory and Chocolate Brown base with the label popped up over it. I don't have the dies that match this set, so I just free cut with scissors following the edge of the label. I love the shape of this label stamp and the accent details inside it!

Even with the "bling" it still has a great masculine feel, like tooled leather boots! Still a card a lot of ladies (including me!) would also enjoy receiving! :)


Next we have Rupa Shevde's "Cute as a Bug". I love bees! This little guy holding the honey dipper and the sentiment are too sweet! I colored and cut out the bee and then popped him up over this flourish from "Bring the Bling" embossed in Black. Embossing the hearts in back on Red Hot CS to pop over over the flourish and next to the hive were the perfect pops of color and finishing touches! The solid color of the cardstock almost looks like little felt accents when embossed!
I used a glitter pen to highlight the wings and doubled my pop dot stack under the bee to give him some extra lift! Cardstock is Pure Luxury White, Turquoise Sea, and Wild Dandelion. (Didn't rub this card with the anti-static pad before embossing either obviously, I'm going to say that's a dusting of pollen trailing behind, yeah, that's the ticket!!)

Next up we have Tami Mayberry's "Perfect Pennants". I tried to go a little out of the box with it here. Since there are so many things you can make out of triangle shapes, one of the first that came to mind was to make a large scale tiara, fit for a queen (or little princess!) on her special day!

I began by embossing the scalloped "Bring the Bling" border to give it some structure that I stamped in a curve, checking first that the three large triangles would fit across it by laying out the rubber images on top of each other before I started, perfect fit! After embossing and cutting out the large embossed triangles, I stamped out 5 more tiny harlequin patterned ones and embossed some of the hearts and stars from the set as toppers above them before cutting them out and popping them up.

I made a little banner for the "It's your day"! greeting by embossing it onto a strip I notched out at both ends, then snipping off either side and mounting the rectangle slightly above them for a layered look. The black bling dots I embossed and Black Onyx layer provides a little punch of contrast. This DP is from Emily Giovanni's new Quarter sheets "Grunge Damask" digi pack, love these patterns and colors! :)


Please go check out the rest of our teams blogs for more inspiration with these three great sets!

Gina K


Nina Brackett


Thursday, January 6, 2011

Sneak Peek Day 4: "Gleefully Yours" and "Smile"

Welcome back to our last day of Gina K Designs Sneak Peeks! First up we have the "Free with Three" set "Smile", so fun! (have you picked out your three sets yet?) ;) You get this cute dotted label that fits the Labels 8 Nestabilities and cute senitments and images to go with. I stamped it in Vivid Coffee Bean and then colored the rim of the oval with a YG03. Dp is Basic Grey Marjolaine, this pattern is so fun with the dotted label and dotty tree border!

I nked up the greetings with blue and brown markers before stamping to highlight "brighten" and punhced out this cute little flower with the Marvy flower punch and added a button to the center. I trimmed out some simple leaves from Pure Luxury Creme De Menthe and scored them in middle folding and curling them with my fingers to add dimension before adhering them under the popped up flower. I cut the scalloped border using some decorative scissors.

Don't forget to decorate the inisde! Card base is Chocolate Brown. Hope this card made you smile! :)

Next we have Nina Brackett's new set "Gleefully Yours", filled with musical images and sentiments. The first thing I thought of when I saw this set was spotlighting the microphone, by stamping it on a rectangle of white CS, then covering the middle with a mask, leaving a diagonal space open at each corner to sponge in some black ink, sponging heavier at the corners and with a lighter touch toward the mask. Doesn't this look illuminated and take center stage now? The B&W color scheme and clean lines mixed with the fancy details make for a nice art deco look.

I matted it onto Black Onyx and stamped the wavy staff behind it in Memento Tuxedo Black on White Pure Luxury. For just a hint of bling I added a silver metal adhesive dot to the microphone.


Check out the rest of our Gina K Designs team for more inspiration with these two sets and leave comments for chances to win the sets free! I hope we will see you tonight at the party on StampTV at 7 PM CST!


See you tonight at the party!!!

Wednesday, November 3, 2010

Sneak Peek Day 3: "Light of the Season" and "Heirloom Ornaments"

Welcome back to our final day of Gina K designs previews, we'll be partying before you know it! First up we have Nina Brackett's "Heirloom Ornaments", which coordinates with the Spellbinders Ornament dies. I will be the first to admit this card may be *wee* bit overdesigned, but I couldn't help myself, when the holidays are coming I gotta bring the bling! You can fill up a background with these bold graphic images quickly, here I used Vivid Inky Blue, Brick and olive and eggplant inks. One fun thing about these ornament shapes you can turn them either way, top or bottom heavy for different looks! Don't forget to add some sparkle with rhinestones and emboss the strings and toppers! Here is another view to show the sparkle. The set includes a little bow tie image but I used these different colored embroidery flosses instead to more color and texture. Cardstock is Pure Luxury Lovely Lavender, Red Hot, White and Silver Lining.

Our final set to preview is Gina K's "Free with Three" set "Light of the Season". This is a great holiday set with classic Christmas images and greetings, as well as... a menorah image and Hanukkah sentiment! I only have one person I make Hanukkah cards for, but that person is pretty important (my stepfather) so although I've never bought a complete Hanukkah set, it is SO nice to have these included when that time of year comes around! :) Traditional Hanukkah colors are silver and blue, so I started my card with Pure Luxury In the Navy, Little Boy Blue, White, and Silver Lining. These deep blues might seem a little less than radiant for "The Festival of Lights", but I'm going to use a couple little tricks to create the illusion of light.
I wanted to represent the 8 candles plus one in the menorah and I thought a gradient look with strips of paper for the candles would be perfect. I sponged the bottom of a 2" x 3" strip of Little Boy Blue CS with Inky Blue first, and then cut strips 1/4" wide, cutting the strip for the Shamash candle, which will be in the center, just a little wider. Then I spaced them evenly across my white mat and glued them down.
I embossed the menorah in Silver, filled it in with Stardust gel pen, and die cut it with a Classic Oval. A little sponging on the bottom of the focal point (not the top to create the effect that the flames illuminate above) I did the same for the sentiment which I die cut with a Classic Long Rectangle but left the embossed Hanukkah part unsponged to make the word look like it was giving off light. Just a few thoughtfully place rhinestones like flames above the candles and straight lines by the sentiment give the card sparkle and elegance but still have a clean, unfussy feel that can be very masculine.
I know my Stepfather is going to be crazy for this card! :) This is a great free set, thanks Gina for thinking of things like this!

Please see more samples of these two new sets from the rest of our fabulous Gina K Designs team!
and another fun blog hop with Carolyn King using the ornaments! :)

See you at the party at StampTV, Thursday Night November 4th, 7PM-10PM CST! Come for as much as you can, thanks for visiting today!

Monday, November 1, 2010

Sneak Peek Day 1: "A Year of Borders" and "Winter Mittens"

I am so excited to preview my newest set from Gina K Designs: "A Year of Borders"! These 5" seasonal borders coordinate with SEVEN of my previous hand drawn nature sets, which are also some of my most popular sellers:
You will love having this as an expansion to these sets, or if you have none of them, once you have this you’ll feel like you do! Since the winter holidays are upon us, today I chose the poinsettia border to make an elegant Christmas card, but hopefully you'll see a few other borders popping up today in our design team hop!
I started out with a 4"x 5 1/4" Ivory mat and then punched the bottom. I stamped my poinsettia border above it and colored with Copics (E13 and E57 for pinecones, R37 and R59 for flowers, YG23 and G99 for needles). Next I Cuttlebugged the top of the mat with the Victoria folder and sponged the edges lightly with some olive and Antique Linen ink. I adhered that to a Gina K Pure Luxury Lipstick Red base and embossed my greeting from "Festive Frame" in gold and die cut the mats with Petite Ovals.
I added two more little poinsettias clusters I'd cut out from my second stamped border and popped these up over the greetings like embellishments. I hope this sample give you an idea of how much smaller these individual images are than the ones in the original sets! Accents are Fancy Corners punched from Good as Gold cardstock and adhesive nail heads. Don't forget to add a little sparkle to the centers of each flowers with a Sakura gold glitter pen! This set will make beautiful CAS cards as well, no coloring required, but I just had to do something fancy for our peek! :)

Year round, these are stamps I know you'll reach for again and again. Stamp an entire mat with the borders to create a background in just seconds filled with intricate, already masked natural elements, use a single border to add drama to the side off your card, add one to the inside of your card or create a coordinating envelope, or snip out individual images. It is sure to become a well-loved staple in your craft room.
Would you like to win "A Year of Borders"? Leave a comment at the end of this post telling me which of my nature sets you love best and/or what you'd do with these borders first! Want a second chance to win? Copy and paste a pic of this card and link this sneak preview post on your own blog to help me spread the word! Come back and let me know, thanks in advance!
Next up we have Nina Brackett's set, "Winter Mittens". Stamps in this set coordinate with a few of the Spellbinders sets, which I know you will see tonight in our hop. I hand cut the mittens for this sample, but used a Classic Oval Nestabilities die for the label tag.
Base is Pure Luxury Red Hot and patterned papers are from the Basic Grey Jovial pack. The mats are stamped with Tami Mayberry's "In Stitches" in Memento Rich Cocoa and the tag is stamped on ivory and sponged with Antique Linen. I inked up both the mittens and label images with markers for this two-toned effect. The greetings are separate from the label so you can add the one you want.
My inspiration for this card was to have them look like they are hanging up on the wall, so I used a little turquoise Pure Luxury Button and I love how this Basic Grey paper looks like the distressed and peeling plank in a cabin.
Please see more samples of these two new sets from the rest of our fabulous team!
Nina Brackett- illustrator of Winter Mittens
Release party this Thursday night at 7PM CST at StampTV, it's not a party without all of you Gina K friends, please come!
Thank you for visiting today!

Sunday, September 26, 2010

Day 1 "Lovely Labels" and "Buds and Vases"


Welcome to September's first night of Gina K Designs sneak peeks! I know I always say I'm excited (that's just how I am about stamps), but tonight I am extra super excited because my newest set "Buds and Vases" is a must have companion to one of your favorite floral sets: "A Year of Flowers"! Squeeeeeeeeal!!! This set features *new* flowers drawn in the same style, grouped together and alone for more versatility (and to minimize the need to mask!) plus beautiful containers that will allow you to mix and match the flowers in both sets, arranging them to your heart's content! You simply won't find container stamps or vase die cuts or punches more perfectly suited for the style and scale of the images in "A Year of Flowers" anywhere else! "A Year of Flowers" has almost one THOUSAND samples in the STV gallery, and now with a matching set with vase options, you will never run out of inspiration or design possibilities! :)

This first sample uses the glass vase, colored with pale aqua Copics, a cluster of stems(no masking!) and a cluster of flowers. I made a little tag out of one of the greetings and tied it around the top of the vase with some raffia. Special delivery, indeed! DP is Basic Grey Lemonade, stamped with "In Stitches" and layered onto Innocent Pink. Gingham and button are also Pure Luxury.


Now, there are SO many ways to alter the different containers so will you have even more than originally meet the eye when you see the whole set Thursday night after our party! Here I used the same vase, but this time I inked up just the outside of the image (omitting the middle which makes it look clear) and stamped it onto a Basic Grey Junebug print. Now it looks like a beautiful painted ceramic vase!

I cut a slit following the line near the top with my craft knife and slid my stamped stems inside. Flowers are colored all over first with Cadmium Yellow and outlined with Strong Red. Go back over the blend these areas with the Cadmium Yellow. Leaves are colored first Pea Green and darkened with Moss. (These blossoms also look fabulous without any stems, just trailing out of the tops of a pot!) Although I don't have step by step pics today, I will doing a lot more coloring tutorials in the months to come for these new vases and flowers, plus more tips and tricks to the alter the containers, so be sure to subscribe or follow my blog so you don't miss a post! :)

Base is Red Hot and gingham and button are Pure Luxury.
Now to show how well these containers work with the "A Year of Flowers" blooms, I created a Christmas card, stamping and masking three poinsettias from that set, cut them out, and then stamped the pot from"Buds and Vases" onto a piece of distressed looking solid colored DP from the Basic Grey Lemonade pack, those solids are perfect for old, shabby chic pots! Adhere the flowers overlapping the top of the pot and then trace the underside of the leaves and one side of the pot with a slightly darker marker to give it dimension and shadows. Easy peasy! Poinsettias are colored with Copics and traced with a Stardust pen.
The label is from Nina Brackett's new "Lovely Labels 2", images that custom fit Nestabilities Labels 14, 15 and 16 (more about her new set in a minute!) stamped in cranberry ink on White and colored with a pink Copic for contrast in the middle. Last I matted these onto Basic Grey Eskimo Kisses DP and Cranberry Tart Pure Luxury and added some buttons and lace using glue dots.


This next card in Pure Luxury Red Hot, White and Black Onyx also uses Nina's "Lovely Labels 2", her second edition of beautiful labels and greetings designed to fit some of Spellbinders hottest new dies! First I stamped the label in Vivid Brick and cut it out. Although I do plan to get each of these new die sets, I want you to know if that is not in the budget I found these shapes with their curves are very easy to free cut just following the outside or leaving a small border, if its not perfectly 1/8" around you won't notice like you would trying to cut out a perfectly symmetrical circle, KWIM? Just sayin', if you start out with 3, 2,1 or none of those dies at all you can still go to town creating immediately with all the label images in the set! (but, as you know, dies make it soooo much easier!)

I added one of her sentiments and embellished it with this popped up spray of blooms, also from "Buds and Vases". These flowers are also one image, so no masking! Don't they complement the floral pattern on the label beautifully? Card is finished with some 5/8" gingham and a Pure Luxury red button.


Now I wasn't planning on these originally for the preview, but your many comments about the jar snippet (yup, I drew it and it's in this new set!) on Gina's blog last week inspired me to go to stamp up several jars and get busy filling with them different Gina K Designs sets: shells, strawberries, and caterpillars, oh my! A few were possibilities I hadn't really been thinking about yet, flowers came first LOL! I haven't had a chance to make them into cards with all the preview we are busy preparing for you this week, but you can see the style and scale of the jar is just as appropriate for flowers as it for sets like "Gifts from the Sea", "Have a Cookie", "A Year of Leaves", Gina's strawberries from "Enjoy the Sunshine ", Tami's "Happy Hearts", and I know many, many more! how's that for a versatile stamp? And, you can also see how you can color the top to make it look like it has a lid, I love that option!


Want to win "Buds and Vases"? Leave me a comment below telling me which of the samples above is above is your favorite or what you would do with this set first!

Want TWO chances? Help me spread the word, because there are so many people out there who own the first set that will want the second! After leaving a comment below, copy and post your favorite sample of mine from above onto your blog, along with the following info and a link back to this preview post:


"Melanie Muenchinger is releasing a companion to her "A Year of Flowers" called "Buds and Vases", a die cut stamp set filled with brand new flowers and containers, this Thursday night, September 30 at 10 PM CST from Gina K Designs! Be sure to check out her sneak preview of the set on her blog and enter for a chance to win the set!"


Then, come back here and leave a second comment with a link to your post so I know you did so! Thanks in advance for getting the word out to your readers (friends don't let friends miss out on stamps! ;) I will choose a winner from all the comments and post it here Thursday before the party!


For more samples with tonight's new stamp sets, please visit these participating designer's blog links:


Thank you for visiting me today, more previews tomorrow!

Sunday, August 22, 2010

Sneak Peek Day 1: Wild at Heart, Fanciful Tags, and Grand Damask

Welcome to our first night of Gina K Designs Sneak Peeks! First set we are peeking is my "Wild at Heart", a new frame set with greetings that is sure to inspire! Symbolizing beauty and freedom, wild flowers have always captivated me. Planted by the wind and often growing in difficult, unlikely places, they are as lovely to me as ones that are cultivated. Whether they are weeds or flowers is in the eye of the the beholder! My mother had a little framed flower in our home when I was younger with the sentiment "Bloom where you're planted" (which I've included in this set) which reminded me growing up to do your best with what you have where you have it. I think these flowers and sentiments are perfect for creating cards for friends and loved ones to wish them a lovely day or to give them strength in hard times. The bold background lends itself to countless techniques, new and old, and will have you reaching for some products I'm sure you have but may not have played with in awhile!
This first sample was created with a brayer and a spectrum pad, I'd been waiting months to try one of those spectrums out with this stamp! Simply ink up your rubber brayer on the spectrum pad then roll over the frame til you've inked the entire image, and stamp! I love the beautiful blended look this creates and how the white flowers and stems pop out! If you don't have a spectrum pad, you can roll your brayer over a couple different pads to create a two tone look or use your sponges to daub on whatever colors you choose in the areas you want. Cardstock is Grass Green and White.

This next card I took advantage of how the vines split the frame into different sections like panes of glass, so I created a stained glass effect by coloring the different sections with markers.

Although it is difficult to see on the red rubber because I chose warm tones, this is a completely inked up stamp after coloring with my Memento Markers, it goes faster than coloring paper because the ink just glides over the rubber, you can go quickly without having to worry about going outside the lines, you just stop when you hit the edge LOL! Hopefully you can can see the dark and light areas, I hopped around so that the the same colors would not be touching each other, with Memento Angel Pink, Potters Clay, Canteloupe, and Rhubarb Stalk on the background, and Lilac Posies for the flowers.
I went over the border too before stamping with a black marker before stamping to make it pop. I added some yellow and orange Doodlebug glitter tothe centers. I'm in love with this look!

Just like in "Inspiration Mosaic", there are "open" areas in the pattern which are natural places to add a greeting to I've done in the sample above, but you can layer a sentiment or image over the flowers as well. Cardstock is Sweet Corn and Black Onyx.


Here I made a quick gift set of cards in different colors, these were SO quick and simple to make!
I stamped the frame directly onto Pure Luxury White in different colors and placing a small square of white onto the middle of the stamped off frame before cleaning it to get the lighter shade. Then mat it with a coordinating color, add your greeting and line it up over the frame to match up the flower images. Easy peasy!

I purposely kept today's cards simple and only used this set in creating them and used almost no embellishments and very few layers to show how few supplies you need to create something gorgeous with this set, but I've made about 20 cards with it so far and haven't done the same technique twice! I really look forward to sharing how you can use your other stamp with "Wild at Heart" and go deeper into techniques after the release (kissing, anyone?), it is so versatile! :) To read more about how I came up with this set, read this post.


This next peek uses Nina's "Fanciful Tags", a set of three images to fit the Fancy Tags Nestabilities Dies, plus oodles of sentiments to fit in each. This is a wonderful stand alone set that you can use to create a greeting tag for any other stamps you have, the classic fonts will match everything. Below I used the "Just Because" over my "Wild at Heart" frame, this time I traced over just the border, flowers and stems with Memento Markers , spritzed with water and then stamped to create a water colored effect. Cardstock is Pure Luxury White, Pumpkin Spice and Chocolate Brown, ribbon is Stitched Last, we have Nina's"Grand Damask", which is a wonderful stand alone set as well, with flourishes and a large design element that will make all your cards look extra fancy inside and out. I have been waiting for a great flourish set from Gina K Designs, and this really fills that need! Here I used Pure Luxury Black Onyx and Ivory, stamping the damask and a single flourish in Memento Tuxedo Black ink.

I stamped the rectangle border and greeting from "Fanciful Tags" onto Ivory and trimmed it out to layer the Black Onyx Fancy Tag die cut. I used a border punch for the side and embellished it with just a few adhesive pearls.


So elegant!


For more samples with the stamp sets being previewed tonight, please check out these participating designer's links:


You are invited to join us for our Release party this Thursday night, August 26 from 7-10 central time for contest questions, challenges, and chatter along with tons more samples! The party leads up to the new products featured this week on our blogs being available for purchase online through GinaK Designs at 10 pm. We hope you'll make plans now to be able to join us in all the fun! More peeks tomorrow, thank you for visiting!

Sunday, August 1, 2010

Blast from the Past Day 1

This week the Gina K Designs team is pulling out some of our favorite sets of the past from every illustrator, which promises to be a week long celebration of "greatest hits"! First up, I chose to use my "A Year of Leaves" set. Although I use these leaves and sentiments year round on masculine and sympathy cards, this set really works overtime when Fall comes, there's nothing I like to stamp and embellish my cards with in late Summer and Autumn than beautifully colored leaves!
Here I just used one leaf image from the set and the simple greeting "Thanks", in one of my favorite fonts of all time! These small greetings are perfect for making tags, and I love how this one turned out, using a Labels Eight die on Pure Luxury Ivory, then punching a border punch on all four sides and stamping the word in the middle! I scored the background in a diamond pattern for more interest and texture and added some stitched ribbon and brads. Base is Wild Dandelion. Popped up, these leaves look like they are gently drifting to the ground...

I also like using them with favorite floral sets, here the same leaves and another greeting take the set "A Beautiful Life" from Spring to Fall...
Drawn in the same style and scale as "A Year for Flowers", these sets are just perfect for mixing and matching!

And just to revisit a few of my faves I've made with the set (which are now coming back around, so to speak!), here is a card and matching acorn and leaf earrings I created that are currently featured in the "Stamping Savvy" section of the newest issue of CardMaker Magazine (p.28-29) These are definitely some of my favorite images for Polyshrink!
"A Year of Leaves" was also featured in the recently released book "Interactive Cards". This is probably one of my favorite projects ever! The little caterpillar image from the set morphs into a pop up butterfly (this butterfly is from "Take Flight", a favorite Gina K set from the past!).

I've also had several designing friends offer to share new samples they've created with some of their past favorite sets of mine, thank you SO much ladies for sharing your talent again with us today!

Brenda Turner

Carla Suto

Carolina Buchting

Geri Utterback

Karen Knegten

Libby Hickson

Linda Payne

Melissa Shultz

Selma Stevenson

Sharri Seffens

Sue Van DeVusse

Tina Gilliland

Next, we have one of my favorites from Nina from last year: "Lord of the Season". I stamped this fall topiary in Vivid Coffee Bean and colored it with with earthy Copic colors inspired by this beautiful Basic Grey Indian Summer print. Those little spots are color are perfect with the tiny details of the fruits, flowers and leaves in the wreath. TIP: when coloring a wreath, select several colors but just use one at a time, putting that color in several different places to balance it out and draw your eye around, so you won't have lots of clumping in just one area, before moving to the next.
Cardstock is Pure Luxury Pumpkin Spice, Chocolate Brown and White, which is sponged around the edges with Wild Honey Distressing Ink. I used a Nestabilities border die and some Pure Luxury ribbon for the bottom. I would have liked to match it to the pink I colored the ribbon in the image but didn't have anything like I thought! good thing there were lots of other colors to choose from LOL! I just love breaking out all these fall colors! It's been a long, hot summer!


And finally more 'Blast from the Past' Gina K Designs stamp sets, check out these participating designer's blogs:


The entire GinaK Designs team would like to invite you to the virtual Release party we'll be having this Thursday, August 5th on StampTV. It will be a bit different than our usual release party, but we'll still have challenges, contest questions, and designer samples that you won't want to miss out on! More information on that event will be shared by GinaK soon, so stay tuned to her blog for all the details this week!

Wednesday, July 21, 2010

Stained Glass Hummingbird

Hello! I've been meaning to ink up this hummingbird from "Hugs and Prayers" , and all I see when I look at it is stained glass so I wanted to create a little round window so to speak by tracing a Circle Nestability I placed over the stamped image on white and tracing with a black pen to frame it up. TIP: Find a size die that just fits your image allowing it to touch on three or more sides or places like it is connected to the panes. Using the Nestability allows you to see inside the die for positioning the image the way you want.
I colored it with Copics, but didn't go for a smooth Copic look this time, instead mottling the colors by using two or more shades in dabs and removing color with the blender to give it a spotty swirly look like colored glass. Then I covered the whole die cut with Versamark and embossed with white Iridescent Ice EP. Love the sparkly and texture that created, looks like the real thing, wish you could see it in real life as a completely glitter colored image is so hard to photographed but still show all the colors! I stamped some of the flowers from the set on the Innocent Pink mat and sponged the sides with coral ink after coloring the flowers. Other card stock is Pure Luxury Ocean Mist and Black Onyx. Flourish punches in Grass Green and a sateen Copic colored flower and a rhinestone finish the card.

To be completely honest, I made this before Brenda posted her Inspire Stained Glass Challenge, but it fits so perfectly I will be tagging it in the gallery LOL!

Have a great day! Blog hop coming up tomorrow night! :)

Thursday, July 8, 2010

Special CAS: Just Around the Corner...

Here is a pretty clean and simple card made using Nina's new "Hugs and Prayers" flower, colored with Copics (Coral, Strong Red and Cardinal for the flower, my favorite red combo!), I used Gina's trick of having my image overlap the long rectangle Nestabilities, click here for the video on how to do that. Today's TIP: When getting a new set of Nestabilitlites dies, and you have the choice of Large or Small, start with Large! Although you will probably want to go back for the other size later for creating 1/8" mats for your other set (which I always do) I find I use the largest dies in the set more often than the smallest dies in each set, and the very smallest ones , sometimes not at all unless I'm making a tiny tag. It's nice to have larger scale dies for framing up larger images, IMHO! After sponging some yellow ink for a warm glow into the top and bottom corner using my die as a stencil, I then matted it onto Black Onyx and added some pop dots to the back.


The greeting is from Asela's new "Pretty as a Peacock", and the "You're Special" wraps around the corner of a peacock square. I thought that would be a fun way to add the greeting around this flower but you don't even need to omit the image part: just stamp on your card, then place your matted focal point (needs to have a right angle corner like a square or rectangle) to fully cover the peacock up. That's it, just add ribbon! This dandelion 5/8" gingham is one of my favorite new Pure Luxury ribbon wraps form Gina K, I hope you put at least one in your cart! It's just so cheerful and look so sharp with black white and a pop of red!


Thank you for visiting today, your readership and comments are very special to me! :)

Tuesday, June 29, 2010

Day 3: Hugs and Prayers and Seeds of Kindness

Day 3 of the peeks and it's almost time to party!! Today we start off with Nina Brackett's "Hugs and Prayers", a set with both bold and line art images like two steps or separates to suit your stamping fancy plus beautiful scriptures. I started with this lovely bunch of flowers, delaicate but with a modern feel on a Labels Four die cut, colored with Copics, and layered onto a Labels Eight die cut from Grass Green. Sponging around the edges the flowers before removing the die gives them a wonderful glow.
Sentiment is stamped on Wild Dandelion and sponged with Vivid Brick Red, I layered these over Red Hot and Little Boy Blue, both Cuttlebugged with the Victoria folder. Ribbon was from a StampTV kit (and I'm crossing fingers this will be one of the new Pure Luxury Ribbon Wraps!) I added a red button over the knot with a glue dot. I am just lovin' these colors together!!

The next peek uses Gina's "Seeds of Kindness". This sweet flower pot is my favorite! I colored it with Copics and layered it onto Red Hot, Innocent Pink and Grass Green mats, totally diggin' these colors too! I used the Labels Nine this time and I really like how these dies look offset this way.

I also used the scalloped corner punch and this new Nestabilities Classic Scalloped Border Petite die, which was perfect for threading my ribbon through! More red buttons, I am counting the minutes to buy an assortment of the new button containers, how about you?? I was going to use some patterned paper behind all this, but in the end decided the plain Pure Luxury White really made the image pop! this is a beautiful set! :)


For even more samples with the stamp sets being previewed tonight, check out these designer's links:


We'd also like to invite you to attend our Release Party this Thursday, July 1st starting at 7 pm central on StampTV! There will be challenges, contest questions, and more samples from our designers on all the new stamp sets being released this month! We'd love to have you join in on the fun!