Showing posts with label Duos. Show all posts

Friday, December 2, 2011

Inspiration Hop, Day 3: "Inspirational Blocks", "Butterfly" and "Just Calling to Say" Duos


Happy Friday, and thank you for joining us for our third and final day of Inspiration Hops for our November Gina K Designs release! Today we are showcasing the "Free with Three" set and to more new duos. "Inspirational Blocks" is a very versatile set, the bold images are perfect for so many different stamping techniques, so get your ink pads ready! Here I stamped this leafy block three times in Frayed Burlap Distressing Ink onto Pure Luxury White, turning the block each time after re-inking to create some different angles with the leaves. (Three blocks on a card is always a recipe for success!)

Next, I stamped in out three more times on another piece with Faded Jeans, Fired Brick and Crushed Olive Distressing Inks, then punched a 1 1/4" square out of the center of each. I popped each of these up over the blocks on the strop lining up the images. I mounted the strip on Soft Sand and then a scrap of Basic Grey Curio, and adhering it all to the Pure Luxury White base. Sentiment is also stamped in Fired Brick, I put that red block at the top to balance out the greeting at the bottom.

Next we have this "Master Butterfly" duo. I love this quote and actually have this same sentiment one of my sets, but this font is so different: here, instead of a sympathy greeting, this end of the world quote is more whimsical, and I thought would be really appropriate for those daily life disappointments that seem like the end of the world in the moment but just days later (or even later that day!) are really no big deal, know what I mean? So I wanted this card of encouragement to have some seriously happy colors: Passionate Pink, Key Lime, Blue Raspberry and Sweet Mango. I created a color block by stamping the butterfly in the center of these three different scraps of paper, cutting them into thirds and then piecing them together, leaving division in between.

Next I used the unused pieces to cut out the three separate parts of the body and create a reverse effect, gluing them over the contrasting colors. So it's a little spotlighting little split negative, little pop art! I like how this conveys the change and growth. (I have actually been doing a terrific Bible study this semester called Jonah: A Life Interrupted by Priscilla Shirer, the main theme of the study is that is that life's interruptions are really divine interventions and if we allow them to be, amazing opportunities, I highly recommend it!) Finally I applied a layer of Crystal Stickles over each. Base is Black Onyx.
Our last duo is this adorable "Just Calling to Say", the kind of retro style and shape of the phone had me reaching for this cute Echo Park Holly Jolly Christmas number patterned paper, numbered backgrounds are always fun for birthdays (although, ahem! all my friends are older than 25 now lol!) and this one for a Christmas birthday especially! I stamped the phone in black first and then stamped it again in red to cut out and pop up over the first.

I used some tiny adhesive rhinestone on every other number in the dial and free-cut my own word bubble out of Grass Green cardstock for the sentiment to come blasting through the phone! :) Heart cut with a Cuttlebug die from Lipstick Red Pure Luxury, base is Chocolate Brown. I also used a small corner rounder punch and Classic Circle Nestabilites.
Thanks very much for visiting today! Be sure to leave lots of comments along the way, you could win a grab bag of 12 stamp images from Gina K Designs, the more you leave, the better your chances of winning!

I hope you have a great weekend! We'll be putting up our tree, decorating the house and lots of other fun festive stuff! See you next week!

Thursday, December 1, 2011

Inspiration Hop, Day 2: Dogwood and Butterfly, Label Borders, Friends are Flowers Duo


Welcome back to our November Inspiration Hop with the newest sets from Gina K Designs! First up we have this beautiful set "Dogwood and Butterfly" from Theresa Momber. I love this frame, already embellished with a garland of dogwoods and a space to add your greeting! I stamped it on white and colored with Copics. I referenced some pics I found online with just a hint of peach on the tips to color them, this Basic Grey Curio was perfect to go with! They have really deep veins and grooves in the petals, so I added stripes of gray for shadows. Last I sponged with some Frayed Burlap Distressing Ink, traced here and there with a stardust pen and adhered it behind this popped up Grass Green window cut from a Classic Oval and a Beaded Oval Nestabilities. Card also uses Cuttlebug "Grace's Frame" embossing folder and adhesive pearls, and Ivory and Chocolate Brown for the base and layering.

Next up, we have this fun set of bands with tags "Label Borders" by Tami Mayberry. When I first saw this set, I saw borders, but when I pulled each one off the backing and onto the binder sheet I saw they could almost wrap around my wrist... and that got me thinking about... WATCHES! (I just couldn't share it at the party, wanted to save it for a "hee hee" moment in our hop!) ;) hee hee

After stamping each on different Pure Luxury Cardstocks (Bubblegum Pink, Moonlit Fog, and Key Lime) and cutting them out, stamped them again on white to make the faces from the label part and drew on some simple numbers and hands with Memento markers to show different times during the day ("GREAT day!" all day! ) to go with the greeting. I added a little bling with some adhesive rhinestones and a silver nail head. I stamped "great" on pink and popped it up to make that corner a little more interesting. :) Base is Black Onyx.

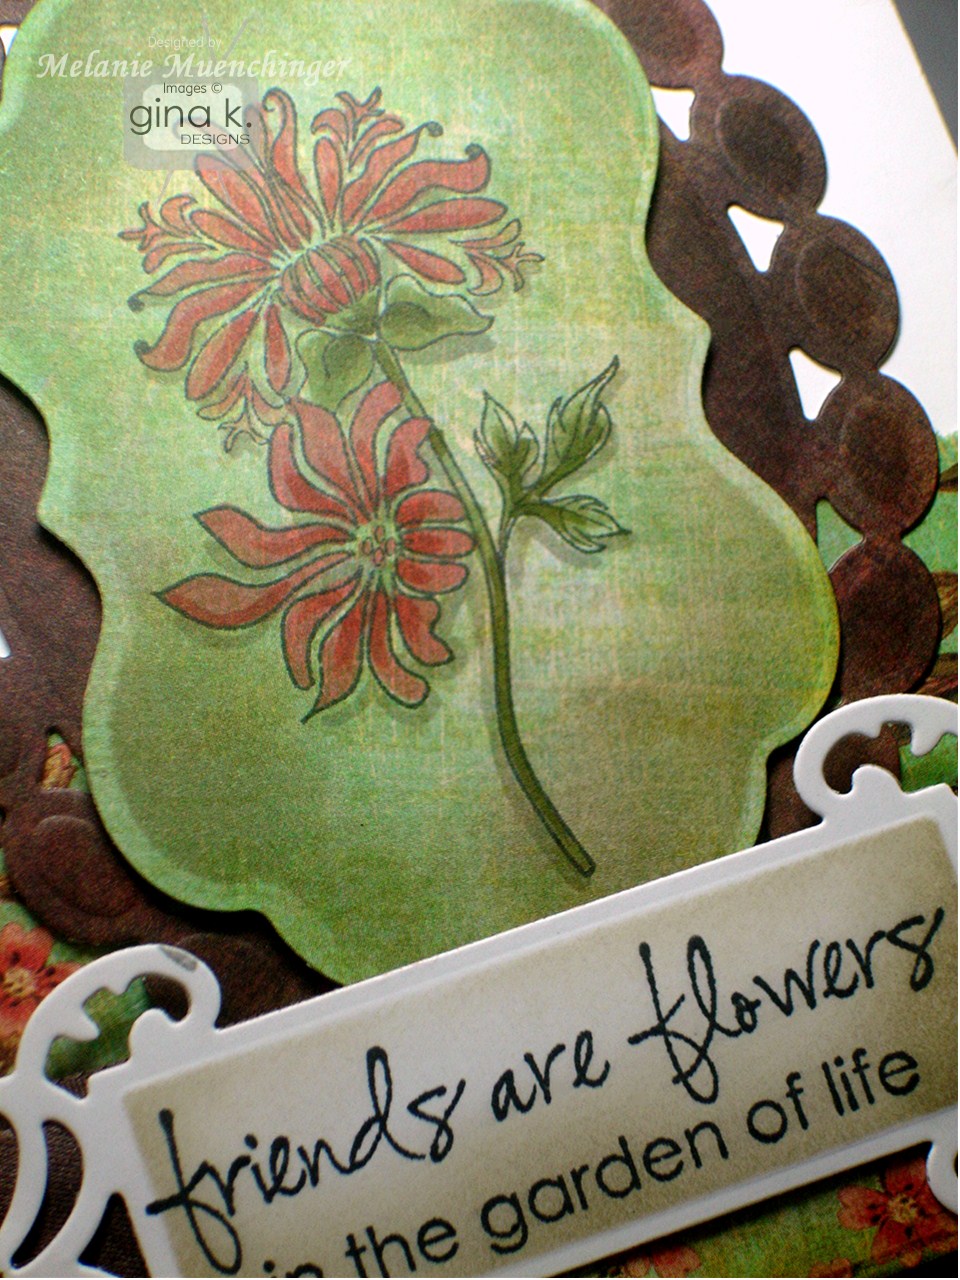
Last we have another duo: "Friends are Flowers". I colored this image with Copics (R05, R22, G12 , YG97, and W3 for shadows) but instead of stamping on white I used a piece of green DP from Basic Gray Curio pack to change it up! I cut it with a Labels 14 Nestabilities and sponged on just a little Frayed Burlap before removing the die.


I placed this over a Beaded Oval Nestabilites cut from Chocolate Brown. Patterned paper is also from the Curio pack, a perfect match for this image! The greeting is stamped on a Fancy Tags 2 and attached with mini brads. Base is Pure Luxury White. I love the contrast of the bright white with all these distressed elements!

Thanks very much for visiting today, and please come back tomorrow for our final Inspiration Hop this month! Be sure to leave lots of comments along the way, you could win a grab bag of 12 stamp images from Gina K Designs, the more you leave, the better your chances of winning!

Thank you for visiting! Wishing you a great day!

Wednesday, November 30, 2011

Inspiration Hop Day 1: "Stately Flowers 1", "Make a State-ment", "Close Kit Friends" and "Because of You" Duo


Good morning!! Thank you for attending our party last night and welcome to our first day of Inspiration Hops with the Gina K Designs team! I have to say, I love all my sets in their own way, but I am especially thrilled to bring you this month's "Stately Flowers 1" and "Make a State-ment", introducing the beginning of a series that has been one of my all time favorite experiences illustrating! I spent several weeks drawing all the different state flowers and I can't tell you what a pleasure it was to research all these glorious florals, studying hundreds of photos each, wanting to them as detailed and accurate as possible, many of which I'd never seen or heard of before (having only visited certain regions). What an amazing time of discovery! With the music turned up as I drew, it was like making a cross country road trip with the top down and everything in full bloom!

Collecting these sets over the next year will be like a journey of your own, enjoying so many fantastic and unique flowers America has to offer!* Whether a set contains a flower for your home state or a friend or relative's state or not, I know you will enjoy these detailed botanical illustrations for coloring or just making some really pretty cards for anyone, anywhere! Here I swiped that same piece I used from the CAS card with Frayed Burlap Distressing ink and added a star I cut out of a piece of moonlit Fog CS embossed with Stars Cuttlebug folder. Card also uses Kraft, Red Hot and In the Navy Pure Luxury.

I think you'll also really like the shading in these images which makes coloring a snap, it helps show where to put the darker colors, or even easier, for example just use one shade of green on a stem if you have a more limited supply of coloring media (and/or want to save time), the darker rendering in the image will make your color in these areas appear darker when you add them! Flowers are my favorites to color so I'll be sharing lots of tutorials for them here, come back often, because all four of these new beauties come in LOTS of different colors!

I've lived in Texas my whole life and have only had the opportunity to travel to a handful of other states, but the friends I've made here over the years have spread across the US. I am so excited to have these set to really personalize cards for them to honor where they live now and send them sweet memories of where they came from, as well as create special cards for cyber friends I've never met in their great states, it's a little bit like getting to visit them referencing the map (my geography isn't the best, so there are a few instances I have to check and make sure which state is which) or coloring a native flower!

I think "Make a State-ment" is such a versatile set, and I"m really excited because while lots of guys aren't into flowers generally ALL guys LOVE MAPS, this is going to be a great image to own! My 6 year old William said "I love this one so much I have to color it RIGHT NOW!" and he sat down and used a different Copic for each state (then left them all out on the desk, booo!) Fifty colors took awhile, but there are SO many ways to highlight just the state or states you want, with paper piecing or these little elements in the set: thumbtack, arrow, etc. TIP: The greetings are much more versatile than at first glance also, because you can omit inking the "in" or to" and the end of each if you want to just stamp a card saying "have fun" or "Come see us", no state required! :)

This card uses Soft Sand cardstock, again the top panel is sponged with Frayed Burlap and some Vintage Photo. Map is stamped in Versamark and I used a lavender Copic to fill in Colorado. Columbines can be almost any color, but I colored this one to match the Rocky Mountain Columbine, which is the official state flower. Nestabilities die is Labels 14, sponged with Wild Honey Distressing Ink.

We've also created a free set of 50 free pdfs, one page for each state, that you can download from StampTV to use with both these sets. This way you have every state name, in different sizes and fonts, for smaller tags, cards, or large scrapbook pages to use with the "Make a Statement" set and flowers right away, rather than having to wait for your particular "state" to come out!

Here you can see I have stamped a few of the greetings from "Make a State-ment" and framed them with some random Nestabilites, they will work with any shape. The one on the right side stretches across a card front like in the Texas sample, the one across the bottom is perfect for an 8 1/2" x 11" or 12x12" page border, and I've allowed for a generous amount of room around the remaining smaller words on the page so you can do larger cropping with images in different ways.

Last we have some stamp duos! The first uses this cute little dancing silhouette "Because of You", it reminds me of a Ty Wilson print I had on my wall in the late 80's early 90's! ;) Instead of a silhouette, I decided to do a bunch of Direct to Stamp coloring on the image with my Memento Markers: Desert Sand for the skin, Angel Pink for her dress and Ladybug to draw on some flowers and ink the shoes, Rich Cocoa for the hair. I did this in two layers, stamping twice and cutting to make on tuxedo dimensional. Don't forget to huff on the image before stamping to moisten the ink!

You can take the fine tip of the marker to go over any areas you want darker or add more detail, I also used a Sakura glitter pen for some sparkle and a rhinestone for her little earring. :)

Then we have the "Close Knit Friends", I thought it would be really fun to put this knitting basket with this stocking paper from Echo Park Holly Jolly Christmas and color all the yarn balls to match. Cardstock is Turquoise Sea and Lipstick Red, I added some Pure Luxury buttons and little bit of bakers twine.

Thank you very much for visiting and please enjoy the hop! Don't forget to lave comments along the way for a chance to win a grab bag full of 12 different stamps images from Gina K Designs, the more comments you leave the more chances you have! Comments will be drawn randomly and Gina will announce the winners! (While you're here, why don't you tell me where from!) :)

*How did I choose which to start with? Well, as you know I live in Texas, my relatives live in California, and I know a couple special people in Wisconsin and Colorado! ;) Future sets will be a combo of states large and small, with a good mix of very different looking blooms!

Friday, November 25, 2011

Black Friday Special from Gina K Designs!

Ready for a great special and some shopping? You know Gina wouldn't let the day after Thanksgiving go by without serving up something extra fun for you! Check out these extra freebies duo stamp sets you can get today only when you spend $50 or $100 or more at Gina K Designs on any products you choose! (Plus, don't forget you will still earn "Free with three" set if you buy three sets of stamps!) So which are you favorites above? I'd love to know! Get the top two with $50 or all with a $100 purchase! Collect them all! :) It's a great time to stock up on cardstock and consumable as well as cross some of those stamp sets off your wish list or get gifts! (Can Christmas really be only one month away, eek!) Happy shopping! This special ends at midnight, so don't miss it!

I hope you all had a terrific holiday yesterday! Feel free to share here what some of what was on your Thanksgiving menu, I'd love to know!