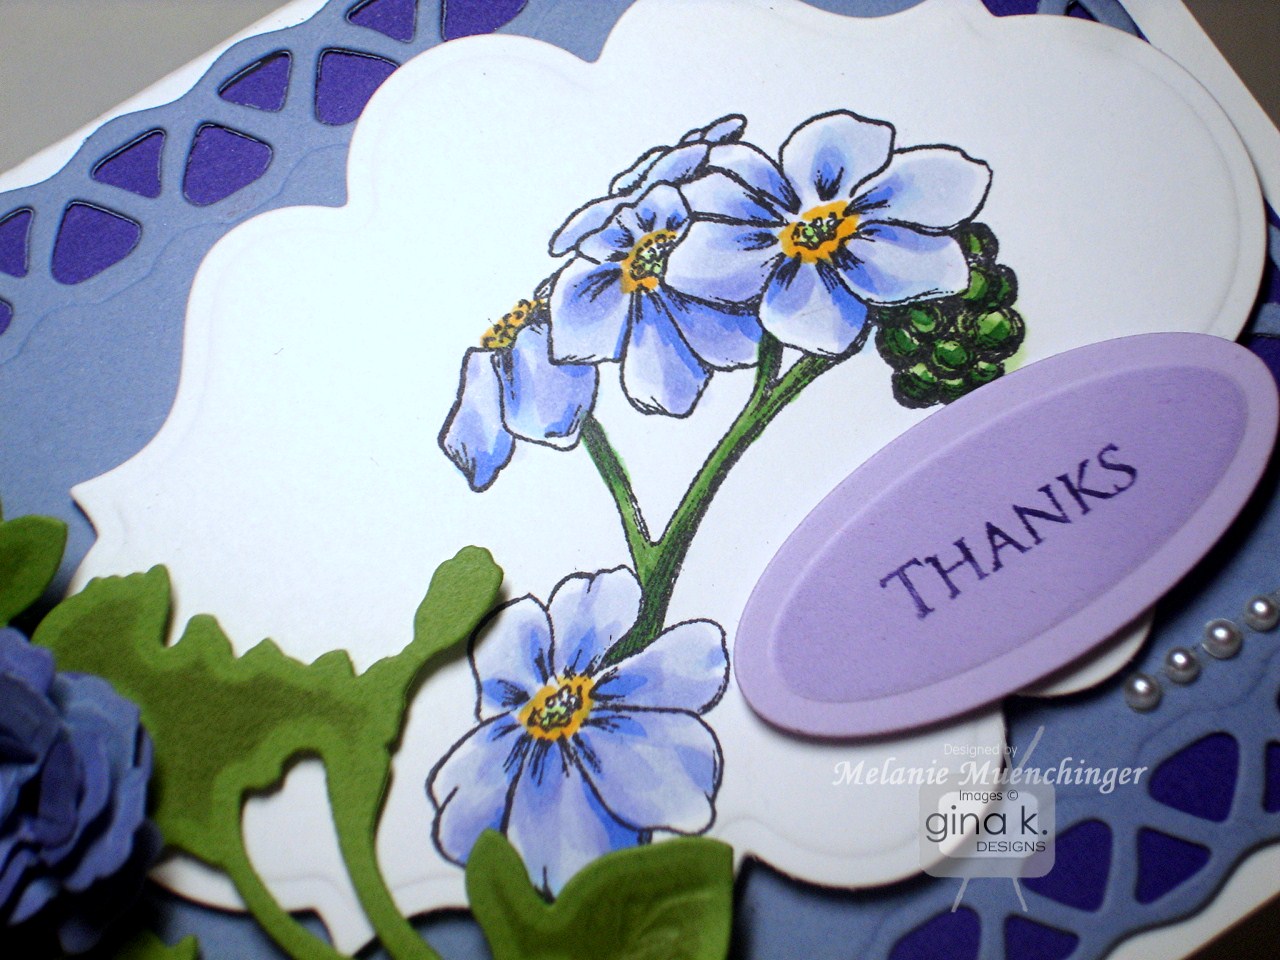
Hello! Here is another card for Stately Flowers 5 at the release party!
I got several questions about what I did here. Cardstock is Gina K Pure Luxury Kraft, Black Onyx and Wild Dandelion. I love coloring on Kraft to achieve a certain look. Just keep in mind when selecting your shades that the colors will darken quite a bit when you go over darker cardstock than white. Also, a darker marker like this Putty Copic might be normally be too dark for a shadow on white CS, but it is perfect on Kraft, looking more like a W-3 or W-5. just trace the undersides of the image, easy peasy! To have the leaf sticking out the edge just trim on the edges of the leaf inside of where the outer edge of the mat will be cut by the die, top and bottom, then have this part sticking out above the die before running it through the machine. Such a cool trick! I love this ginormous image!
I can't remember now if we shared this clearly or not, but Theresa
smacked me with a challenge throw down that I use eyelets somehow on one
of my samples, I believe it was... the *day* before the release? (last release she hit me with the crimper) So she inspired the whole card with just that one prerequisite, can you believe? Anywho! After adding some yellow eyelets with my Crop o Dile to the corners of this Matting Basics B die cut (sponged with Antique Linen), I looped some copper metallic cord that I've had for ages through both corners and secured on the back with pop dots. (If I was going to throw on an embellishment I seldom use, I figured I'd best try to get a little creative with how I worked with them, or at least something a little less expected from me: copper, no tie or bow, around the corners, check, check, check!) Take that, Theresa! hee (By the way, has she posted HER eyelet card yet? I have to go see...)
Okay, I'll be honest, we are having our team inspiration hop for this set on Monday, and now that I've "shown you all my cards" (heh heh!)...what should I make for you?? I'm open to suggestions! :)
A woman who works with her hands is a LABORER; a woman who works with her hands and head, a CRAFTSMAN; but a woman who works with her hands, her head and her heart is an ARTIST. ~ Louis Nizer
Showing posts with label Spellbinders. Show all posts
Tuesday, October 23, 2012
Friday, October 19, 2012
Stately Flowers 5 Now Available
Good morning! Hope you are able to check out the release party threads (and enter the contests!) if you weren't able to make it last night! All the new products including Stately Flowers 5 (clear and rubber) and the matching Silhouette cut file are now available to purchase from Gina K Designs. Here is the full reveal of my set. Which image from this new set is your favorite?
Here is a card I shared at the party, simple, easy to mass produce, no coloring! Gina K Pure Luxury White, Cherry Red and Fresh Asparagus. Isn't this Spellbinders Framed Fancy Tags Two die cut gorgeous?
Here is the first version I made of this card, before I added the punched fancy corners. I go back and forth, loving the blinding white, but also the added color of the punches...! Which version do you prefer?
Have a fantastic weekend!
Here is a card I shared at the party, simple, easy to mass produce, no coloring! Gina K Pure Luxury White, Cherry Red and Fresh Asparagus. Isn't this Spellbinders Framed Fancy Tags Two die cut gorgeous?
Here is the first version I made of this card, before I added the punched fancy corners. I go back and forth, loving the blinding white, but also the added color of the punches...! Which version do you prefer?
Have a fantastic weekend!
Thursday, October 18, 2012
Illustrator Hop and Release Party Invitation
Good morning! The Gina K Designs team is readying for tonight's October release party and the illustrators are giving you another peek today at the new sets coming out this evening! Here's just a taste of what you'll be seeing from each of us. I really hope you will join us tonight for Gina's newest StampTV video featuring the new sets (and cardstocks, and embellishments, oh my!) and the contests, prizes, new samples and chatting with the teams and StampTv friends!
Here is my sample with the newest addition to my Stately Flowers series, Stately Flowers 5. I had to give you Oklahoma's Mistletoe in time for Christmas! Isn't that sweet? Change the color of the berries, and this little of sprig of leaves will add a lovely touch of nature to your cards year round.
Supplies: Gina K Pure Luxury Kraft, Red Hot Cardstock and Spellbinders Matting Basics B set.
Memento Cottage Ivy, Lady Bug, Espresso Truffle (for stamping image) and Copics YG03, YG23, YG67, and YG93. White Opal Liquid Pearls
This set also contains the flower South Dakota proudly claims: the Pasque Flower (also known as Pulsatilla, or Wild Crocus. Did you know Pasque means Easter?) Love the showy bloom with the prickly stems, a survivor that thrives gracefully in the wild! I used the matching Stately Flowers 5 cut file for the Silhouette Cameo on the flower, also available tonight.
Supplies: Gina K Pure Luxury Lovely Lavender, Wild Heather and White Cardstock.
Spellbinders Hexagons, Memento Tuxedo Black and Sweet Plum. Copics V06, V09, V17, Y06Y19.
White Opal Liquid Pearls
Can't wait for you to see the full reveal of Stately Flowers 5 tonight at 7 PM CDT! All new products will be loaded to the store at that time for you to get your shop on!

Now please hop with the rest of our illustrators for peeks and inspiration for ALL the new sets:
Gina K
Becky Oehlers
Beth Silaika
Melanie Muenchinger (you are here!)
Tami Mayberry
Theresa Momber
See you this evening at the party!
Wednesday, March 28, 2012
What Butterfly? Tutorial
Good morning! In an effort to come up with something really creative with my Wild Flowers set for you today, I discovered another really fun way you can use those butterfly images in the set: make big, showy leaves for the flowers! Leaf clusters are already included in the set, but these have a different shape and size and the detail inside the wings adds a special touch, and so simple to do.
Here I inked up the larger butterfly with a Memento Pear Tart marker and then added a few streaks to the center with Memento Bamboo Leaves marker and stamped.
Cut out. Snip each butterfly into four separate leaves, or two V shaped clusters. Slip under your flower and arrange as desired. Doesn't this double blossom look terrific?
The flowers are stamped four times with Memento Angel Pink and cut out. Stamp the separate dotted stamp into the centers inked with Memento Tangelo. Curl edges with fingers and mount one on top of the other with pop dots. I added a bit of Crystal Lacquer to the centers and sprinkled on bit of Doodlebug orange glitter before it dried.
Finally, Splendid Circles are definitely one of my favorites of the new Spellbinders die sets, can you believe all that pizzazz and detail you get from just one die cut?? I layered a Black Onyx Classic Circle behind it to make the details inside pop more. Pure Luxury White base is embossed with Cuttlebug Leafy Branch folder.
Hope you enjoyed this simple tutorial! So excited to have all these new "leaves", more stamps, yeah! You'll never look at those butterflies the same again! :) Readers often ask me how I come up with out of the box ideas like this, and truly I often don't see them when I'm designing the set at all. It's only after I am stare at the piece of rubber and just start seeing shapes rather than the whole. Try it, you might be surprised and delighted with what you find! ;)
PS See that linen-looking mat under my work? It's from Scor-pal and I love this Stay Put Craft Mat! Will come back with a post all about it, but it is so terrific for my work surface as well as staging photos for my blog, LOVE!!
Hope you enjoyed this simple tutorial! So excited to have all these new "leaves", more stamps, yeah! You'll never look at those butterflies the same again! :) Readers often ask me how I come up with out of the box ideas like this, and truly I often don't see them when I'm designing the set at all. It's only after I am stare at the piece of rubber and just start seeing shapes rather than the whole. Try it, you might be surprised and delighted with what you find! ;)
PS See that linen-looking mat under my work? It's from Scor-pal and I love this Stay Put Craft Mat! Will come back with a post all about it, but it is so terrific for my work surface as well as staging photos for my blog, LOVE!!
Labels:
Gina K Designs,
Recommended,
Spellbinders,
Tutorial,
Wild Flowers
Saturday, March 10, 2012
Catching up with Sherry Cheever and Stately Flowers 2
In case you haven't had much time to surf your favorite blogs this week, I want to make sure you don't miss the amazing designs of the amazing Sherry Cheever using "Stately Flowers 2"! Living in Kentucky, I am so glad she has the state goldenrod in her talented little hands! :) Delighted to see her own spin on these flowers, Sherry always does "shabby" so well!

Blue and orange are complementary colors, so these dirtied up vintage versions of pumpkin and aqua work so well! It looks like the flowers are embossed in gold and then colored (but you'll have to check with Sherry to be sure!), such a fabulous look!
And I am so partial to the girliness of this hawthorn card, don't these flowers look fabulous in pink? Love the double matting of the dies behind the image with the Spellbinders Classic Circle in black and Tear Drop Circle in pink. Something else I love about seeing others use my stamps, often hen I draw something one way, I don't always think to turn it in a different direction when I stamp (it has a "this end up" for me lol!) so when I looked at her card and saw these flowers tilted to the right it just takes on a whole fresh new look! :) Wonderful dotted paper, too, think it is a terrific choice with the tiny flower centers.
Hope you will stop by Sherry's blog and leave her some love! Thanks again, Sherry for working your magic with my stamps!
Can't end today without saying thanks so much for all the enthusiasm in your comments the past two days and at our release party for "Wild Flowers", I am so excited you're excited! :) Hope you're okay with taking just a wee break from the "Stately Flowers" series, but it will resume shortly, states near you coming soon! ;)
Have a great weekend! We are having really nasty, cold, wet weather here, so there will lots of movie watching and snuggling and hot things to eat and drink (all a few of my favorite things!) Looking forward to it!

Blue and orange are complementary colors, so these dirtied up vintage versions of pumpkin and aqua work so well! It looks like the flowers are embossed in gold and then colored (but you'll have to check with Sherry to be sure!), such a fabulous look!
And I am so partial to the girliness of this hawthorn card, don't these flowers look fabulous in pink? Love the double matting of the dies behind the image with the Spellbinders Classic Circle in black and Tear Drop Circle in pink. Something else I love about seeing others use my stamps, often hen I draw something one way, I don't always think to turn it in a different direction when I stamp (it has a "this end up" for me lol!) so when I looked at her card and saw these flowers tilted to the right it just takes on a whole fresh new look! :) Wonderful dotted paper, too, think it is a terrific choice with the tiny flower centers.Hope you will stop by Sherry's blog and leave her some love! Thanks again, Sherry for working your magic with my stamps!
Can't end today without saying thanks so much for all the enthusiasm in your comments the past two days and at our release party for "Wild Flowers", I am so excited you're excited! :) Hope you're okay with taking just a wee break from the "Stately Flowers" series, but it will resume shortly, states near you coming soon! ;)
Have a great weekend! We are having really nasty, cold, wet weather here, so there will lots of movie watching and snuggling and hot things to eat and drink (all a few of my favorite things!) Looking forward to it!
Labels:
Gina K Designs,
Guest Designer,
Spellbinders
Thursday, February 16, 2012
Forget-me-not (You didn't!)
Good morning! I am finally getting around to sharing a card I made with some Forget-me-nots I'd colored from my new Stately Flowers 3 set a few weeks ago. I really wanted to wait until I got some new Spellbinders dies on my list to create a real impact on the design, and I am SO glad I waited! :)
These are the first time for me to use the Lattice Rectangles (oh, how I love this set!!) Labels 20, Shadow Flowers (these stems will be the perfect "flourishes" with ALL my flower images! Like tucking little pressed flowers under my mats, isn't that delicate die cutting so lovely?) and the new Bitty Blossoms. You've seen me use these Petite Ovals a bazillion times, my "go to" for small sentiments! the latticed and rolled blossom are cut from Pure Luxury Little Boy Blue and layered over Vibrant Violet, stem is from Grass Green and tag is Lovely Lavender.
The Copics I used to color the flowers are B63, BV02, B66 (lightest to darkest on flowers, see how I just trace the lines in the image in the middles of the petals with the darker color to create the folds and trace the undersides to cast shadows fro the petals above?) Y17 for middles, and YG11 and G07 on the stems and seeds. There is so much shading on the stem in the image already you really don't even need to different shades, saves a lot of time! Looking at the closeup, I realize now I forgot to create a shadow around the flowers (oops! Oh well!) I also skipped sponging into my label die, keeping this card clean and bright. Finishing touches are just some tiny adhesive pearls to the corner and center of rolled flower.
Hope this inspires! Thank you for visiting today! Be sure you have entered my Spellbinders blog candy from Tuesday's post (scroll down), I will announce a winner tomorrow!
Labels:
Copics,
Gina K Designs,
Pure Luxury CS,
Spellbinders,
Stately Flowers 3
Friday, February 3, 2012
Inspiration Hop, Day 3: Free wth Three "Fresh Start"
Good morning, so glad you're back! Welcome to our final day of inspiration hops!
Is this a cute set, or what? "Fresh Start" is free, this month only, when you buy any other three sets from Gina K Designs. I actually used every image in the set on the card below, (and just one of the greetings, got a baby shower coming up!) they work so well together!
The color palette was inspired by one of Gina K's new custom designer paper packs, Pure Luxury Red Carpet, I use these colors together all the time, and they match some of my favorite Pure Luxury cardstocks! After selecting the red, chocolate and aqua pattern, I drew further inspiration from all the dots for my design as well as the little red leaves, shaped just like the birdy's wing... :)
Bold stamps are so fun to kiss with textures and patterns, so I stamped my bird and nest once with Memento Rich Cocoa, and then, without cleaning the nest stamp, pressed the flower pot image that was inked with the same color directly onto the rubber, and then stamped. Now the first dark image serves as my base for paper piecing and layering, and the flower stamped nest will be cut out and popped up over it.
I cleaned the image and stamped it in red and aqua to make the other layers, love the dimension and different pops of color! I inked up the love tree with my markers to stamp on the Ocean Mist layer. I also added little Turquoise Sea cardstock accents by using the negative cut out pieces from the Classic Scallop Edgeabilities die, placing them exactly where I wanted below the matted DP layer.
Red Hot layer is embossed with Spots and Dots CB folder. Button accent is from the Pure Luxury Turquoise assortment. Card also uses Chocolate Brown.
Enjoy hopping with the rest of our Gina K Designs team for more inspiration with these new stamps! Leave comments along the way to enter to win a grab bag full of Gina K stamp images, the more you leave, the better your chances of winning! Two winners will be randomly chosen!
Is this a cute set, or what? "Fresh Start" is free, this month only, when you buy any other three sets from Gina K Designs. I actually used every image in the set on the card below, (and just one of the greetings, got a baby shower coming up!) they work so well together!
Bold stamps are so fun to kiss with textures and patterns, so I stamped my bird and nest once with Memento Rich Cocoa, and then, without cleaning the nest stamp, pressed the flower pot image that was inked with the same color directly onto the rubber, and then stamped. Now the first dark image serves as my base for paper piecing and layering, and the flower stamped nest will be cut out and popped up over it.- Gina K
- Giovana Smith
- Jennie Harper
- Jimmi Mayo
- Lori McAree
- Melanie Muenchinger
- Sharon Harnist
- Theresa Momber
- Tina Gilliland
- Vicki Dutcher
- AJ Otto
- Carolina Buchting
- Cathy Tidwell
- Donna Baker
- Emily Giovanni
Thanks for visiting! Have a terrific weekend!
Labels:
Blog Hop,
Free wih Three,
Gina K Designs,
Spellbinders
Wednesday, February 1, 2012
Inspiration Hop Day 1: "Stately Flowers 3" and "Mehndi Wishes"
Good morning, welcome to our first day of Inspiration Hops for our new Gina K Designs release1 The first set I am showing today is my new Stately Flowers 3, the third in my Stately Flowers series! (BTW, Theresa told me this is her favorite of the series so far, oh my!) This month I have three new flowers (large and small versions of each) Magnolia, Bitterroot and Forget-me-not, representing the four states Louisiana, Mississippi, Montana and Alaska. I love all the sentiments in this one, too, suitable for so many different occasions!
Well, I have lived in Texas all my life, so the first stamp I had to get inky in this set was the Southern Magnolia! There is a huge magnolia tree growing in our neighbor's yard across the street, and if you have never seen these beauties in real life, they are a sight to behold! I would venture to say they are easily one of the "stateliest" flower in the whole series: their blooms with creamy, ivory petals like bisque porcelain are as a wide as a dinner plate! I went to town with my Copics coloring this one! You don't have to do as much shading on these white petals for a show-stopping card, but I wanted to challenge myself, I'd been waiting so long to color this image! :) The flower is stamped in Memento London Fog (no black today, I wanted the outline to be a little more subtle.) Die is a Petite Oval Nestabilities.
The photo below shows the colors I used, hope these are helpful! There are so many other combos of green you could use for the leaves, shades for the petals, and pastels for the background, so don't worry about having these exact colors, just a reference of the range of shades and contrasts I used. I will do step by step photos for you soon. Depending on the location of your light source shadows will vary, for this sample I imagined it coming straight down, which cast large shadows onto the lowest petals from those above. BV31 (Pale Lavender) was great for this, and the warm corals and peach shades around the flower really set off the cool shades nicely. I did not use a blender at all, as I like to blend dark colors with my lightest marker, as well as doing tip to tip coloring to create an in between shade.
I used the smaller magnolia to stamp a watermarked pattern in Versamark on the Pure Luxury Just Peachy cardstock adding some score lines above and below the greeting, also from this set (don't you love these two fonts together?) I used both the large and small image to create a green pattern on White cardstock with Crushed Olive for one flower and Forest Moss Distressing inks for the other, sponging the edges with same.
Card base is Pure Luxury Innocent Pink and mat is All Spruced Up. I also used a Classic Triple Scallop Edgeabilities to cut a border in the sponged mat. Finally, pearls are just the perfect embellishment for these Southern ladies!
Next I want to show a sample I made using the Bitterroot and NO coloring. I'd never seen nor heard of these gorgeous flowers before I started drawing the series. (I would like to know who came up with this name for such a beautiful flower lol! I'm guessing someone tried to eat it way back and when and it was...bitter!) Anyway, the symmetry of this flower is just perfect for stamping patterns, so I stamped the flower again and again re-inking each time, in pink on Pure Luxury Ivory. Next, I scored a diamond pattern at one inch intervals with my Scor-buddy, and then covered two thirds of the mat with scratch paper so I could sponge more of the same pink ink over the left. Pull your scratch paper away, and it looks like you have two layers of perfectly coordinated paper!
I chose this Fancy Tag 2 die , which I thought framed up this new sentiment so beautifully, and sponged pink over the die before removing like a stencil. Well, happy accident, this is the first time I noticed those two little pieces that pop out of the die on top and bottom look like teeny hearts, isn't that just so sweet with the "spread your love..." sentiment, like scattering seeds? So I popped these up on the right corner.
I love finding uses for the perfectly cut negative pieces that come out of Spellbinders dies! Card base is Black Onyx and the "O" in love is embellished with a single adhesive pearl. Seriously minimal card with just two cardstock colors, two inks, one die, and one embellishment (but I really like how it turned out!)
Hope you love this new Stately Flowers 3 set as much as I do!
Our next set is from Rupa Shevde "Mehndi Wishes". I love these designs, they are completely unlike any other stamps I have in my collection, yet I have always been fascinated with the right colors and motifs of India as well the beautiful henna body art that is Mehndi!
I wanted to make a pattern with the gorgeous flourish design and thought this jumping horse was perfect for the sentiment "You can do anything". What a fantastic sentiment and joyful image!
I started by stamping the flourish on Pure Luxury Lipstick Red in Memento Tuxedo Black, turning the stamp back and forth to create a nesting pattern. I used Classic Ric Rac Edgeabilites to cut and emboss a border on the side the side, I thought the dots and diamonds in this die were perfect with the details in these stamps.
Here you can see I finished adding Sakura Gold Glitter pen inside each hole of the cut out and to accent different details in the flourish, just tracing, very simple to do, but it now it looks like gold silk thread in a sari!
I stamped the horse on white and used Copics R59 and R11 for mane and designs and W-5 for the shadows. Don't forget the glitter pen! He's popped up with foam dots and fussy cut, ready to hurdle that greeting! :) Oh, isn't he magnificent?!
Reminds me of some of what I think is the most beautiful writing in the Bible, when God speaks to Job of His creation. It goes on and on for several chapters describing the vast wonders of nature, the weather, etc, but this part of chapter 39 is about the horse (emphasis mine):
Enjoy hopping with the rest of our Gina K Designs team for more inspiration with these new stamps! As you hop through the blogs, make sure you leave a comment on each of the blogs including mine because we will choose two random winners from all of the comments who will each win a grab bag full of deeply etched, precut Gina K. Designs stamps!
Well, I have lived in Texas all my life, so the first stamp I had to get inky in this set was the Southern Magnolia! There is a huge magnolia tree growing in our neighbor's yard across the street, and if you have never seen these beauties in real life, they are a sight to behold! I would venture to say they are easily one of the "stateliest" flower in the whole series: their blooms with creamy, ivory petals like bisque porcelain are as a wide as a dinner plate! I went to town with my Copics coloring this one! You don't have to do as much shading on these white petals for a show-stopping card, but I wanted to challenge myself, I'd been waiting so long to color this image! :) The flower is stamped in Memento London Fog (no black today, I wanted the outline to be a little more subtle.) Die is a Petite Oval Nestabilities.Next I want to show a sample I made using the Bitterroot and NO coloring. I'd never seen nor heard of these gorgeous flowers before I started drawing the series. (I would like to know who came up with this name for such a beautiful flower lol! I'm guessing someone tried to eat it way back and when and it was...bitter!) Anyway, the symmetry of this flower is just perfect for stamping patterns, so I stamped the flower again and again re-inking each time, in pink on Pure Luxury Ivory. Next, I scored a diamond pattern at one inch intervals with my Scor-buddy, and then covered two thirds of the mat with scratch paper so I could sponge more of the same pink ink over the left. Pull your scratch paper away, and it looks like you have two layers of perfectly coordinated paper!
Hope you love this new Stately Flowers 3 set as much as I do!
Our next set is from Rupa Shevde "Mehndi Wishes". I love these designs, they are completely unlike any other stamps I have in my collection, yet I have always been fascinated with the right colors and motifs of India as well the beautiful henna body art that is Mehndi!
I wanted to make a pattern with the gorgeous flourish design and thought this jumping horse was perfect for the sentiment "You can do anything". What a fantastic sentiment and joyful image!19 “Do you give the horse its strength
or clothe its neck with a flowing mane?
20 Do you make it leap like a locust,
striking terror with its proud snorting?
21 It paws fiercely, rejoicing in its strength,
and charges into the fray.
22 It laughs at fear, afraid of nothing;
it does not shy away from the sword.
or clothe its neck with a flowing mane?
20 Do you make it leap like a locust,
striking terror with its proud snorting?
21 It paws fiercely, rejoicing in its strength,
and charges into the fray.
22 It laughs at fear, afraid of nothing;
it does not shy away from the sword.
You can do anything, indeed!
Enjoy hopping with the rest of our Gina K Designs team for more inspiration with these new stamps! As you hop through the blogs, make sure you leave a comment on each of the blogs including mine because we will choose two random winners from all of the comments who will each win a grab bag full of deeply etched, precut Gina K. Designs stamps!
Thanks for visiting me today, I truly appreciate your comments and feedback! Hope these card photos and explanation are helpful to you! :)
Labels:
Blog Hop,
Gina K Designs,
Rupa Shevde,
Spellbinders,
Stately Flowers 3
Monday, March 28, 2011
Spellbinders Blog Hop
Good morning and happy Monday! Today the Gina K Designs team is doing another thank you blog hop for Spellbinders, sharing more samples of cards we've made with our Grand Calibur gifts! If you are following the hop you should be arriving from Lee Murphy's blog, but you may start anywhere along the way and see everything, thank you for stopping here! The card I made for today, which also uses this week's StampTV's sketch challenge, uses 5 different Spellbinders dies and I was able to cut them ALL in one pass on my Grand Calibur, then flip and emboss all five on the second pass, love it!
I stamped my daisy bunch from "Spring Basket" in Vivid Coffee Bean on the Long Rectangle panel and then framed it on Long Scalloped Rectangles die cuts from Pure Luxury Creme de Menthe and Chocolate Brown. After coloring my daisies with Copics G21, YG11, RV00, BV31, BV00, and V17, I layered these over a Petite Scalloped Circle from Lovely Lavender mat, both stamped with my "Bring the Bling" flourishes in Versamark, which I then covered with Liquid Pearls. Base and Fancy Tag are made with the new Gina K Pure Luxury Wild Lilac.
Greeting is from the new Free with Three set "Stenciled Spring". I hope you can participate in our sketch challenge this week!! Be sure to upload your card using this sketch to the STV gallery with the tag STVSKSP19, good luck winning a set of free stamps!
Now please continue the hop on Sharon Harnist's blog and check out more stunning samples with Spellbinders along the way from the rest of our talented Gina K Designs team! Enjoy the rest of your day and I hope to see you again tomorrow!
Labels:
Blog Hop,
Gina K Designs,
Grand Calibur,
Spellbinders
Sunday, March 13, 2011
Spellbinders Blog Hop
Good morning! The Gina K Designs team would like to welcome to you a special Spellbinders Thank You Blog Hop!! Recently Spellbinders generously gifted each member of our Design Team with the amazing new Grand Calibur, what a perfect gift for a papercrafter and we are all enjoying this fabulous machine! We have made some special cards and projects to showcase the new Grand Calibur and why we are loving it so much! (You should be coming from Lee Murphy's blog, but if you're starting here, you will find another link at the end of this post which will take you to the end and allow you to circle back around!)
Here is a card I made with one of the Fancy Tag Dies. These beautiful tags are often the inspiration for the entire card, the elegant flourished and intricate details make it easy choose paper and images to create a gorgeous, coordinated project and really add flair to any sentiment! I embossed a greeting from "Basket Blessings" in gold into the center of the die and then rubbed some metallic paste over the die before removing it, I love using these dies like stencils, just makes the beautiful details in the embossed edges pop even more.
I embossed my bunch of tulips and lilies from "Spring Basket", stamping one on ivory cardstock then flipping the stamp over to stamp below and create this rounded, wreath effect. Cut out and mounted under the tag die cut, it looks like a beautiful medallion, I love the way the flower bunches frame the sentiment.
Gina K Organdy, adhesive nailheads, Wave Flourish Punch
As I've said before, the thing I love most about the Grand Calibur is having the ability to cut and emboss so many images at once on the large plate, but I also love how evenly it applies pressure, so that even when you are doing one die like this Fancy Tag, it easily cuts out all those tiny details in just one pass.
Thank you again, Spellbinders for the Grand Calibur! For someone like me who is a constant collector of Nestabilities, this machine and streamlines the cardmaking process and gets me using all these beautiful dies more often! Love it!
Time to continue the hop, please check out another project using Spellbinders at Michelle's blog!
Labels:
Basket Blessings,
Gina K Designs,
Spellbinders,
Spring Basket
Monday, December 27, 2010
A Grand Calibur Christmas!
Hope Santa brought you some fun things this Christmas! Here I am with one of my prezzies, the Spellbinders Grand Calibur, wooooo hoooooooooooo!
Although I use my Nestabilities on almost every creation, when I FIRST saw this new die cutter, I thought "For GINORMOUS dies. Maybe I don't *need* it..." and maybe you're thinking that, too, if you mainly do card making and aren't sure how much you'd use the larger dies...well, you NEED it!! Even if you never buy any of the Grand dies (but you will, and so will I!!) it is so, SO worth being able to run an 8" x 11" sheet of cardstock through and cut as many of the regular sized Nestabilities dies as you can fit on the sheet in ONE pass, then flipping them over and embossing them ALL at once on the second pass! Let me show you!
Here I placed 6 of some of my favorite large Spellbinders labels (One, Eight, Fourteen, Fifteen) and new beaded circles and beaded ovals (just got these beaded dies so you haven't sen me use them on a project yet, but oh my word! They are so gorgeous, love the detail!) on one sheet of White Pure Luxury cardstock. (I could have actually placed them more closely and gotten some fancy tag dies on there too, did later, but didn't take pics of that)
Now put your cutting plate down on top over the dies and hold the end as you run it through to keep the dies on the far end from sliding around. Here they are all cut below from that one smooth, rolling pass! It goes through so easily, lately I've been feeling like I need to go to the gym and work out a little more to get the plates cranked through my 'bug! ;)
Flip your stack over after cutting and transfer the cut dies to the base plate, facing up, and add the tan mat and embossing plate. Roll through the Grand Calibur once.
Remove the plate and dies, and ta da! Now you have ALL these beautiful embossed dies in about a minute or two! This would have taken forEVER with my little 'bug, I'd still be cranking! And I LOVE not having to crop down the paper to fit on a smaller plate as well as not having to make so many additional passes! It really is going to save so much time and energy and I am excited to have all these embossed die cuts ready to go when I sit down to stamp! So for the dedicated crafter, I think this machine is worth its weight in gold! Highly recommended (looks super cute on my desk too in raspberry!) and of course now I have to get back to you soon with a review of the Grand Dies, Labels One and Four are first on my wishlist!! :)
Did you see the Gina K snippets have started? I'll be back soon with a few cards my kids made for me, more Christmas pics, stories, and handmade cards from friends, plus some some more "Mugs and Kisses" samples before our previews start next Monday!
Labels:
Grand Calibur,
Nestabiliities,
Spellbinders
Subscribe to:
Posts (Atom)