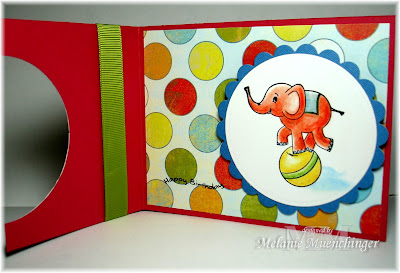
 Here's a card made with Rupa's elephant from "Whatever Floats Your Boat"(image is colored with Koh-i-Noor pencils and OMS). I had to repeat that cute little ball by grabbing some fun spotted DP and a way to get it moving. The scalloped focal point holds it closed, and when it opens,
 the focal point tilts back
  and forth.
 For this Tilt Card project, you need:
1 9 1/8" x 11" piece CS, scored at 5 1/2" (SU! Ruby Red here)
2 coordinating DP prints (these are both Basic Grey "Cupcake"), 1 piece cut 4"x 5 1/4", the other piece cut 3 3/8" x 4"
(these measurements do not have to be the same on your card, just worked well with the size circle die I chose)
hobby blade
2 pennies
2 dimensionals
CS for focal point and scalloped mat (PT white and DCVW Textured Earth Elements)
Fold your CS at the score.
Adhere larger piece DP to the inside of the folded card.
Adhere smaller DP to the front short side of card.
Cut a circle through both layers of the short front that will just fit your round focal point, with your die or Coluzzle. (Just laying it on here to show you, don't cut on the Scor-Pal! (I should have put my mat underneath, this was just for the pic) :)
 Make a square hole with your hobby blade under the center of where you will attach your focal point to the back of the card, big enough for dimensional to wobble around in.
 Put one penny with a dimensional on top under the hole, remove backing and adhere a second penny with dimensional on top of that.
  Remove backing and place focal point on the center.
 Wrap some ribbon around if desired to add interest.
 Tomorrow: my last guest spot week with Cathy Tidwell! Coming up: Can you believe the Gina K Designs sneak peeks start in less than a week?! Not only am I excited about our new stamps, but I will be having my biggest blog candy offering yet during the peeks!! Be sure to turn out each day, can't wait to share what it is! :)
May your day rock!
This is just too cute! I love the colors and the coloring is amazing!
ReplyDeletevery cute!
ReplyDeleteMelania~What a cute image, and your coloring is perfect. Love the DP! This is adorable and I love the tilt idea. It reminds me of the slider cards..what a COOL idea. I will have to try this! Chris
ReplyDeleteThat is adorable! Love the DP you used!
ReplyDeletethis card is so cute. and the colors are a perfect fit for a birthday card.
ReplyDeleteOh this totally ROCKS! I LOVE it, Melanie!
ReplyDeleteThis is such a great idea!! I love your blog, just stumbled upon it.
ReplyDeleteAwesome card. You rock girl! Hope you are feeling better today.
ReplyDeleteThat is SO cute...and an elephant on a ball...what a perfect one to be rocking!!
ReplyDeleteoh soo awesome girl! love it....love that dp too...cannot wait to see what you have up your sleeves for us! lol!
ReplyDeleteSuper cute card!
ReplyDeleteOoh! You KNOW I love all this brightness! This is an adorable card! I must try this one day!
ReplyDeleteSuper cute Melanie!! Love it!!
ReplyDeleteThis is so adorable, and so fun too!! Thanks for all of the details!!
ReplyDeleteOH cuuuuuute!!!! And wonderful tutorial so I can finally try a card like this!!!
ReplyDeleteThis comment has been removed by a blog administrator.
ReplyDelete