TOMORROW I WILL BE ON ANDREA HAYS' "FEATURED CRAFTER FRIDAY" -PLEASE CHECK IT OUT!!
I made a couple reverse topper cards for the Gina K design gallery this month, they are similar to tent topper cards, but instead of mounting your focal point on the outside of the folded card, you cut into it, so that you image will show inside AND outside(you worked so hard on it, you don't want them rushing to your message inside without appreciating your nice coloring job a little longer, do you??)
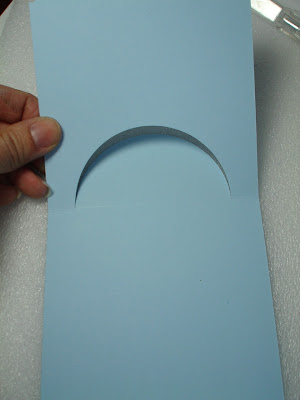
First, find the middle of your card. Lay your coluzzle with the center of the track on the middle.
 Cut just the top half of the circle (or oval)
 Fold.
Fold. Add your focal point. Write on the inside. Decorate the outside.
  The finished card (see above) can be displayed now with the outside showing or with your handwritten message. Easy, right? I used Stickles on the water, and popped up my images on dimensionals. I really like this "good luck" greeting, can be used for so many things: a new venture, expectant mom, etc! Hop on by tomorrow for some Valentine posts! (it might get a little mushy!)
This card is fantastic!! So cute!!! Can't wait till this set is in my inky hands too!!! I think by now you know how I feel about the Hippy set!!LOL Thanks for sharing the tutorial!!
ReplyDeleteThis is adorable, Melanie! I have to try one of these! Just darling!
ReplyDeleteGreat tutorial...and I will DEFINITELY be making one of these! Your card is just too, too cute! :-)
ReplyDeleteAwesome Tutorial! Thanks so much!!
ReplyDeleteWhat a FUN card--it makes me want to jump!! I can never seem to get the topper card just right. . .SO glad you put step by step directions. I'm going to make one tomorrow. Too bad I don't have the frog YET!
ReplyDeleteOh coooool!! Thanks for the tutorial with the photos.....I don't have a coluzzle, but I'm sure I can come up with something! I can't wait to try making one of these!! This card is sooooo cute!!! I can't wait to get my Hoppy's!!! Have I already said that??!! LOL
ReplyDeleteThat is so neat! Thanks for the tutorial and Your froggy is such a
ReplyDeletesweetie!!!
This is darling. Love the frog with the shamrock. Great tutorial.
ReplyDeleteToo cute, love this little froggy... I have to try that type of card.... :-)
ReplyDeleteCan't wait to try this type of card...thanks for the tutorial! Just love it...looking forward to getting my froggy stamp!
ReplyDeletevery cute! I just ordered this set couple of days ago and i can't wait to get it. My mom loves frog and will be retiring next month, i want to use this set =)
ReplyDeleteI love this card! It's so cute! Now I need the circle cutter so I can make some of these! :)
ReplyDeleteToo cute Melanie, I am eagerly awaiting the arrival of both your sets.
ReplyDeleteoooooo - I like that! So bright and cheery
ReplyDeletereally cool design
ReplyDeleteThank you so much for the totally easy directions. I don't have a couzelle so I substituted a plastic bowl.
ReplyDeleteAnd it worked but I will get a couzelle.
Thank you
Wow, this is really clever! Thanks for giving us a great tutorial!
ReplyDelete