Wednesday, April 30, 2008

We Can't ALL Be Handy...


Let the "Mr. Fix it" in your life know you love him even if the "honey-do" list never gets any shorter! This card using Rupa Shevde's new "King of the Grill" set is definitely NOT for my husband Paul, who is about the handiest person around, but I couldn't resist making this card when I saw the hammer and nails! You could actually add an "s" to the end of "Mr". and it could be for ME, I've definitely left a few Swiss cheese walls behind when hanging a picture LOL!*(not so with Paul, he's always sure to have his pencil, stud finder, level, etc etc!)


I though a classic single layer panel (embossed with the square Classic Nestabilies) would be perfect (quick!) for a nice Father's day or masculine birthday card. The little framed picture which "frames" the greeting is on dimensionals, mounted slightly askew (in keeping with my theme!) and I used the piercing tool for my many random holes ( I love how this turned out!!!)and a little silver brad for the nail. I stamped, colored and cut out the hammer, shadowing both that and the stamped nails with a gray 20% Prismamarker. Very easy card!

*easily remedied by covering them with the big ol' picture!!

Quick Cropped Giraffe Couple!

I've seen a lot of hippy cards using "the bi-colored spots", but the first card I saw with this was Cindy Haffner's fabulous sample! So when the baby stamp came out, I thought how perfect to make each parent have the different colored spots to produce a lovely, blended baby ! The color inspiration for this was Gina K's first Hip Hop sample, I just loved that blue color with the chocolate. (This blue background paper is DP from my Cosco slab. )My hope is that by incoprating both the blue AND pink and keeping the bling to a minimum(I used the Button Babies Brads through the SU! punched ovals) I can send this card out for a new baby boy OR girl!
After stamping these giraffes I decided they were further apart than I wanted them(shown above, originally I was going to put the baby between them) so instead of doing it over, I found a fast solution. Cut around just the left side of the right giraffe, cutting stright up to the giraffe hoof from the bottom and then straight up to top edge when you are done with the outline, and then splice the two together. (you don't have to cut out the wonky new edge in the middle just glue the giraffe on top of it, lining up the top and bottom of the CS so they're straight.
One last thing I did to complete the illusion (forgot to take a pic, sorry) was to cut off the left giraffes right front hoof to adhere on to top of the new spliced image(See how in this bottom pic it looks like one foot is missing? Now look back up a t the completed card to see what I did. Yeah, that added a little more time, but still faster than cutting out both giraffes!!)

EDITED TO ADD: Roni, I need you to contact me by 5PM CST Thursday, 5/1 to claim your prize, otherwise I will need to draw another name for the Papertrey set. Thank you!

Tuesday, April 29, 2008

Whoooo's the Daddy?

BWAHHHHHHHHHHHHHH!

Sorry, I was trying to come up with something "out of the box" for the owls, couldn't resist! (Gina, are we still friends??)

It's all pieced with the SU! hostess DP pack, and the glittered background DP is from a DCVW mat pack. Cardstock and Wasabi Striped ribbon are SU! Button Babies Brads from Gina K.

I don't really have anyone I NEED to send this to, except to give them a good laugh!!)* I do know this one couple, though, that just annoucned their pregnancy, they have a very good sense of humor, might find it "a hoot!"**

*Carolyn...?

** but might not

These Frogs FeelGood!

Gina K's mention of Dr. Feelgood in the forum the other day reminded me of an idea I had for a Hoppy card, so I pulled out Carolyn's adorable set to make this! The clinking glasses are one image, so I stamped this first (Palette Burnt Umber) and then stamped a frog on each stem, didn't even have to mask! Don't you just love those googly eyes she has for him?? and that "hubba hubba!" look he's giving us??

I sponged the edges of my focal point in both the brown and rose inks and then made the background by two step stamping the heart and its outline, rolling the solid stamp in the Cranberry Crisp ink to create the shading. Last I cut out two little hearts and added "husband" and "wife" in the center of each, most of the words from "Hip Hop Accessories" ("anniversary" is also in this set) fit in these hearts! The dry embossed Regal Rose background was done with the Cuttlebug Swiss Dots folder. The stacked ribbons are SU! Burgundy 1/4" and Rose 5/8" grosgrain. The scalloped edge at the bottom was done with SU!'s large corner rounder punch.

"Cheers!" :)

Blog candy winner of the Papertrey Anniversary set:


Here are your random numbers:81
Timestamp: 2008-04-29 10:56:05 UTC

Roni Thompson said...
I don't have any of your sets yet. Love your blog and I hope I can win this set! Thanks

Roni please send me your snail address and I will send your set!
EDITED TO ADD: Roni, I need you to contact me by 5PM CST Thursday, 5/1 to claim your prize, otherwsie I will need to draw another name for the Papertrey set. Thank you!

Monday, April 28, 2008

"Ear Candy" Winner!

And the winner, as chosen by www.random.org*, is:

Melody (lacyquilter) said...
How fun is this! I love the idea of using a second french hook. I linked you in my blog.http://lacyquilter.blogspot.com/2008/04/fun-earrings.html
April 24, 2008 9:36 AM

Congrats, send me your addy and favorite colors and I will send you your candy!

*Random Integer Generator
Here are your random numbers:2
Timestamp: 2008-04-28 18:57:49 UTC

One hour left to enter for the PT set on this post, 10PM CST is the cut off, winner announed tomorrow!

Wrap it! (or, What's Up My Sleeve?)

Now let's say you want to decorate that tin, but aren't quite ready to "commit" (adhere the labels!) Make a sleeve that wraps around the item and can easily slide on or off, giving you or the recipient (if you gift it) freedom to change the purpose/look of the tin later!

You'll need a piece of CS that's 3 1/2"x 8"(I came back to edit this measurement originally typed 3 7/8, sorry!). I stamped my label (in Palette Burnt Umber) onto the middle (which will be on top of your tin) but instead of scoring, I just placed the stamped label part on the center of the tin top and then wrapped it around, pressing with my fingers. I found this was a little easier than trying to where to score because the sides aren't straight(you have the lip of lid sticking out,) this way you have a nice, comfortable fit. I stamped the whole Bordering Blue sleeve with SU!'s Stitched background with their matching ink.
Wrap around the tin and secure the back flaps with sticky strip. As you can see in the pic above I put a piece on both ends not just the one that would be on the outside, so that when you slide the tin in and out it wouldn't catch on the loose inside, KWIM? The wrap is sturdy enough to hold it's shape perfectly to slide on and off again and again.

I wrapped and tied my Chocolate Chip satin ribbon around it(with the wrap on the tin so it's nice and snug). Next I stamped the same label on Vanilla CS I had stamped with SU!'s Paisley background (stamped off once to lighten it) and then with Stitched background to match the sleeve. I cut this to the inside border and adhered to the wrap, so you have that nice brown border all the way around it.

All done, I just love how it turned out! I just think it's so luxurious, and a fun way for someone to "unwrap" it! again and again!

(BTW, what do you think of this tailored photo border? compared to the soft photo borders? I dunno, just playing around, changin' it up!)


Coming up later this week, the wraps aren't just for tins, check back for more fun ways to use this sliding label wrap! :)

Sunday, April 27, 2008

The Frog Prince

I was so excited to see Rupa's "What a catch!" phrase and fishing pole in her new set because they were just what I need to create this! (I'd been wondering what I would do with the pool background from my DCVW adhesive mat pack, until now!) I submitted this for the SCS challenge this week, which was to do cut outs,( something I try to do an almost every card, actually!) The larger frog is NOT cut out, I just stamped him at the end of the line (all shadowed with a warm gray 20% Prismacolor marker) and then cut my mat smaller than the image so his foot and the end of the pole would be sticking out. The little frog (on a dimensional)and lily pads are obviously! I still needed a little something and I wanted to bring out the yellow in his crown so I added the corner punches on either side to balance it out, and the brads to give it some bling and tone down the yellow. The little "kiss me" sign was cut out as well(you knew it went with the crown, right? Frog Prince was always one or my faves... :)

More later, there's a super scary storm out, gotta go snuggle and drink cocoa with the kiddos! (while DH makes Sunday pancakes) :) But I have some contest stuff to announce, RAKS to share, new tutorial etc etc!

Saturday, April 26, 2008

Whistle While You Work...!


Doesn't Sara look so happy to be vacuuming her nice blue (flocked!!) carpet??* (I pray I can clean my house with this kind of attitude some day!)


I thought the flock would be really fun to give this card some texture. To make sure the color looks nice and even, use a piece of cardstock (here I used Ballet Blue) that matches the color ofyour flock, this keeps it from being patchy. I covered the whole piece with adhesive and then dumped on the flock, patting it down for good coverage before putting the rest back. These papers are both from that big Costco slab (so it's either Wild Aspapragus or Magnolia) aren't they fun? I cut her out out and mounted on top, but held off on using my beloved dimensionals, asI noticed they made her look like she was hovering over the carpet instead of actually vacuuming, so...! The scallops and circles punches help tie in the patterned "wallpaper". The punched greeting is from SU!'s Lovely Labels.

EXCITING NEWS: Gina K's giving away a set of Megabilities on her blog, check it out along with her adorable new Kindred Spirits card(which just gave me some new ideas for my Kindred Spirits! off to go create!!) I was also jumping up and down to read about he new products she is now carrying, I'm going to make you look to read about them all, but one is the large window tin! These things are PERFECT for What's In Your Tin? 1 and 2, just look at this project of Jana's! perfect proportions! Can't WAIT to get my hands on these babies(rubbing hands together, maniacal giggle)

*because the dog's gone?!

Friday, April 25, 2008

Now, What's in MY Wallet??

That's my bag, baby!* (I love carrying around a little red purse(I've actually got a big one, too!) why carry black** when you could carry RED?? ) I told you I'd come back with a ladies wallet, and was going to make a wallet to match Elle's grill ,but then I remembered I'd been meaning to make a new little holder for my business cards, so I decided to make one to match my favorite purse instead. I LOVE how this photo window turned out using the label stamp from "What's in Your Tin? 1"! It was a very simple addition to the wallet project(and allows you to change out the pics instead of committing to a few that are glued down...!) I can also see how changing it up slightly could make really cool luggage tags! ;)

First, assemble the "w" part of the wallet as described in this post. Next I needed to make my window layer, this piece (Real Red) is 4 1/4" by 2 3/4", slightly smaller than the width of the front of your wallet. I stamped my narrowest label border on the cardstock AFTER embossing(this CB folder is "Mesh", the irregular shapes and sizes are a great match for this bag!) Look how the little embossed squares divided up the thin borders into near perfect stitched lines for me!!
Then I cut out the middle of the border with my hobby blade. Save the cut out, you'll be using the whole piece later! :)
I flipped my window over and added a piece of acetate slightly smaller than the the piece of CS, then put terrifically Tacky Tape around three edges only , the long edge that will run along the wallet fold stays open so you can slide your photos, ID or business cards in and out! :)
Here is the assembled wallet, all "stitched" up(with my Signo white gel pen) and ready to go! See the folded little tab on the side...?
It's that cut out piece, I didn't have to cut it down change the shape at all! Instead of scoring I just wrapped it with my fingers around the wallet and pressed. I attached it with tacky tape again on the back side. The big antiqued brad only goes through the tab layer, so it won't show inside the wallet. it stays closed pretty well just folded around but I may go buy some little magnet closures so it snaps together.

And here you can see how it wrap around and the inside. I added another brad to look like a snap closure, but I cut off the prongs with my craft and rubber scissors and attached it with a glue dot so you wouldn't see them when you open it.
And last you can see the red CS doesn't look as "flat" as before. I rubbed my Ruby Red pad all over it so the embossing would have some depth and distressing.
Now, what would have been SO much better: inking my CB folder in a deep red before running it through for the negative Cuttlebug effect! (smacking head, shows what a hurry to post and no planning gets ya!)This would have been an even closer match to the bag...oh well! next time! I may go try to kick it up an extra notch by adding another window to the back and or the inside as well as either apply some Crystal Effects or swipe my Versamark pad over the texture and some clear embossing powder to give it a shine like my bag...or I might not! it's the weekend! ;)
have agood one, don't forget to enter for the earrings or blog candy!


*one of them, at least, I remember when my Z Becky Brown arrived last year and I showed my DH saying,"Sweetheart, I'll never have to buy another purse again!" He just looked at me and said, "Mmhmm. I've heard that before"

**I've got those, too!

"What's in Your Wallet?"

I was really excited to see a gift card holder I'd never seen before featured in "Try a New Technique" this week, I took one look at it and thought, "hey, I recognize those proportions!" It's perfect for the "What's in Your Tin? 1 and 2" sets!


Very simple to make: take a piece of CS 4 1/4" by 11, and score at 3", 5 1/2", and 8". Then fold it so it looks like a "W". There are other punches you could substitute to make the slit, but this one used your word window punched twice (long enough to fit the GC through) with the large oval punched out in the middle(just halfway up to make the "pull notch", see below)


Attach the insides of the fold using Terrifically Tacky Tape along the edges, now it stand up like a regular card. I used my corner rounder on the front and back. Next I ran both sides through my Cuttlebug with theTiny Bubbles folder, gives it a cool leather look. I decided not to bother piercing any holes for my faux stitching, just went around each side where the embossing ended with a dashed line using the fine tip of my SU! Chocolate Chip marker(see close up of pic). I stamped the label border from WIYT?2 on the insides, front and back in Palette Burnt Umber, and added "The Essentials" on one side and "Especially for you" on the other. (You could do your stamping before you emboss, but the images actaully came out pretty clean here since the texture is so fine, I like the look) I swiped my pad a little over the edges of the wallet so the embossing could pick up a little bit of the ink.


Last I stamped the label borders on two of my kids' pics and cut them out adhering them to the inside of my wallet. (the one you see here is William at 6 months) The wallet looks so real, I know my stepdad is going to love it! This was a really fast, FUN project! and very masculine! (The itunes gift card is just a sample, I'll be putting another GC in there he will really like. :)


Next I guess I need to make a fabulous ladies wallet for Mother's Day! If you try your hand at a wallet gift card holder using the What's In Your Tin? sets, please let me know or link it here, I'd love to see! Now scroll down for some blog candy! :)

Celebrating a Whole BUNCH of Hits!

I'm really not sure what number to believe anymore! My sitemeter says over 50,000 visits. My blog counter (which was in synch with the sitemeter when I set it up now says over 70,000!!) Anyway, a lot of people have been stopping in, so I'm celebrating and giving away a very special candy!*


Do you know what this is? The Papertrey Anniversary Set "Simple Little Things". I cannot say what it's value is exactly because it has never been offered for purchase, it shipped exclusively to people who ordered 12 or more sets last year. I will say I spent approximately $270 to get it! The set contains 34 acrylic stamps, a mix of decorative elements and greetings. And I want to give it to one of you.


One comment per person on this post (telling my how many of my stamp sets you own and/or which one is your favorite) until Monday, 4/28 at 10 PM CST, with the winner revealed on Tuesday, April 29! All I ask I that if you leave a comment here to play you do not already have the set, and that you'll use it instead of selling it. I really want the winner to be someone who loves it but didn't get to earn it themselves. (I won't go checking to make sure people didn't get one, it's on the honor sysytem)


To sweeten the deal I'll throw in some cards I made using Papertrey ink stamps, too :)


* and something else pretty exciting? In less than 4 months I've done over 100 Gina K Designs posts, check out my labels!

Thursday, April 24, 2008

Melanie Muenchinger, Jewelry Designer?? *

Okay, here's a project I'm as excited about as my onesies and ipod tin! How about a beautiful, handmade Mother's day (or fabulous friend) gift (earrings and jewelry case/wristy) for under $2.00, which includes the packaging??


For this project you need:
4 adhesive page pebbles (mine are EK success)
1/2" circle punch
a piercing tool and mat to protect your work surface
fabulous DP (glittered looks especially cool!)
2 jump rings
4 little earring fishhooks(both of these can be purchased cheap in bulk baggies at any craft store in the beads/jewelry department, comes out to pennies apiece)

Altoid Tin ($1.50/each)
What's in Your Tin? 2

Punch out circles of your DP and then sandwich it between two page pebbles(see in the pic above). Doesn't that look awesome?? Those bracelet/jewelry blanks can be pricey, but page pebbles are cheap! I think I got 100 of these for 2.99?? They adhere to your DP and you can see the colored DP on both sides, which is great for this dangle design since you get a lot of movement. The look you want is up to you: same sides matching or different but coordinating , have fun with it! If you use a double-sided DP, you only have to punch one circle for each! You can of course use stamped paper (for little girl earrings, stamp a flower or heart from Just So Hippy and center inside the circle punch!), plain colored cardstock, or patterns you find in magazines to sandwich between the pebbles. :) (The DP In all three pairs in this tutorial are from the DCVW All Dressed Up Pack!) Finished the glittered ones really like like some little glass bead from Murano!

Poke a hole with your piercing tool through all layers (the page pebbles and DP) about 1/8-1/4 inch from the top. (I actually put both my foam mat and self healing mat under. It's not difficult to make the hole, but you do have to press hard.) The next three steps are shown below:

1.Take the open part of your fishhook(which would normally go through your ear) through the hole like this. Edited to add: Melody pointed out these are called "french hooks", shows how little I know about making jewelry! I improvised with this since the hole is so thick trying to use a jump ring itself wasn't working.

2. Then wrap the end back around the middle in kind of a figure eight so the end won't poke the person wearing it. If the open end is on the left, wrap to the right, around the back, and come around to the right again and press down to meet the middle(you can use pliers or other wire tools to make the wrapping easier but I just used my fingers, too lazy to dig my toolkit out! In the pic I have not wrapped it back down)

3. Now open your jump ring and put the circle from your twisted hook, and the circle from your second hook in, and close the ring. That's it! Now do the second one. (sorry these pics are blurry! click on the finished earrings to see it better) Using two french hooks makes them extra long and dangly!

Now you're ready to decorate your tin and make the card to put the earrings on! All stamps are from "What's In Your Tin? 2". (The one above was in a post a few weeks back, decorate as you wish!)

Stamp one of the label borders on thick cardstock (I used Ivory CS and black ink to match my earrings and packaging) and trim along the border. This will be the card to hold your earrings. Poke two holes through the CS to thread your earrings through. "To:" on the front and add your recipient's name!

Aren't those pretty?? I put "Especially for you" on the back and "From" then signed my name, before tucking inside the tin.
I don't think it's necessary, but if you want to add some "value" to this inexpensive (handmade, ONE OF A KIND!) gift, of course you still have have room to tuck a gift card underneath! :)

So what do you think? Are you ready to make some? Would you like a pair of these for yourself? Link this tutorial on your blog and provide the link in this comment section below by 10PM CST Saturday night. I will draw one person randomly (oh, maybe a couple more!) and send you a pair of earrings!
Check back for a really cool Father's Day Project using the same stamps(but NO TIN!) I'll just tell you now, it's NOT EARRINGS! ;) Have a great day, it's almost FRIDAY!
* NOT! I am really wire challenged and as much I enjoy punches/tools like that, I'm not too good with pliers etc, so I haven't experiemented much with jewelry, unless it just calls for gluing a bead on something and callin' it good! And I'm cheap, some materials are more expensive that others. But, I will have another almost cheap, easy way to make a necklace coming up! Stay tuned!

Wednesday, April 23, 2008

If Elle Woods Grilled...

she'd have a blinged-out Weber and a matching(platinum!) spatula! I don't grill myself, but I'm confident some of you and your friends out there know how to start a fire! I added the little crown and "queen" from my new "Hip Hop" set to Rupa's "King of the Grill" :)

I made this for the color challenge this week, Chocolate Chip, Certainly Celery and Pretty in Pink. All paper is SU! except for the paper piecing which was done with DCVW adhesive mat pack, awesome for little piecing like the handle!!

I attached some adhesive rhinestones to my celery colored button brads from Gina K. Hope if you click on the pic you can see my "flame broiled background"?? I used my CB Distressed Stripes folder to emboss the chocolate chip CS and then rubbed my Burnt Umber Palette ink over the embossing (which I also used to stamping my images) I really like the texture it added. But if it doesn't say "hamburger patty" to you, then maybe just "deck"...


Okay, stop back later for another girly "King of the Grill" project! ;) (you can probably guess...)

Tuesday, April 22, 2008

Hip Hop Accessories Tip Sheet!


Here is a super easy card using the DCVW glitter mat pack for a background and three accessories from the new "Hip Hop" set! I punched these out with my SU! 1 1/4" circle, and then layered on my Cuttlebug flower dies(aren't they perfect with the flowers on this paper?). It may be difficult to seein the pic, but I added some stickles to each of the little accessories to match the paper. I created this sample to illustrate you don't always have to use the animals from my animal sets to make a card*, the little accessories work nicely spotlighted by themselves, and now you have mnore in Hip Hop. :) I also used three "greetings" from the set: "you're my", baby", and "girl". TIP: I love using DP with horizontal strips, it's such an easy way to line up and bring attention to your greeting.


Speaking of tips, I can't design a stamp set without giving you a tip sheet! Feel free to copy and paste this list to keep with your set, or you can download the word document I posted in the Gina K forum ;)

Hip Hop Accessories Tip Sheet

The individual words and greetings make the perfect little tags. They are sized to fit your small CB and Nestabilites dies, as well as SU! punches.

There are 4 "baby" versions of your favorite images from the Just So Hippy and Hoppy sets. However, they do not have to be babies, it could be a husband and wife, big brother/little sister,two friends etc... They are all looking up at the larger animal ("I sure look up to you!") if you choose to use se them alone, however, they look adorable watching the kite or the little butterflies from "Just So Hoppy".

The tiny umbrella in Just So Hippy is adorable with these smaller animals.

The bow can be cut off the rattle and placed on the neck, head or on the tail (as a little reminder?) of your animals to dress them up or make them look more festive/feminine.

The crown and party hat fit all the animals in all 3 sets. The crown is fun with "kiss me" and the frog, but can make any animal into a "queen for a day", prince, king etc!

The little kangaroo can fit in the big kangaroo's pocket (either cut the small one in half and adhere or mask the large pocket and stamp the little roo over it) or jump along beside the larger or ride on the tail(etc!)

The lily can be used on the lily pad or as an individual flower in their mouth, tail, hand. The pad can be givn a "stem" for them to wave like a big frond/fan!

The baby accessories make fantastic tags, accents and backgrounds in addition to being accessories for the animals to hold!

Enjoy grounding your animals in the new little grass image! Stamp it just under the feet and or at random at the bottom of your focal point or along a line to make a horizon

The greetings are designed to work alone AND with your greetings in the Just So Hippy and Hoppy sets. Many stand alone, but several you put together, there are hundreds (thousands?*) of combinations!
Just a few examples:

(Hippy/hoppy/so hoppy) together
(hippy/hoppy) holidays
hippy/hoppy) anniversary
(hippy/hoppy) Father's/Mother's Day!
queen(princess etc) for a day
I sure you look up to you DAD (sister, etc)
to the hippest new parents ( son, husband etc) around!
(So hoppy/hippy) you're my (mom, sister, dad etc)
I sure you look up to you MOM or
DAD I sure look up to you
you're my baby boy(girl)
you're my prince(princess)
you make me so(hoppy(hippy)
new baby boy
girlfriend
etc!

The different sentiments when paired together also work terrifically for the exterior and interior of your card.
Examples:
I sure look up to you Dad/Hippy Father's day!
So hoppy you're my husband/Hoppy anniversary!
Dad you're my King for a day/Happy Father's Day!
Queen for a day/Mom of the Year! Happy Mother's Day!

"kiss me" is VERY cute with the frog!! As all the other two lines greetings do in the other sets, it fits in your balloons and sign. Many of the one word stamps in this set will, too (MOM, DAD, son, girl, boy etc)


As always, please email me if I've overlooked anything, I'd love to add your terribly creative and clever tips!

* during the release party, I posted this card joking,"this one's for people who hate animals..." Emily Giovanni was the only one brave enough to raise her hand LOL!


** hey, if anyone wants to try to make a list(generate a formula???) to figure them all out, be my guest! ;)

"Yellow and Blue Make Green!"


Was that from a Ziploc commercial?? Anyway, had to pull out some of my favorite patterned papers in some of my favorite baby colors (SU! hostess DP pack, Wild Wasbabi striped ribbon) to piece this little card which uses FIVE (of the 50!!)* new stamps from "Hip Hop Accessories": a ginormous add-on set (that is great by itself!) for your Just So Hippy (from which I used the larger hippo here) and Just So Hoppy stamps! Now I a have baby card I could send out for a boy or girl!

The hippos (which I used a white gel pen on to fill in their eyes, teeth, and toes) are mounted on dimensionals on top of a classic Nestabilites Rectangle. I cut the rattle in two pieces and mounted each piece on either side of the hippo tail to make it look like it was behind it. :) I took a cue from my focal point and decided three strips of DP for the background would be perfect to represent eahc of their colors, and to balance the colors put the apricot on the left , opposite of the apricot hippo, and the wasabi in the middle, kind of symbolic of their "union". ;) (Do I over think these things??)

VERY IMPORTANT TIP for when your new "Hip Hop" set arrives, this will save you a lot of time: (You've probably never had this many on a sheet**, and you don't want to lose track of a single image or greeting! )

1. Before cutting your rubber, peel off the paper backing.

2. Lay the rubber on the desk face up and go over it with our waterproof ink pad, inking every image.

3. Press the glossy side of the paper backing(which you will later be sticking your stamp onto) down on the inked rubber, smoothing over it to pick up every image and remove. (or use a plain sheet of paper if you plan on keeping this stamps on an acrylic stand) Even with a fast drying ink this surface may resist it a little so blot a few times with scratch paper. It's okay if it smudges, this is just going to be guide for where to put all your stamps!

4. Now you're ready to start cutting away (while you eat your Gina K "thank you" m&m's!) Each and every stamp has a perfect spot mapped out on your sheet, no worrying about trying to figure out where they should all go, it's already done for you. (I had a pic of this but accidentally deleted it, sorry!)

I'm going to start doing this with all my new stamps that arrive, so much easier to stamp it once and make my own image sheet instead of trying to do it with all the cut pieces. Even with a sheet that doesn't have many images and plenty of room to make them fit, it's great to see at a glance which stamp I need to locate on my messy desk and put back where it belongs! I hope this helps you get organized and ready to start playing with your new stamps that much faster! :)

Happy Earth Day! Go recycle some paper or rubber! ;)

*baby hippo, rattle, "to the hippest", "new", "parents"! There is actually room in between the words on "to the hippest" for you to cut this sentiment apart and use them separately if you wish (which makes 52 stamps!) or you can leave them together and just ink up the words you want :)

**I asked Gina if I was crazy to put so many stamps in one set! (I'm not sure I ever heard back, but she probably was thinking,"Crazy, YES, but not for that reason!" LOL!) For the record, though, I had to laugh when I read in Gina K's blog that I had "married the hippies and hoppies and now they've all had babies!" I wasn't over planning animal weddings or anything!! But now that she said that I feel somewhat compelled to show you all the couples! ;)

Sunday, April 20, 2008

The Couple that Plays Together...

stays together! This card uses the kangaroo from "Just So Hoppy" and five new stamps from "Hip Hop Accessories"(now available for purchase!), can you find them all?* This is the first time I put two large kangaroos together, isn't it fun how easy it is to make them holding hands?? (no masking, just cut one out and adhere!) I was really excited to add a kite image to this set for all your animals to fly: nothing is quite as carefree as a kite and it makes the perfect little embellishment to float outside your focal point mat in whatever spot you card is needing "just a little something extra"! TIP: The kite looks terrific when stamped on DP and mounted on a dimensional. :)

The kangaroo baby fits inside the big one's pocket. Two ways to do this(and one of them is not masking, there are easier ways for this one, but if you really insist (shrug), go for it!): 1) Stamp and cut the kangaroo in half, adhering just above the pouch line. 2) Kick it up a notch by cutting out the baby, and stamping the large kangaroo a second time, cutting out the bottom portion of her body to mount on dimensionals over the baby roo for a 3 D/paper tole effect, as shown here. I had to give you the whole image in the set though, not just the top half, so it can hop out alongside it's mom whenever you think he/she is ready! ;)
EDITED TO ADD: one large kangaroo was colored with a Copic, one with an SU! marker. Can you tell which?**


Are you lovin' the little grass image as much as I am?? Now I want to go back to all all the cards in my basket and add grass! This is a really quick and easy way to "ground" your animals, no pun intended!! Stamp at random and color to make a little pasture, or just under each foot. You can also stamp them along an imaginary horizon with space in between and link them with a thin sketchy ink line.


And of course you have to wish the hoppy couple a "Hoppy anniversary"! also included! inside! :) Scallop & circle punches and 5/8" grosgrain is SU!, paper is Wild Asparagus and DCVW


Check back for more hip hop samples later and a new tip sheet! Thanks for stopping by!

*kite, grass, baby roo, "to the", "hoppiest", "couple"

** the red one uses SU! I didn't have this rust color in a Copic but I wanted to see if "coloring in circles" the way you do with copics worked with a regualr marker: I think it definitely cuts down on the stroke lines you see! Give it a try!

The Top Tin: Sharon McNair's!

Thank you everyone who participated in the contest and everyone who voted! You can go back and see the projects here. Sharon's Grandparent's Tin had the most votes, she won a "Hip Hop Accessories" set! This is the first stamping contest she has EVER entered, so I know she is thrilled and grateful for all your support !

Second place was Donna Baker's Breast Cancer Gift Tin, who will receive a special prize pack(Donna won my contest last month, and there she goes, being wonderful again!)

And last but not least, random.org chose comment #27, Erin Bailey.

Erin... said...
What great samples!! I'm voting for the grandparent tin, b/c I can just see how excited my daughter would be opening it up and coloring away with gramma!
April 19, 2008 3:48 PM

Erin will also receive a special prize package. Send me your addresses please and I will send your prizes on their way! :)

The next contest starts as soon as "Hip Hop" hops into your cart! Email me a pic of your best projects using "Hip Hop Accessories" for a chance to win my May release! Contest details soon to follow! Keep checking back for more great tin projects!

Now if you'll excuse me I have a party to attend! :) see you there!

Now THAT Was SOME PARTY! Sneak Peek #4


I just had to come up with something off the wall for you* to showcase this new Gina K Designs set ,"Owl Always Love You"! (Hope I succeeded!) I thought since they are attached to the branch you could have it extending from the right OR LEFT side of your card (if you wanna go there)! The balloons from "Just So Hoppy" extending upwards complete the illusion... :)(and of course the "classic Gina K expressions"("perplexed"!) are perfect here (you just know these two are going to spend all morning trying to recount last night's events over coffee and migas!)


Here's that DP again from "the grill card", I don't know, these colors are just calling me! I colored my owls and balloons (all done with Copics) before I selected the paper, but decided to go for it anyway, even though the DP didn't have any turquoise. Hopefully I made it work pairing it with the bright ribbon, and sometimes it can be good to have a splash of unexpected color to give it a little more "oomph"!


TIP: I made sure to cut the paper so the top and bottom of my focal point hit where the white lines intersected in my pattern, it looked really off otherwise, but very sharp this way, so I'm glad I took the time to redo it.

T minus 17 hours til the release party!!! can't wait, can't wait!! ( and I'm SO excited you're excited about "Hip-Hop", that rocks!! :) More sneak peeks of "Owl Always Love You " here!

EDITED TO ADD: Voting is closed for the contest! I've pulled the post so that no more votes will be added and the results can be tallied; check the release party thread tonight to see who won!

*Now that I'm "old", my idea of a good party is having adult conversation with my friends I never get to see, but I remember back to my college days when it wasn't considered a successful party until something got broken, there were footprints on the ceiling, etc etc...I can't say I miss those days!

PS Maybe being from Austin I just have bats on the brain (we have the largest urban bat population here in, I believe, the entire world! and as a happy result, very few pesky bugs:)

Saturday, April 19, 2008

So Hoppy Together! Sneak Peek #3

QUICK: how many different stamped images do you see here??* how many are new?** ones you already have??"***

EDITED TO ADD: Voting is closed for the contest! I've pulled the post so that no more votes will be added and the results can be tallied; check the release party thread tonight to see who won!

Jessica Rone emailed awhile back and said images from my first two sets "Just So Hippy" and "Just So Hoppy" were allowing her "to create the scenes of my dreams"; well, dreaming just got better! With my newest release, "Hip Hop Accessories", you'll have everything and more to deck out your first two sets(OR a very cute set on it's own!) and create cards for any person, at any time of the year****. Think "Hippy holidays!" or "Hoppy Anniversary!" (I will of course have a tip sheet of ideas for you :) In addition to 37 new greetings(!!!) you have pint-sized counterparts of your favorite animals from "Hippy" and "Hoppy" that could be babies(perfect for Mother's and Father's Day), but could also allow you to have big and little siblings, husband and wife, two friends, on and on! And a ton of little fun props of course for them to hold and complete your scene or make backgrounds, tags, or a little embellishment for a spot that just "needs a little something"! And did you notice the new frog's adoring look up at the bigger one? "I sure look up to you!";) There are 50 stamps in this set, and it's 
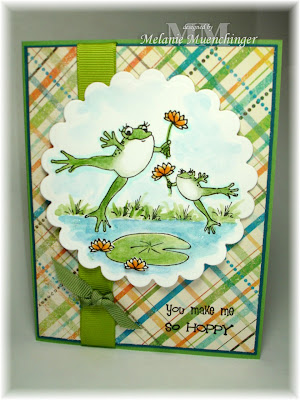
still just 17.95!(approximately 35 cents per stamp!)


The card above was inspired by my "three" boys, my husband and two sons. All three are "all boy!" I was so excited about how the card turned out: I got to add all the little details I wanted, but it still appealed to all three guys. (Stick a frog on it and I guess they'll let things like "girl ribbon" slide LOL!) :) On that note, a few frog pics I have to share: here is our koi pond, which my husband Paul dug/landscaped when Jonathan was just a baby, it's FABULOUS! (I'll never understand it, but within hours of a rainstorm hundreds of bullfrogs find this pond!! (click on it and you'll see our collection of "frogs" hiding among the plants) :)

And here's Jonathan at age 4, with one of at least 20 frogs we caught one "morning after"! (Paul likes to go release them at the neighbor's house, heh heh!)


Originally I was going to add a little tag like Gina did on her giraffe card with a "husband" or "son", but in the end I decided not to, because each of "my boys" looked at the card and saw something different:


William(age 3): "Mommy and BABY!!"
Jonathan(age 5): "Hey! that's me and Dad!"
Paul(older): "Yeah, that's you and me, hon' "

This made me very hoppy(hippy?!) because it let me know the images were telling the different "stories" I hoped they would when I designed them. :) And had I chosen to be more specific than "you make me so hoppy", I could have also made: "husband, you're my prince", "mother and son, hoppy together" etc(just using greetings from this one set!)


I used my aquapainter and WWCs to color everything, and I believe this is Magnolia DP(from a Costco pack). I used three different "greens here, Wild Wasabi for the base and Olive and Moss SU! ribbons. Normally this would look "off", but I think the different shades actually all came together here with the variations of green in the focal point and the patterned paper.


Hope you are as excited to see the rest of the set as I am to share it with you! Just one more day!! Check here to see what the rest of the Design Team has done with the set so far! (and check back later today for projects to vote on for this month's contest!!

*Seven

**Five! a new little frog, a fabulous tuft of grass, lily pad, lily, and "you make me" greeting

*** Two: the big frog and "So Hoppy" from "Just So Hoppy". Don't have these already?? What are you waiting for?? (oh, this set, I see! :) Buy all three of these sets on the 20th for just $53.85, and get free shipping AND the new free with three set! (Insert crazyamazed emoticon here!)

****And you can bet they will work with future sets I've designed, hee hee! (high five!)

Friday, April 18, 2008

Time To Vote!

Here are the top "tins" submitted for this month's contest!(in no particular order) I will be sharing some more pics I received along with their great tin ideas later, thank you everyone who submitted!

The voting is over, but here they are, enjoy these ideas!
Lee's Makeup Tin


Pamela Smerker's Goodies Tin (hopefully you can read about the project, I can only link the blog home page not the exact post!can someone send me the link? the name is "Stretching a tin label"...Pamela??)


Bee's Message Tin


Sharon Mcnair's Grandparent Survival Kit (Sharon doesn't have a blog so I have linked the post her description of the project)


Donna Baker's "What Cancer Can't Do" Gift Tin


Carolina Buchthing's Altered Mother's Day Planter

Thank you for helping me pick a winner!

*You may vote for yourself! :)

Comfort and Peace: Sneak Peek #2

I am SO! excited! about this new set from Gina K Designs "Comfort and Peace"! I thought several of the greetings stamped together here (six, count 'em, SIX, all from the SAME set!) would make a beautiful free verse "poem", very similar to the wonderful Susan Polis Schultz poems if you've ever read them.

I don't have ANY greetings like these in my stamp collection, and now I'm wondering how I've gone so long without them (oh yeah, because I've never seen any offered quite like these!) It can be so difficult to know what to write in a card when someone is dealing with something so difficult, but I think these communicate all your loved ones need to know. They say much more than the usual "Thinking of You" and are more versatile than "With Sympathy". In addition to people dealing with illness and loss of loved ones, I can also see using these for friend who has lost a pet, someone struggling through a family crises, or just a very busy, stressed friend that needs to be lifted up. It's so important for them to know that not only are we sorry, but that we'll BE there for them. Some days I think I'd burst into tears of gratitude if someone sent me a card that said "remember to take care of yourself, too" What a good friend!!

TIP: I put ALL the greetings on a large acrylic block so I could ink them all up at once and stamp just once! Don't you love unmounted?? Before peeling them off, it would be good idea to stamp out a few more to have on hand, because unlike a birthday or anniversary you know is coming, unfortunately the need for a "difficult times card" often comes at the worst, most unexpected times, so make it easier on yourself to get a much needed card out a little faster. :)


Below is the inside of the card* which shows one of the lovely florals included in this set. Here I cut out a window through both the base and green CS with my scalloped nesties and sandwiched some vellum paper in between. These bold flowers (ink and shade directly on your image with markers before stamping**) are SO gorgeous, I love the tropical look, again very different from the many, MANY flowers I have. AND(it gets even better!), it's FREE when you buy three sets from Gina K Designs this month! AND, it coordinates with LAST month's free set, which you can purchase on the 20th and put towards 3 sets to qualify, how great is that?

You'll notice I didn't leave a space behind the window to write anything(you can put their name at the top and sign it at the bottom so it won't show through, though..), but what else needs to be said?(I hope no one would think me insincere for not writing a note when I took the time to make the flippin' card LOL!!! ahem ;)

More peeks of this set at Gina K's blog!

Okay, tomorrow: a sneak peek of MY NEW SET!** Wonder what I'll show, hmmm, I better decide soon! :) Any guesses??

* I stamped the "poem" on the white nestie layer FIRST, adhered to the base directly under the window , then stamped again on the outside of the card, it was very easy to line up this way! If you're a wee bit off, that's okay, gives it a nice shadowed look

**TIP: I hit it randomly with my old olive marker, not necessarily on the "shadow/under side", which I think gives it a kind of "sun-dappled" look like it's coming through the trees) :)

**AND the contest "candidates": are you ready to "get your vote on"??

PS When I have a minute to come up for air at some point during/after release fun/craziness, I will be emailing each and every one of you who has commented on the "Fly Away Home" post! I'm so sorry to hear how many of you are without a mom, but I'm so GLAD I posted and that we can all support each other/share our stories! BIG GROUP BLOG HUGGGGGGG!!!