Showing posts with label Stately Flowers 3. Show all posts

Tuesday, December 11, 2012

Becky and Melanie's Holiday Hop!

This blog candy giveaway is now closed. See post above for the winner.
  
Good morning!  Becky and I thought it would be great fun to team up for a little Holiday Hop today! We are showcasing Becky's new set, "Warm Woolen Mittens" along with Becky's new cut file "Grand Banners" and "Grand Banners - Winter Sentiments" and my newest set, "Lots of Letters" (clear  and rubber) today, along with a few of my designing friends' recent faves from me! Joining us are some dynamic designers that will knock your socks off with their beautiful work today!  Make sure you visit everyone's blog to leave a comment and be entered to win a clear "I do!" and "Beyond Baskets" stamp set! We will draw a winner randomly and announce Thursday morning!
Now on to today's projects!

 Today I have a sample using both Becky and my newest sets, Warm Woolen Mittens and Lots of Letters! I love how this design turned out and hope it gives you lots of ideas for other ways to frame the letters than the ones I included in the set, like, mittens, for instance! I stamped the outlines of the mittens in Memento Espresso Truffle, and because I didn't have any masks ready, I just went ahead and made them overlap, and colored in the little areas with a Blue Copic, just like the loops in the scripty greeting (and over parts of the knit pattern for accents), isn't that fun?! Then I centered a letter on each mitten to start my greeting, cut them out and popped them up, and added Becky's cute sentiment below. 

TIP:  Stamping out the Lots of Letters alphabet to create just shorter, large words on a card is a *great* way to incorporate them with part of another greeting, rather than spelling out a long one. Mixing fonts and letters sizes this way gives you cards and sentiments such a fresh feel.  I used a Spellbinders Matting Basics B die to trace a border with a marker and then added the little faux stitch detail to connect the greeting to it.  Card base is the beautiful new Powder Blue Pure Luxury!

 Next, I have a very simple card with Lots of Letters and the coordinating Pretty Patterns set (clear or rubber). This fun circles border looks terrific with circle framed letters (punched with a 3/4" circle and popped up), and I will be making some personalized cards and gift sets for the holidays.  Inks are Memento Teal Zeal, Summer Sky, Sweet Plum, Bahama Blue and cardstock is Powder Blue and Pure Luxury White.

 Finally, I had to share this card (because I love it so!) using the magnolia from Stately Flowers 3. It's one of my favorite images in the series, and I made it for a movie inspired challenge (favorite films, can you guess?*)  This is like the triple panel stamping technique, but way easier if you have Spellbinder Matting Basics dies!  Stamp just one piece of CS with the magnolia in hot pink.  Now place three nested rectangle dies from the set on top, centering each and run through your cutting machine. Leave the dies in place and sponge peach ink on top with a sponge dauber. Remove dies and cut two mats 1/8" larger from Passionate Pink to layer under smaller stamped mats.  
  Adhere to a Just Peachy Pure Luxury base.  I used one of the smallest dies in the set for the greeting and stamped the flower again on Ivory (in that same pink) and added just hints of color with Copics (E93, YG00, YG63) and cut out.  I stamped it one more time on Fresh Asparagus cardstock in Bamboo Leaves and cut them out to layer underneath the flower.

Here are the sets I used today:


 Happy holidays and happy hopping!  Don't forget to leave comments for more chances to win some stamps!
Designer Hop-
Becky Oehlers (Illustrator of Warm Woolen Mittens)  
Thanks for visiting today! And thanks to my fabulous guests!

*Steel Magnolias, using Shelby's wedding colors "Blush" and "Bashful"

Tuesday, April 3, 2012

Magnolia in a Vase, and Some Info

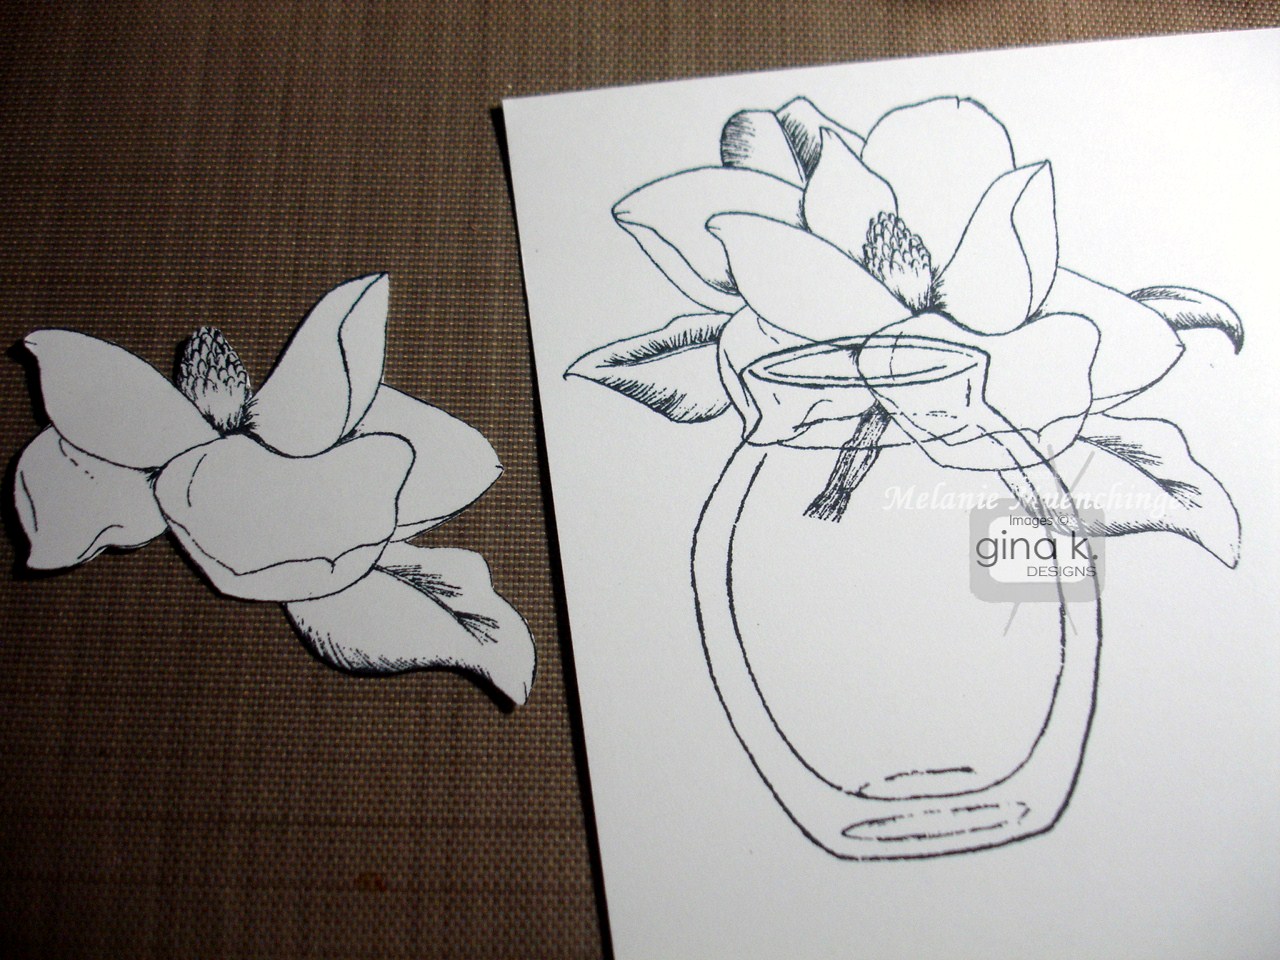
Good morning! Today I have a magnolia from "Stately Flowers 3"(one of my favorite images in the series!) inside a small bud vase from "Buds and Vases". I just love the mix and match possibilities for all my floral sets with these vases and baskets since they are drawn in the same style and scale! Cardstock is Gina K Pure Luxury Chocolate Brown, Little Boy Blue, White, and Lemon Drop. Die cut is Spellbinders Labels 20.
First stamp the flower and the vase in black on white CS. No need to mask, top where images intersect will be covered. Just stamp a second magnolia and cut out the petals that will overlap the vase in the front, plus a few extra. This will create so much dimension in the final floral image.

Color the center with Y11 and shade left side with W-3. Use C-3 to create shadows on petals at center and undersides. I just make tiny flicks with the tip. Do the same for the edges of the vases and to suggest water and a shadow underneath. Use a blender to blur lines if edges of gray look too hard to you. that's all you need to fill this clear vase with water!
Now add YG93 to the part of the leaves that are shaded and leave the areas on the outside and toward the middle with no black hatching marks white. I went ahead and colored on of the leaves that will be covered by the popped up flower, just in case you can see underneath form certain angles, but no need to shade as as you do on the exposed top flower.

Here it is layered and mounted on the card.
I added an adhesive pearl on the greeting and embossed both he chocolate and blue layers with Victoria CB folder. TIP: Adhere the brown layer first and then emboss together for a seamless pattern. Hope this card inspires, I adore these two images together!


Before I go, I wanted to address Verna's question from yesterday about loving the flowers, but not really having a use for the state name stamps. I totally get that, Verna, and am sure it has crossed others' minds! (and of course, not all of our GKD fans even live in the US, they are all over the world!) If you look over the sets, however, you will see the state names are really a very small percentage of the total stamps, both by number and square inch of rubber used, here is a breakdown:

Stately Flowers 1-20 stamps: 8 flowers, 1 design element, 4 sentiments, 4 flower names, 4 state names

Stately Flowers 2- 18 stamps: 6 flowers, 5 sentiments, 3 flower names, 4 state names

Stately Flowers 3- 17 stamps: 6 flowers, 3 sentiments, 3 flower names, 4 state names

(If you are worried there is a trend that each set has less than the last, the images just got bigger. And I am happy to report the next Stately set to come out has even more images and greetings than the last few, plus some "winged things" to go with, know you will love! Stay tuned!)
I want to let you all know, if you don’t have any of the Stately sets, that these are some really BIG images! The magnolia, for example, measures 3 3/8” x 2 ½”. That's a big stamp! Your card needs little else to feel complete. Also, I pack these stamps into sets as *tightly as possible* to still allow for cutting. There is very little rubber left. If you compare them to other sets of similar size on the market, these have far more greetings and images. I try not to let a bit of space go to waste to provide the maximum versatility and bang for your buck!

I'll admit, I've bought many a set in the past that has a a few images which never see ink as well as the extreme that I got something for just ONE image ( I know, I know!!), but used that one stamp so much that I felt it was well worth it! I hope these flowers would make you feel the same. They are terrific for patterns and colored focal points, and thought carefully about which flowers I put in each set together, to give you a lot of different looks and hopefully at least one flower that really makes your heart skip a beat. You can probably guess from the amount of use each gets on my blog which ones are m personal favorites! ;) And while I have not yet used the state and flower names myself, I am a lover of "words" and enjoy knowing the names of things. On certain designs, particularly vintage ones, having the name and state gives it very botanical feel, lie it's is from an old book or seed catalog.

Finally all these sets coordinate with so many of my other florals, as I've shown the past two days. Baskets are next! :)

Having said that, here are some ideas for those state names (or any stamps in a set that you can't see inking up) if you don't plan to use them... ;)

  • Offer state stamp name as a blog candy or pay it forward
  • Know someone in that state? Send them the stamp as a surprise! Even if they aren’t a stamper, they would probably get a lot of use out of that one word for other items.
  • Post in a online stamp trade forum, someone might really want just that particular state name!
  • Save to use as an adhesive remover! Yes, an un-inked rubber stamps works the same as those adhesive removers you’ve seen for sale. If you have some excess sticky stuff squishing out on your mat, or remove a mat and have a bit of yucky adhesive left over, rub clean stamp over it gently and watch as it peels the offensive stuff off and your cardstock looks good as new! (This does not work if the paper tore off)
  • pads under a coaster or a trivet (hee, this last one is a joke! sort of...!)

Hope this helps you in making decision whether or not to purchase and what to do with any extra "unwanted" stamps! (Find it a little home, stamps need love, too!!) :) I really need to go back to doing tip sheets for all my sets. Let me know if that is something you want and use! Have a terrific day!!

Tomorrow, bunnies!

Friday, March 16, 2012

Guest Designer: Cynthia Olheiser

Good morning! Thanks so much for all your kind words this week visiting our hops! :) Going back to Stately Flowers 3 today with my guest Cynthia Olheiser! To remind you, Cynthia lives in Alaska and was a great person to showcase her state flower. Today she works her magic with the two other state flowers in the set, here is one using the bitterroot.

I love that she chose to do a crayon resist technique with these flowers, (loving those pops of white at the ends of the petals!) and then sponged he purple and green in big round sections to give it this great look! The repeating circles in the DP are a lovely complement and the glitter gives it such sizzle! Gorgeous card, Cynthia!

Here is a little more about Cynthia in her own words:

Describe your style/what you think you do best: Clean and simple is probably the style that I would use to describe myself. Most of my card creations are sent to family, friends and church members by mail. I like to keep the layers and embellishments minimal for mailing.

FAVORITE TECHNIQUE: This is really tough because I like to experiment with lots of techniques. However, I really enjoy adding machine stitching to my projects. It’s an inexpensive technique and gives the project a finished look.

COLORS/COLOR COMBO: I tend to gravitate toward “Autumn” colors – browns, oranges, reds, yellows. I am least comfortable using pastel colors.

FAVORITE EMBELLISHMENTS: Ribbon, baker’s twine and pearls

FAVORITE GINA K SET BY MELANIE: A Year of Flowers”

FAVORITE GINA K SETS (FROM ANY ILLUSTRATOR) The very first set that I bought from Gina was “Just be-claws”. The crab/lobster in the bucket still makes me smile!

CRAFT SUPPLIES I CAN’T LIVE WITHOUT: Copic Markers, Fiskars paper cutter, Cuttlebug, and scissors

I’VE BEEN STAMPING FOR (HOW LONG): I started stamping in the late 90’s when my neighbor invited me to a Stampin’ Up! party.

I GET MY INSPIRATION FROM: StampTV, Splitcoast Stampers, Paper Craft Magazine and various blogs that I visit.

Tell us about your FIRST stamping experience!! I don’t really remember my very first experience. I come from a crafty family and remember making the ink thumb print animals when I was young.

Tell us about your most MEMORABLE stamping experience!! Two highlights for me were making the wedding invitations for my sister and birthday invitations for my niece’s 1st birthday party (then surprising my sister by traveling 2000 miles to be at the party!)

THE MOST IMPORTANT THINGS I’VE LEARNED ABOUT STAMPING/CARDMAKING ARE: Don’t be overly critical of my creations. Create what I enjoy since that’s really what the craft if about.

SOME OF MY STAMPING/CRAFTING GOALS ARE: I have taken a long break from scrap booking and would like to get caught up again this year. A longer term goal is to be published by one of the card making magazines.

ADVICE FOR BEGINNERS: Join various stamping challenges to learn and stretch your creativity. You may be surprised at what you can create when you participate.

FAVORITE THING TO MAKE THAT AREN’T CARDS: Scrapbook pages from our vacations, my nieces and our two dogs (who each have their own scrapbook!). I also enjoy altering frames that I pick up from garage sales.


CHALLENGES I LIKE TO PARTICIPATE IN: My favorite challenge to participate in would be sketches. A sketch really gives me the start to create a card.

Another craft I have a talent for (or one I would like to try): I enjoy scrapbooking, knitting, and cross stitch. Some day I would love to start quilting, but my budget will only allow for one craft at a time!

Tell us about life in Alaska! This is my 19th winter in Alaska. My husband and I moved to Anchorage in the Fall of 1993 and have never looked back! The state is beautiful and we both enjoy the outdoor activities that the state offers – camping, hiking, skiing, 4-wheeling, fishing and hunting. The summer months are generally from June through early September. September is generally raining and lasts until mid-October when the first snowfall can arrive. During the summer months we experience 20 hours of daylight with only twilight during the four hours of dark around summer solstice. Winter months are the opposite with 4-6 hours of daylight at winter solstice. We lose/gain a few minutes each day so it’s gradual, but noticeable at solstice. Of course, Alaska is known for its moose, bear and salmon. We have all three within the city limits of Anchorage! Many moose have taken a liking to my daffodil buds in the Spring…. Munching them as though it were a free smorgasbord. Luckily, we have a 6 foot privacy fence in the back yard to prohibit the moose from reaching our vegetable garden!

TELL US SOMETHING ABOUT YOURSELF THAT MIGHT SURPRISE US…

I have a dual bachelor’s degree in Business Administration and Home Economics with an emphasis in Clothing and Textiles. I took my first sewing class in 7th grade and learned how to use a sewing machine by stitching on paper. It seems as though I have come full circle from my days in that Home Economics introduction class! I still have my Brother sewing machine that I bought in college and it is what I use when adding stitching to cards.

WHAT I DO WHEN I’M NOT STAMPING: In the summer months I spend as much time as possible outdoors. My husband and I have several flower gardens and a vegetable garden. We also spend our summers camping, fishing and riding 4-wheelers on mountain trails with our two Labrador retrievers. During the Winter months I cross-country ski, read and spend time in my craft room.

A FAVORITE QUOTE:

“I can do all things through Christ which strengtheneth me.” Philippians 4:13*

Be sure to visit Cynthia's blog today to leave her some love and see what she did with the magnolia! Thanks for visiting, and have a terrific weekend!

*This scripture is in my new Wild Flowers set :)

Wednesday, March 7, 2012

Sponsoring CPS this Week

I am honored to be sponsoring the CPS challenge this week, thanks for creating this fabulous sketch! This was the first time I used the mini version of my magnolia from "Stately Flowers 3" and I love how delicate they are! Not sure what this card will be "celebrating" quite yet, but I'm so glad I used the red for pop instead of staying monochromatic, love the drama it adds!
This was also my first opportunity to play with Spellbinders"Romantic Rectangles" (I used just the top half of the die cut for my frame, and I hope more of their new offerings have that pierced edge, isn't that gorgeous?) and "Decorative Inserts 3".

Materials:
Stamps: Gina K Designs “Stately Flowers 3” and “Celebrate the Season

Cardstock: Gina K Pure Luxury White, Black Onyx, Red Hot

Ink: Memento Tuxedo Black, Copics C-1, C-3, YG63, G99, Y02, Y21, Sakura gold glitter pen

Accessories: Spellbinders Romantic S5-090, Classic Edges Two E8-008, Decorative Inserts Three E8-011, Grand Calibur; 2 mm adhesive pearls, scissors, pop dots, Cuttlebug Victoria folder

I donated a signed copy of my book “A Year of Flowers, 64 pages of step by step technique tutorials for 36 cards, arranged by season and occasion, all featuring my stamp set of the same name from Gina K Designs. This book also includes a perpetual calendar for important dates so you can plan your cards as you work and send them out on time. Be sure to check out the details on the CPS blog for how to participate in the challenge and enter the contest for the giveaway.

Good luck! Thanks for visiting me today! Please stop back tomorrow for our release party invitation and to see my new set!

Tuesday, February 21, 2012

Southern Red Velvet Inspired...


From the time I was little, my favorite cake to make and have on my own birthday was Red Velvet, a southern tradition! If you've never had it before, I highly recommend, the flavors are terrific and the deep red color of the cake is a showstopper! Here is a photo I've shared before of me decorating one in the late 70's. (Much like William's cake aesthetic, I didn't leave an inch undecorated!)
Today's card is inspired by this terrific, sentimental dessert using the Stately Flowers 3 magnolias on Gina K Pure Luxury Lipstick Red and White. Flowers are stamped in Memento Rhubarb Stalk and dies are Spellbinders Fleur de Lis Rectangles, and Petite Classic (Large and Small) and Scallop Oval Nestabilities. Let your dies make it fancy, no need to color today! :) The big creamy magnolia petals here remind me of peaks of frosting and layered tags a pretty serving tray! The cake itself really is this deep beautiful red...
Following is the recipe my mom and I use for red velvet cake. The cake is extremely moist and great paired with this shortening based whipped frosting. In January I made a red velvet cake for my brother's birthday (on request), for once bypassing that tried and trued recipe, instead trying out one from Buddy Valastro's Carlo's Bakery (ooh, yikes, would the gamble pay off?) While there were good things about the finished cake (which by the way was harder to make, but it got moister over the next few days instead of drier and the buttercream was VERY good, two pluses), Buddy, we love ya, but I really wished I had stuck with the cake from my childhood, nothing compares "to Mom's"!

Red Velvet Cake

1/2 C shortening
2 eggs
1 1/2 C sugar
2 T cocoa
2 (1 oz) bottles red food coloring
1 C buttermilk
2 1/4 C flour
1 T vanilla
1 T vinegar
1 t salt
1 t baking soda

Preheat oven to 350 degrees. Cream shortening, eggs and sugar. Make a paste of the cocoa and red food coloring. Add to creamed mix. Add alternately buttermilk and flour, beginning and ending with flour until mixed. Mix vanilla, vinegar, salt and baking soda separately, then fold into batter. (Note: mixing less time the cake will be fluffier, mixing longer the cake will be denser, but very moist either way) Pour into 2 9" greased cake pans. Bake 24-30 minutes.

Frosting

3 T flour
1 C milk
1 C powdered sugar
1 t vanilla
1 C shortening (part margarine)

Cook flour and milk on stove til thick; cool. Cream sugar, vanilla and shortening until light. Add cooled paste and beat until peaks form. Spread on cake.

Enjoy!

PS Annalize said last week...

I would like monochrome or any 2 colour ideas with your stamps (no colouring ;) CAS and QAE (Quick and Easy :)! Did not get the feeds but saw on FB. Your enthusiasm is contagious ;) Thanks!

So here it is: two colors/monochhromatic red and white, no coloring! :) Have a great day!

Monday, February 20, 2012

Guest Designer: Cynthia Olheiser

Good morning! Today I am sharing a card made by Cynthia Olheiser, whose work with Stately Flowers 3 you'll be seeing more of in the coming weeks! Cynthia has a gorgeous gallery on StampTV and this card a few month ago sold me on her ability work magic with my flowers! I was so excited to see she was from Alaska, which made her a great choice to help me showcase the Forget-me-nots of her state in this newest set!

Don't you love how many shades of blue are in the world? These are so different from the shades Kris and I used on our Forget-me-not cards and I love 'em all! This vivid sky blue just pops with that pink, and I especially love the way she sanded the Victoria Cuttlebug embossed layer (so pretty with the shapes in this image) to reveal those little bits of white, just like the middles of the flowers! The tiny Swiss Dot embossing is such a nice detail to with berries in the image, and I love how she matted the layers to have the one row revealed across the top. Her focal point is like a mini canvas with the black pen drawn frame and the popped up flowers give it so dimension. Terrific design, Cynthia!

TIP:
Whenever you are going to have a greeting on an embossed layer, be sure to stamp the sentiment before embossing so that you get a get a good impression and it's easy to read.

Please be sure to check out Cynthia's blog, Stamping in Alaska, today for a list of materials for this card and another sample. Leave her some love!

Thursday, February 16, 2012

Forget-me-not (You didn't!)

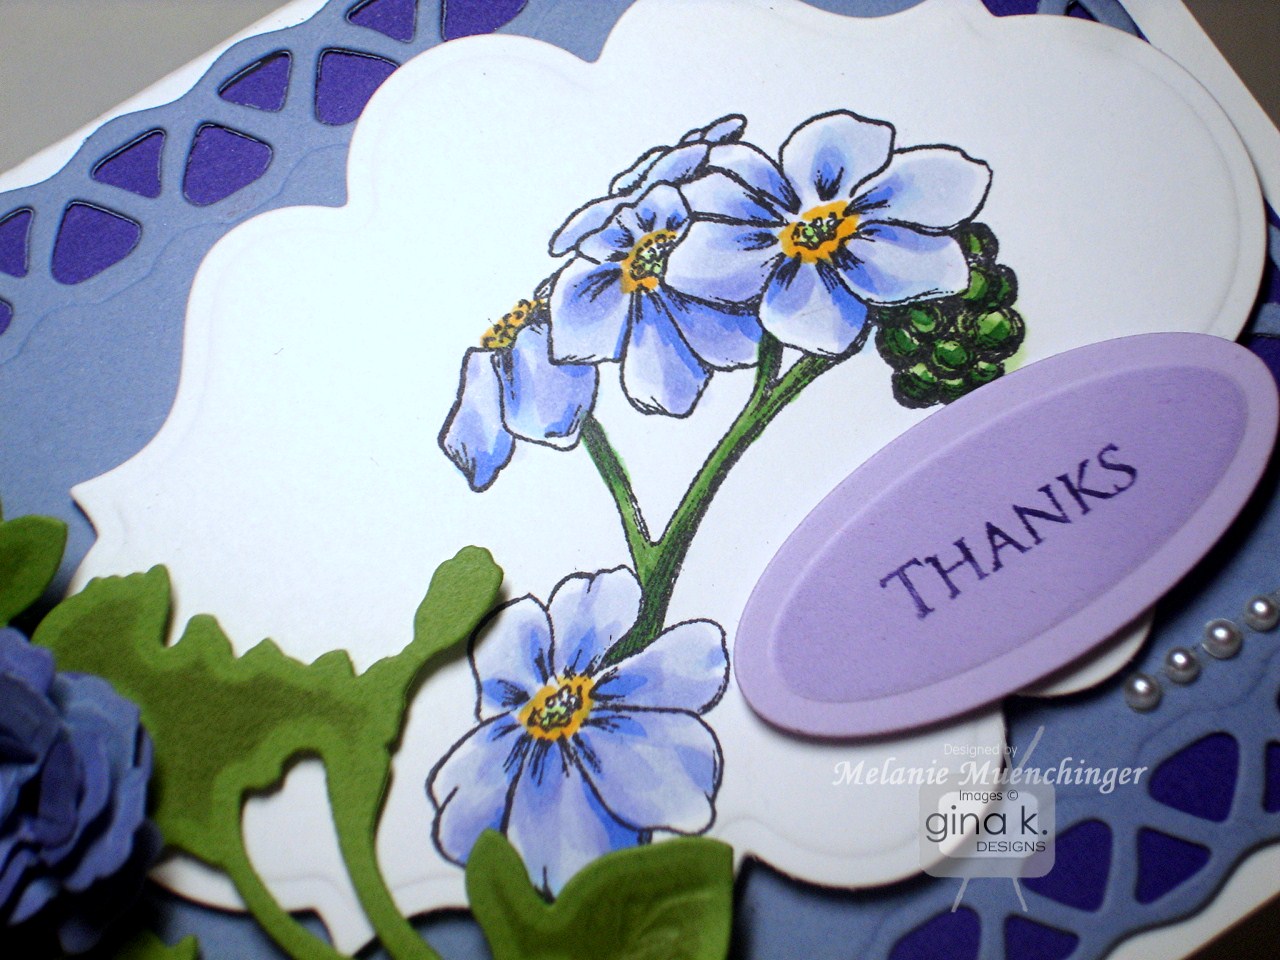
Good morning! I am finally getting around to sharing a card I made with some Forget-me-nots I'd colored from my new Stately Flowers 3 set a few weeks ago. I really wanted to wait until I got some new Spellbinders dies on my list to create a real impact on the design, and I am SO glad I waited! :) These are the first time for me to use the Lattice Rectangles (oh, how I love this set!!) Labels 20, Shadow Flowers (these stems will be the perfect "flourishes" with ALL my flower images! Like tucking little pressed flowers under my mats, isn't that delicate die cutting so lovely?) and the new Bitty Blossoms. You've seen me use these Petite Ovals a bazillion times, my "go to" for small sentiments! the latticed and rolled blossom are cut from Pure Luxury Little Boy Blue and layered over Vibrant Violet, stem is from Grass Green and tag is Lovely Lavender.
The Copics I used to color the flowers are B63, BV02, B66 (lightest to darkest on flowers, see how I just trace the lines in the image in the middles of the petals with the darker color to create the folds and trace the undersides to cast shadows fro the petals above?) Y17 for middles, and YG11 and G07 on the stems and seeds. There is so much shading on the stem in the image already you really don't even need to different shades, saves a lot of time! Looking at the closeup, I realize now I forgot to create a shadow around the flowers (oops! Oh well!) I also skipped sponging into my label die, keeping this card clean and bright. Finishing touches are just some tiny adhesive pearls to the corner and center of rolled flower.

Hope this inspires! Thank you for visiting today! Be sure you have entered my Spellbinders blog candy from Tuesday's post (scroll down), I will announce a winner tomorrow!

Friday, February 10, 2012

Special Moments


Hello! I finally got around to creating a card with this bitterroot image from Stately Flowers 3 I colored a few weeks ago! I used images online to help me choose the colors, and saw that those tan colored buds would terrific as a really bold pink and brown combo! Base is Gina K Passionate Pink and both DPs are from the Casual Friday pack. I might not have thought of this particular pack at first glance when I'm thinking about "flowers", but when you hold your images next to you papers you'll start seeing colors and similar motifs like the pointy leaves popping out...

Tracing the undersides with a W-3 Copic creates such a realistic shadow! Greeting is from Mehndi Wishes, I thought the sentiment was perfect with the single gorgeous bloom! I added some teensy adhesive rhinestones to the flower center, stamens and o in "Moment" for some sparkle!

Have a terrific weekend! We have family here celebrating little William's 7th birthday oh my, where does the time go! I remember posting about his THIRD birthday just after I started blogging! Talk to you soon, hugs!

Thursday, February 9, 2012

Hello from Alaska

Good morning! Thanks so much for all your sweet comments and visiting our hops the last two days. Today I am sharing a card made with the Forget me-not from Stately Flowers 3 (because I haven't shown one with that yet, colored it, yes, bu haven't finished the card!) from one of my readers Kris Reeves (Kris in Alaska) I did some digging and found some very talented stampers from Alaska (check back in the next few weeks from another Alaskan guest Cynthia Olheiser!)

Isn't this blue gorgeous?! I learned something receiving her photo: all the ones I'd seen online looked so violet or periwinkle. Kris said, though, "The forget-me-nots here are definitely blue... I grow them in my yard... or I should say they grow where they want to in my yard! Some of them do have a periwinkle phase to them but it's the gorgeous "blue" that I look forward too when they are in bloom. I've actually never seen them any other color than blue or light periwinkle except in catalogs and with artists' license in designs. Do grow them... they are so very lovely... especially after a long winter of snow!"

Wow, how gorgeous would flowers this color be in your yard? Now I might have to use the this image with Gina K Pure Luxury Blue Raspberry! (Anyway, as you all know, all's fair in coloring in stamping, make it what you like!) :) I love how she created the border with the flowers around the oval die cut window and added just some hints of violet to the little berries and petals with colored pencils.

Another fun thing, I spied a little clay pot growing kits for Forget-me-nots at the Target dollar spot this past week, just praying they will grow! :) They are sitting on kitchen window sill so I'm hoping they'll make it and I can see some of these in real life. Wouldn't it be sweet to gift one of these pots to a teacher or friend along with a stamped card to match? So...I'd run to Target ASAP before they sell out of these little dollar mini gardens, would be cute as a little girl's birthday party favor, too, friend for Valentine's Day etc! Even my boys were excited to put the little seeds in the pot and add water to the disk of soil to watch it expand. Hopefully I can come back in a few weeks and have picture of some three inch plants, ready to transplant into a larger pot or our garden!

Thanks for visiting today!