Showing posts with label Just So Hippy. Show all posts

Wednesday, February 18, 2009

Hip hip hurray!! The pub is here!

Just had to share : my first published card is now on the newsstands! CardMaker March 2009, (pg. 86, my new lucky number, hee hee!!) I love that my first published card just so happens to use my very first stamp set "Just So Hippy" (as well as "Hip Hop Accessories"), how appropriate! (That was not intentional, I submitted several others that first time, so it could have been any of one of my first several sets!) I actually spotted the magazine at Barnes & Noble a few weeks ago, but was waiting to get my issue in the mail so I could share a pic with you! (A few of you actually already saw it, and emailed me congrats, thanks ladies!) ;) Obviously I knew what the card was going to look like, but it was such a fun surprise to see how beautifully they photographed and staged it, I heart that daisy!! What a thrill!

So, I was going to put my extra copy that they send up for grabs here on the blog, BUT, I decided in the end I really needed to give this first one to "Mom", my first supporter! You understand, right? ;) But the next one (July 2009), I will, okay?? (That one has FIVE of my cards in it, squeal, can't wait, can't wait!)


The main reasons I *think* this one got accepted:

clean design, easy for any stamper to recreate, FIT the call (baby theme), some tradtional & non-traditonal baby card elements (hippos?), with a bit o' humor thrown in! ;)


The month I submitted this last summer, was my first time to try getting published, but as I said earlier I sent in several other cards that time too that did not get accepted. Carolyn wrote a post about r*e*j*e*c*t*i*o*n the other day, well, i know something abot that, too! I've definitely had more rejected than accepted! Out of curiosity I just went and counted all my submissions: about 1 in 4 has gotten published. As you know, I make a lot of cards, more than one a day last year! I don't submit everything I make ( less than 1/10th of what I created ), but try to figure out which ones I think have the best chances. (Lots of my personal favorites have been passed over! and I'm fine with that, it doesn't make me like the designs any less) Fortunately, with Cardmaker you can just email a picture, so it doesn't hurt to try submitting several, if it's not accepted (I prefer that term to "rejected!") you still have that card you love to do with what you like!! so GO FOR IT! Everyone will experience some rejection, but it's worth it (seeing your card in print is great, the money's not bad either, a very nice supplement to your crafting fund! I treated myself to a ton of Copics) ;)

Anyone out there have published cards coming out using my stamps? (I know Carolyn does!) Please let me know! I appreciate your support and the heads up! :)

Oh, I'd also love to know: any of you subscribe to Cardmaker? Any other pubs you like/had success with/ recommend I try submitting to? Thanks for reading and sharing my good news, please share if you have some of your own! Have a blessed day!

PS Did anyone notice the typo in the photo? how appropriate for ME, LOL! (the world's worst typist) That's cool, I've definitely seen it butchered worse! ;) BTW it's pronounced Men - chinger (rhyming with "ringer") just in case you were wondering! :)


PPS NOW, there are BIG THINGS going on over at Gina's today! HUGE! (I KNOW what's in the box!! do you?? and it's just the beginning! Go look!)

Tuesday, January 13, 2009

Monkeyin' Around with Copics

Before today's coloring tutorial, here is another Pop Tone paper I will be using for my base, Orange Fizz. (I'm not going to try to match my coloring to it today, though, as I have a lot of earthy tones going on in my DP that i can pull from, a fun print from the Black Market Imported Rhythm pack.) :)


Orange is a really nice color when you find the right shades! (SU! Only Orange doesn't get a whole lot of play in my rotation LOL!, but I really like SU! Pumpkin Pie on my fall cards) Paper Temptress Orange Fizz is a bit softer and less "spicy Autumn", makes for happy spring and summer fun-in-the-sun cards.

So we're starting with the "Just So Hippy" monkey ( I've missed you, little guy!) he is stamped on Gina K Pure Luxury 80lb (the lighter weight today since I'll be mounting it on a mat, I don't have to worry about bleeding through here, save your 120 lb paper for card bases!) I filled in his skin areas with Copic E21. Often I leave just a hint of the top right side uncolored, like a white highlight.

Next I went in with a darker flesh tone E11 (not sure why this has a smaller number since they usually increase as they get darker, it looks darker to me LOL!) to the bottom of each of the areas. For the face, think of an imaginary line going from his forehead to his chin, and color the left half, this way that right side of his face is picking up the light. (okay, it's his right side, but it's confusing to say it that way LOL!)

Next I made a nice solid coat working in small circles with my E33. I left his tummy white for now because I want his little belly to be lighter.

Okay, I added a lot in this "step", sorry, I forgot to take a couple pics LOL! I added a brown that was just a bit lighter to the his back and undersides of his arms and legs and blended the flesh tone in for his tummy. (I could ahve done that earlier when I had one of my skin Copics out, nbut I thought I'd be using a different color at the time) I outlined a little shadow under him with the W-1 and used my colorless blender to take some ink away from his cheeks and added in this little pink for a becoming blush!

Now here he is on a gate fold card (score your 4 1/4"x 8 1/2"CS at 2 1/8" and 6 3/8", conveniently there's a little dot on these marks on the Scor-Pal!) ;) which uses three different sides of that Black Market DP. Notice anything different about him here?? Yup, I forgot when I stamped earlier to add his little tattoo! (and I am sorry to say I can't find my little flower stamp ANYWHERE! wahhh! fingers crossed is turns up) So I used the heart instead. :) I stamped it over the brown and blended out the color with my Colorless blender and filled in with pink the same way I did the cheeks. The Colorless Blender has so many uses besides blending and covering boo boos. If you start collecting Copics or only get a few this is one you "need"!
I got this fun little EK Success Flower punch at Hobby Lobby the other day, so I punched out a flower from the patterned paper for him to hold. This could have been "Valentine's Day", even with the orange, but I decided to birthday instead.
What animal should we do next? or, hands?? Actually, I have a get well card coming up too, that you're going to LOVE! and the Hand-in-Hand contest, eek! AND the next Gina K Designs release is only 9 days way did you see? I will be super busy making samples for this next week!! can't wait, can't wait!! any guesses about my set??
Last, don't forget to scroll down and read the post with the latest candy! That's for all now, gotta go, LOTS TO DO ! TTYS!

Saturday, January 3, 2009

Where Are They Now? Bee Burg!

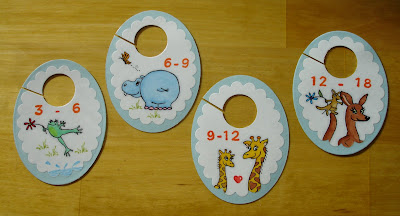
Bee Burg, my readers' "favorite pick" the month of my "What's in your Tin?" contest, has been busy making..a BABY this year LOL! (and he is coming SOON, maybe today, so I thought I'd better hurry up and share LOL!!!! I have her addy if you want to send her a card!) ;) You can tell from today's project she's in "full nesting mode" and used images from my first THREE animals sets "Just So Hippy!", "Just So Hoppy", and "Hip Hop Accessories" to make these inspired closet dividers!!

Accck, it's so cute, I could eat em up!! (num num num) As you can see, this fabulous idea and design would be very easy to recreate with Classic and Scalloped Oval Nestabilities and a notch for the closet rod. You could change the colors and animals out to work for any nursery theme, I just love this! What a great project to gift a mom to be or her to make herself while she's "waiting", as a mom I know there's nothing like creating some special touches for your baby and his or her room to prepare for that most special of arrivals!!
Here's a little more about Bee:


Favorite technique: Paper dry embossing (I'm in love with my Cuttlebug folders ;-)) and I also love embossing with powder and my heatgun.
Favorite colors/color combo: I'm a rainbow kind of girl! The only color I don't like and use very rarely or in small touches is yellow. My favorite color is blue and I love pairing it with all kind of colors. Most of the time when I make a card or project it is with someone in mind so I get my color inspiration from the person or from the paper I feel like using that day, or the ribbon...
Favorite type of project to make that's not a card: Anything with my kids in mind, and maybe giftcards holders. Oh and those mini albums I have been making lately...:-)

Favorite Gina K set by Melanie: It's hard to say, but I would go with "Have a cookie" and "Hand-in-hand" even though I have neither of them (yet! ;-))...
Favorite Gina K sets (from any illustrator): Same as above! :-)
Craft supplies I can't live without: Well the basics: paper & cardstock, ribbons, stamps, coloring pencils and markers... for the "extras" I would say my Cuttlebug and the embossing folders and my Nestabilities... Of course Prima flowers and brads and...
I've been stamping for a little less than 1 1/2 year.
I get my inspiration from anything! But I am certainly influenced by all the crafty blogs I visit!.. ;-)
The most important things I've learned about stamping / cardmaking / scrapbooking are that's it's all about you! LOL! It's not about following rules or doing a perfect job or something that everyone will rave about, it's about having fun and expressing yourself! If in the process it makes someone else feel loved or appreciated then it's even better! :-D
I started papercrafting to have something just for me that I enjoy and that relaxes me. It is definitely liberating and rewarding. I had no clue I would "meet" (over the net ;-)) so many wonderful people in the process! ♥...
Some of my stamping/crafting goals are: Make my kids' photo albums (much catching up to do in that area, years!!!..). Scrapbook more. Make a recipe book for my daughter with traditional french recipes from my grandmother. Maybe one day (years from now!) design my own stamps? Who knows?...
Some of my stamping/crafting accomplishments are: I still see myself as kind of a newbie in that field so my accomplishments are still ahead of me!... ;-)


Thank you Bee for blessing us with your project today, I am just so touched my stamps are a part of that little boy's room! And I know we all wish you the VERY , VERY best for yor delivery, praying that it's safe and speedy, and a healthy mom and baby! :) Keep us updated!
Be sure to scroll down and leave a comment on the post below if you have not already for the Paper Temptress prizes! Winner of the BCDZYNS set and winner of Donna's planner announced this evening!!

Monday, December 8, 2008

While You're Waiting...PEEK!

ha HA, made you look! Here's a little something I made today, how do you like my new snowman? er, snowhippo! I sketched in a little pile of snow around it to complete the effect.
I added a bunch(12 to be exact) rhinestones that could either be interpreted as falling snow or stars. The full moon (hee!) was made by masking with a scrap circle and sponging Night of Navy ink. I went back in after removing the mask on the udnerside of the moon an his bottom for a nice rounded effect. :) Card base is Incandescent Blumarino from Paper Temptress, a navy paper that has such an amazing shimmer, you have to see it to believe it. I outlined the hippo, portions of the trees and bright and happy" in my greeting with the Stardust glitter pen. White CS and ribbon are both Gina K Pure luxury.
Card also uses Gina K's"Seasonal Sayings" and "Tree Silhouettes" (only a couple days left to earn it free with three sets!)
Only a couple hours til the next peek! (for real!!)

Friday, December 5, 2008

Hippy Holidays!

While my mom was here for Thanksgiving, she suggested I dress up the "hippys" with some festive winter stuff for the holidays, and she was right, it's been too long since I played with the giraffe!! (Amazing to think it's been almost a year since this first set of mine was released! And I'm pleased to report it's still one of my biggest sellers, thank you!) :) With a little masking I was able to place Rupa's ornament in its mouth, and popped up the front ornament on a dimensional. Image is colored with Copics, sentiment if from "Hip Hop Accessories", ribbon is from the Gina K Pure Luxury Holiday assortment.


I just can't get enough of using WHITE now for a card base now that I have the Gina K 120 lb Pure Luxury CS, if you haven't tried it, you must, you won't be sorry!


hmmm, now what should I have the hippo do....? oh, I know, back later! ;)
Tomorrow, it's my week to host the Papercraft Planet sketch challenge, please come check it out, I've created something really special with "punch" in my sample you won't want to miss!

Friday, July 4, 2008

Happy Dance! Hidden Shaker #2

I've been meaning to make a hidden shaker (with beads enclosed between my two white focal point mats) for this little Kindred Spirit image "Summer Fun", and I finally got around to it! (We are heading to a backyad barbecue this weekend and thought it would be fun to give our hostess (my DSIL)). Give it a little shake and the little "ch-ch-ch-ch" sound makes me think of running through garden sprinklers!
I colored my image with Koh i-Noor pencils and OMS, and outlined the spray with Stardust Stickles for shimmer. I decided to keep the card fresh and simple with a white on white scheme and just a touch of a green with my striped ribbon(think garden hose! ;). A few strategically placed page pebbles give the feel of stray water drops. The little "happy" is from Just So Hippy, the font that looks really sweet with these Kindred Kids. (and wouldn't the "kick up your heels!" from Jumping for Joy be CUTE with this , too? :)

Have a very safe and happy 4th!

PS I have a bit of NEWS to share later this weekend, please stop back by if you get a chance!

PPS I'm thinking I should extend my contest a few days(Monday or Tuesday), too, with the holdiay weekend, I'm afraid a Sunday deadline just won't give enough people time to participate, what do you think??

Friday, June 6, 2008

I Can Shake More than My Hips: The Bobblehead Card


Need a little "pick-me-up"..?
Follow this simple bobblehead tutorial!
This card works like the tilt card, but instead has two layers on top of your mat instead of just one so the front one is fixed in place and your back layer moves.

Start by stamping your image twice. This works best with a 2 layered image like the giraffe (the hippo and ostrich would be great also.) :) A few tips here: I colored and cut a little more than just the neck on the first one. You need this part of it to put the dimensionals on and so you won't see something not colored when the giraffe is in motion.
I made a little grassy spot below it and then cut out without going in between the legs, saves time and is easier to mount on your dimensionals (don't have to cut skinny pieces or worry about your spin part showing) Below you can see how much I cut of each. (I ended up cutting off the shadow I originally did around each, that just wasn't going to work.)
Now put on dimensionals at the base below the neck. Add dimensionals at the bottom and middle of your giraffe body layer so it will be popped out, adding more dimension and also allowing your neck room to move. (After taking this pic, I added another dimensional on top of each of the two on the legs, it needs to be stacked a little farther out, so take note)
Now sometimes a penny is just a little bigger than your image, so you have to be creative with what you'll use. Here I used a little button. (I know, most buttons are worth more than a penny, but dig one out in a color you never use, okay?:) Put a dimensional on top of that. Then cut a hole with your hobby blade that gives it just enough room to tilt when you put the dimensional through the whole and stick another button on(or penny or whatever, you won't see this part)
See how I mounted it onto the finished card above. The button in back moves easily because it's above the card, if you don't make a tent topper, you'll need to add more dimensionals behind your mat so it can swing. I like how the neck extends even higher than my topper(a Nestie circle) To make this fit in a A2 envelope, the folded part is 3 1/8 x 4"( a piece 4" x 6 1/4", scored at 3 1/8". It could have been been 4 1/4"but I cut it a little narrower it just looked better fit the scale)


I'll be making a lot more of these with my different animals, it's really fun and is so cute with the sentiment "Keep your head up"(and you should see it when it tilts a little right of center, it gives you kind of a "say whaaaat??" look! bwahhh! :)


If you decide to try your own bobblehead , please link it here, I'd love to see what you do! :)


Have a great weekend!


Tuesday, June 3, 2008

Party Animals (The Gang's All Here!)

In a complete WWBD? moment*, I decided to spend half my day cutting and masking** my booty off to make this diorama with practically half my animal stamp releases (8 images from Jumping for Joy, one from Hippy, one from Hoppy, and a party hat from Hip Hop! whew!) on one big diorama card! I just love how you can put all these animals and images together and they really look like they came from one ginormous stamp set!
Hopefully you can see I made the stand into a cake by topping it with the sparklers! The little bear is closing his eyes and making a wish, getting ready to blow out his candles. :) (it would have looked better to cut out the cake also, but I thought about cutting out around all those sparklers for about 2 seconds and decided not to!)

The little roo, ostrich and seal and ball are mounted on dimensionals. Everything is colored with Copics. I used my Coluzzle to cut the oval window. To make the front and back of your shadowbox, make two scores on each side and fold. I made my back piece a little longer so you could see the red layer. Dimensions for you diorama depend on how big you make you scene. For this, I just made sure it 5 1/2 inches high so it would fit in one of my in a large envelope (that hold a card made from an 8 1/2 x 11" sheet of CS folded in half)

For complete instructions on how to make these, see Dawn's tutorial since she's already got all the steps photographed for you! (Blast from the past: Here is the first shadowbox I ever made, almost 4 years ago!) Since I had so much else going on on my card, I decided to skip any brads eyelets or ribbon to hold the sides together this time, I just used Terrifically Tacky tape like she did.

Today is the 3rd, one week left to enter my Guest Designer Contest! Go for it!

* What Would Barb Do? (Barb Schram, who lives and stamps by "the more cutting, the better!" philosophy...)

** masking: covering up your already stamped images with the same stamped images you've cut out, so you can stamp something else over it, which will then look like it's behind it

Thursday, May 15, 2008

I Suffer from PRTS

"PreRelease Traumatic Syndrome", characterized by an inability to stamp with anything current while stalking the mailman for the next big thing!! And in this case, I'm talking about all the new stamps and Bling & Dazzle that will be arriving momentarily for the Gina K Designs release next Tuesday! I've got get rockin' on sneak peeks for you, they start this weekend, squeal!! (My tip sheet for my new set is already finished and I can't wait to actually make examples for each tip! Now I just need the stamps!! Hurry, mailman!!!)

Be sure you come to the release party on the 20th in the Gina K forum from 7-10 PM CST for prizes, free stamps, and a reveal of my contest winner! (Reminder, all contest entries are due on the 17th, voting starts on the 18th when I post the candidates(thank you everyone who submitted stuff yesterday! I'm still waiting on some more!!)

Oh my! Lucky me, Michelle is PRTS-free and has a fabulous sample and tutorial already to go, Check this out!!!

I DO have an idea for Hip Hop with the kite I'm going to try to finish today(3 ways I can see executing it, just have to pick which will work best), as well as two cards with the current free set (only 5 more days to get Comfort and Peace free before it's available for purchase), but we'll see if I can get them done!! (can you believe, I have FOUR tin posts in the works, completely written up, two that I need one embellishment for to complete, one that requires a bit of computer work, and one that I just haven't found time to start on the tin. I am so behind!!! But trust me, you'll love them!)

Wednesday, May 7, 2008

Hey Girl

Quick post my house was such a wreck today, I had to break down and clean it before I could get any stamping in! (Ugh, I hate when that happens!) I made a few other fun things using the plastic canvas piercing templates I'm excited to share, but this is the only one I completed so far.

It was a snap to go all the way around the border the Pretty in Pink mat with my white gel pen with my rectangular template I cut, I didn't have to move it once, love it! Then I used my circle template and pierced the three circles in different sizes at random. I slid my 1 3/8 " punch into the medium circle so the Regal Rose would show through, so I could spotlight my "birthday girl" greeting made from the Hip Hop and Just So Hippy sets. I chose a circle Nestabilitie slightly smaller than the largest pierced circle for my giraffe image, which I colored with Copics R20 and E13 to match the ribbon(it's called The Robert Stanley Collection in the floral department at Hobby Lobby, on sale 1.50 for 10 yards!) Since I had such warm pink and brown tones on this card, I used my Skin White E00 Copic for the shadow rather than choosing a grey or blue shade. Finally, I used my half inch circle punch and page pebbles to accent the butterfly and the "hey" greeting from Just So Hippy.
That's it! you like?? I HEART my new piercing templates!!! more to come!

Thursday, May 1, 2008

Get the hang of it!

Here's the first card I made when my Hip-Hop set arrived. I used the metallic paste to rub over my different textures, the CB Distressed Stripes (nice grass!) and CB Floral Fantasy folder(which I think looks really cool with the giraffe print) and the scalloped Nestie. I hadn't posted it yet, because I thought it still needed a little something....how about this?!
TIP: To create some hanging signage, stamp and cut out several little "signs" (the square stamp) from Just So Hippy, then hand letter or stamp in your favorite small alpha stamps.(In hindsight (LOL!) I think drawing in my own letters would look better with this set/idea, like a kid wrote it) Lay them out in a curved "line" (since the middle will be the "heaviest") between your animals mouths or tails, and follow this imaginary line with a pen. Draw a little bow or dangling end on either side. Adhere the signs to the card. Here's a close up!
I thought it turned out so cute! Of course, a friend (who I will not name*) came over and asked, "What's "luvu"??" But you get it, right?? LUV U! I had a limited amount of space to work with here! For a longer message, be sure to orient your card long-ways. :)

Gotta run, getting ready for a big swap, putting the finishing touches on a prize, and some gifts for a few of my girls! (will share pics and deets of course for all of you at home!)
Hugs! it's almost the weekend, wheeeeeeeeee!
* it's okay, Vanessa, I'm sure a lot of other people didn't get it either

Wednesday, April 30, 2008

Quick Cropped Giraffe Couple!

I've seen a lot of hippy cards using "the bi-colored spots", but the first card I saw with this was Cindy Haffner's fabulous sample! So when the baby stamp came out, I thought how perfect to make each parent have the different colored spots to produce a lovely, blended baby ! The color inspiration for this was Gina K's first Hip Hop sample, I just loved that blue color with the chocolate. (This blue background paper is DP from my Cosco slab. )My hope is that by incoprating both the blue AND pink and keeping the bling to a minimum(I used the Button Babies Brads through the SU! punched ovals) I can send this card out for a new baby boy OR girl!
After stamping these giraffes I decided they were further apart than I wanted them(shown above, originally I was going to put the baby between them) so instead of doing it over, I found a fast solution. Cut around just the left side of the right giraffe, cutting stright up to the giraffe hoof from the bottom and then straight up to top edge when you are done with the outline, and then splice the two together. (you don't have to cut out the wonky new edge in the middle just glue the giraffe on top of it, lining up the top and bottom of the CS so they're straight.
One last thing I did to complete the illusion (forgot to take a pic, sorry) was to cut off the left giraffes right front hoof to adhere on to top of the new spliced image(See how in this bottom pic it looks like one foot is missing? Now look back up a t the completed card to see what I did. Yeah, that added a little more time, but still faster than cutting out both giraffes!!)

EDITED TO ADD: Roni, I need you to contact me by 5PM CST Thursday, 5/1 to claim your prize, otherwise I will need to draw another name for the Papertrey set. Thank you!

Tuesday, April 22, 2008

Hip Hop Accessories Tip Sheet!


Here is a super easy card using the DCVW glitter mat pack for a background and three accessories from the new "Hip Hop" set! I punched these out with my SU! 1 1/4" circle, and then layered on my Cuttlebug flower dies(aren't they perfect with the flowers on this paper?). It may be difficult to seein the pic, but I added some stickles to each of the little accessories to match the paper. I created this sample to illustrate you don't always have to use the animals from my animal sets to make a card*, the little accessories work nicely spotlighted by themselves, and now you have mnore in Hip Hop. :) I also used three "greetings" from the set: "you're my", baby", and "girl". TIP: I love using DP with horizontal strips, it's such an easy way to line up and bring attention to your greeting.


Speaking of tips, I can't design a stamp set without giving you a tip sheet! Feel free to copy and paste this list to keep with your set, or you can download the word document I posted in the Gina K forum ;)

Hip Hop Accessories Tip Sheet

The individual words and greetings make the perfect little tags. They are sized to fit your small CB and Nestabilites dies, as well as SU! punches.

There are 4 "baby" versions of your favorite images from the Just So Hippy and Hoppy sets. However, they do not have to be babies, it could be a husband and wife, big brother/little sister,two friends etc... They are all looking up at the larger animal ("I sure look up to you!") if you choose to use se them alone, however, they look adorable watching the kite or the little butterflies from "Just So Hoppy".

The tiny umbrella in Just So Hippy is adorable with these smaller animals.

The bow can be cut off the rattle and placed on the neck, head or on the tail (as a little reminder?) of your animals to dress them up or make them look more festive/feminine.

The crown and party hat fit all the animals in all 3 sets. The crown is fun with "kiss me" and the frog, but can make any animal into a "queen for a day", prince, king etc!

The little kangaroo can fit in the big kangaroo's pocket (either cut the small one in half and adhere or mask the large pocket and stamp the little roo over it) or jump along beside the larger or ride on the tail(etc!)

The lily can be used on the lily pad or as an individual flower in their mouth, tail, hand. The pad can be givn a "stem" for them to wave like a big frond/fan!

The baby accessories make fantastic tags, accents and backgrounds in addition to being accessories for the animals to hold!

Enjoy grounding your animals in the new little grass image! Stamp it just under the feet and or at random at the bottom of your focal point or along a line to make a horizon

The greetings are designed to work alone AND with your greetings in the Just So Hippy and Hoppy sets. Many stand alone, but several you put together, there are hundreds (thousands?*) of combinations!
Just a few examples:

(Hippy/hoppy/so hoppy) together
(hippy/hoppy) holidays
hippy/hoppy) anniversary
(hippy/hoppy) Father's/Mother's Day!
queen(princess etc) for a day
I sure you look up to you DAD (sister, etc)
to the hippest new parents ( son, husband etc) around!
(So hoppy/hippy) you're my (mom, sister, dad etc)
I sure you look up to you MOM or
DAD I sure look up to you
you're my baby boy(girl)
you're my prince(princess)
you make me so(hoppy(hippy)
new baby boy
girlfriend
etc!

The different sentiments when paired together also work terrifically for the exterior and interior of your card.
Examples:
I sure look up to you Dad/Hippy Father's day!
So hoppy you're my husband/Hoppy anniversary!
Dad you're my King for a day/Happy Father's Day!
Queen for a day/Mom of the Year! Happy Mother's Day!

"kiss me" is VERY cute with the frog!! As all the other two lines greetings do in the other sets, it fits in your balloons and sign. Many of the one word stamps in this set will, too (MOM, DAD, son, girl, boy etc)


As always, please email me if I've overlooked anything, I'd love to add your terribly creative and clever tips!

* during the release party, I posted this card joking,"this one's for people who hate animals..." Emily Giovanni was the only one brave enough to raise her hand LOL!


** hey, if anyone wants to try to make a list(generate a formula???) to figure them all out, be my guest! ;)

"Yellow and Blue Make Green!"


Was that from a Ziploc commercial?? Anyway, had to pull out some of my favorite patterned papers in some of my favorite baby colors (SU! hostess DP pack, Wild Wasbabi striped ribbon) to piece this little card which uses FIVE (of the 50!!)* new stamps from "Hip Hop Accessories": a ginormous add-on set (that is great by itself!) for your Just So Hippy (from which I used the larger hippo here) and Just So Hoppy stamps! Now I a have baby card I could send out for a boy or girl!

The hippos (which I used a white gel pen on to fill in their eyes, teeth, and toes) are mounted on dimensionals on top of a classic Nestabilites Rectangle. I cut the rattle in two pieces and mounted each piece on either side of the hippo tail to make it look like it was behind it. :) I took a cue from my focal point and decided three strips of DP for the background would be perfect to represent eahc of their colors, and to balance the colors put the apricot on the left , opposite of the apricot hippo, and the wasabi in the middle, kind of symbolic of their "union". ;) (Do I over think these things??)

VERY IMPORTANT TIP for when your new "Hip Hop" set arrives, this will save you a lot of time: (You've probably never had this many on a sheet**, and you don't want to lose track of a single image or greeting! )

1. Before cutting your rubber, peel off the paper backing.

2. Lay the rubber on the desk face up and go over it with our waterproof ink pad, inking every image.

3. Press the glossy side of the paper backing(which you will later be sticking your stamp onto) down on the inked rubber, smoothing over it to pick up every image and remove. (or use a plain sheet of paper if you plan on keeping this stamps on an acrylic stand) Even with a fast drying ink this surface may resist it a little so blot a few times with scratch paper. It's okay if it smudges, this is just going to be guide for where to put all your stamps!

4. Now you're ready to start cutting away (while you eat your Gina K "thank you" m&m's!) Each and every stamp has a perfect spot mapped out on your sheet, no worrying about trying to figure out where they should all go, it's already done for you. (I had a pic of this but accidentally deleted it, sorry!)

I'm going to start doing this with all my new stamps that arrive, so much easier to stamp it once and make my own image sheet instead of trying to do it with all the cut pieces. Even with a sheet that doesn't have many images and plenty of room to make them fit, it's great to see at a glance which stamp I need to locate on my messy desk and put back where it belongs! I hope this helps you get organized and ready to start playing with your new stamps that much faster! :)

Happy Earth Day! Go recycle some paper or rubber! ;)

*baby hippo, rattle, "to the hippest", "new", "parents"! There is actually room in between the words on "to the hippest" for you to cut this sentiment apart and use them separately if you wish (which makes 52 stamps!) or you can leave them together and just ink up the words you want :)

**I asked Gina if I was crazy to put so many stamps in one set! (I'm not sure I ever heard back, but she probably was thinking,"Crazy, YES, but not for that reason!" LOL!) For the record, though, I had to laugh when I read in Gina K's blog that I had "married the hippies and hoppies and now they've all had babies!" I wasn't over planning animal weddings or anything!! But now that she said that I feel somewhat compelled to show you all the couples! ;)

Sunday, April 20, 2008

Now THAT Was SOME PARTY! Sneak Peek #4


I just had to come up with something off the wall for you* to showcase this new Gina K Designs set ,"Owl Always Love You"! (Hope I succeeded!) I thought since they are attached to the branch you could have it extending from the right OR LEFT side of your card (if you wanna go there)! The balloons from "Just So Hoppy" extending upwards complete the illusion... :)(and of course the "classic Gina K expressions"("perplexed"!) are perfect here (you just know these two are going to spend all morning trying to recount last night's events over coffee and migas!)


Here's that DP again from "the grill card", I don't know, these colors are just calling me! I colored my owls and balloons (all done with Copics) before I selected the paper, but decided to go for it anyway, even though the DP didn't have any turquoise. Hopefully I made it work pairing it with the bright ribbon, and sometimes it can be good to have a splash of unexpected color to give it a little more "oomph"!


TIP: I made sure to cut the paper so the top and bottom of my focal point hit where the white lines intersected in my pattern, it looked really off otherwise, but very sharp this way, so I'm glad I took the time to redo it.

T minus 17 hours til the release party!!! can't wait, can't wait!! ( and I'm SO excited you're excited about "Hip-Hop", that rocks!! :) More sneak peeks of "Owl Always Love You " here!

EDITED TO ADD: Voting is closed for the contest! I've pulled the post so that no more votes will be added and the results can be tallied; check the release party thread tonight to see who won!

*Now that I'm "old", my idea of a good party is having adult conversation with my friends I never get to see, but I remember back to my college days when it wasn't considered a successful party until something got broken, there were footprints on the ceiling, etc etc...I can't say I miss those days!

PS Maybe being from Austin I just have bats on the brain (we have the largest urban bat population here in, I believe, the entire world! and as a happy result, very few pesky bugs:)

Wednesday, April 16, 2008

A Quickie!

I've got some serious shtuff I've got to work on to get read for the release!! So here is another card that started working it's way towards the bottom of my basket, I pulled it out and sent it to one of best friends this past week for her birthday.

The significance of this is THIS IS THE VERY FIRST CARD I made when my Just So Hippy set arrived in December!!(a warm up, if you will) Not a lot of thought went into how it would turn out, I was just hurrying to get it inked and colored, use a bunch of different stamps from the set, then stand back and admire it (not because of of the result) but because my drawing was now a rubber stamp-wahhhh!!

What I'm really not feeling so much is that skinny dotted ribbon at the bottom(proportionally I'm just not wild about the botton third, should have put a wideer mat under the ribbon), but I looked up after coloring(made the first one pink since Gina K had suggested we make it a set that would work for valentine's Day) and saw I didn't have any other ribbons that would go with it. Oh well! On to the next one, right??(Which coincidentally happened to be the one Gina K posted as her sneak peek for my set before the first release! It's good to warm up!) How time flies! I can't believe on Sunday we'll be releasing my 5th set already! Thank you everyone who is supporting my stamps, you have no idea how much it to means me! :) (high five!!)

Back in a bit! Hope your Wednesday is a good one!

Hint: animals ;)

Sunday, April 13, 2008

Hip Au Chocolat!

This was one of the first hippo cards I made with Just So Hippy (I only realized the other day I'd never posted it when Donna was going through my basket!!) I was trying to be proactive and make a mask for all my images right away when my set arrived, so instead of coloring this one I figured I'd put my mask to work by covering my stamped image on the vanilla CS with the mask and sponging chocolate ink over it. How's that for quick coloring AND a background??

This Au Chocolat DP pack is one of my favorites SU! has ever offered, and to customize/spice it up a little/add some color I stamped my hippy flowers where the circles intersected on the print, and colored them in to match the hippos (Groovy Guava). I hadn't received my circle Nestabilites at that point so I had to use the Coluzzle and some scalloped scissors to create my mats...I love making the hippo look even rounder than usual! And both work really well with the circle design in the pattern.

The weekend is almost over :( Too short!! Hope you had a good one! Check back later for a hair-raising card!! (hee-hee...!!)

Friday, April 11, 2008

Look! up in the Sky! It's a Bird! It's a Plane! It's..."

"BIRTHDAYGIRL"! :)


The new Kindred Spirit images are getting RAVE reviews(yay!) but I have read just a few comments here and there that there might be some of you think they only can only be moms, or they look too young (or too old!) for you! So I'm going to be showing a LOT of ways this next week(and beyond!) how you can change up their looks to suit your purposes! Personally I think if you are a woman or send cards to women you can work( or should I say ROCK!) these stamps!

Something you can do if maybe you need to send card to someone that you don't think "looks" like any one of the images offered, order one that looks like you, as though YOU'RE the one on the front of the card with the special delivery! Here I used the Super "Mom" Naomi, and she's flying in with a card and bunch of flowers from Just So Hippy! I stamped and colored the three little flwor above her hands and sketched in some easy stems. I stamped and cut out her arm again so I could mount it over the envelope I cut out. :) I made this card for my niece who is 13! This superlady could be me(if I gave her darker hair), but it could also be her! Doesn't this super cute outfit work for a teen/tween?! She doesn't look much like"Mom" now, does she?? The letter in front of her (ahem!) bust makes her look like Super"girl", as do the colors and flowery pieced cape(SU!)... so really I think the majority of the ladies can be done up to look like a lady of almost any age with a little coloring and creativity! (that's what you all do best, right...??) And for me that's what's most fun... :)

I have said before that animals and people are my favorite stamp images to work with because of the many ways you can accessorize/animate them, and the new Kindred Spirits have loads of possibilites! You'll be happy to know that THERE are tons of images in the Gina K sets you already have, as well as ones we will soon be releasing! wait til you see! Tomorrow's card?? another SUPER one, oooh girl, just you wait!!! :) (rubbing hands together!!)


NOW, Short on time? Never fear! an even faster card is here!

This is the same card before I added my shadowing to the greeting and the ribbon(the yummy piece above is from Joanne :)

Super easy, still super cute!

Have a SUPER weekend, friends! ;) I'll be back with an award, more BRAK pics, and more stampin ideas especially for you!


TIP: When paper piecing, use your Quickie Glue Pen on the stamped area you're going to be adhering your pieced cut out to, not the little cut piece! I've been doing it the other way around for a long time but realized today it can be kind of a pain to try to pick up that teeny little glue covered piece of DP and flip it over! When you just apply the piece to the already glued focal point, trust me, the glue is in just the right place it needs to be because (say it with me!) it fits perfectly!! ;)

Thursday, April 3, 2008

I Will Survive!

Another little "survival" (really more "just for fun" here) kit to share today: this tin was super simple to decorate using a SU! Scrappin' Kit from last year (I used the materials in it to make the tole kangaroo card in a previous post, what was this one called again? "Friends"?) The trims are self adhesive (just peel and wrap!) and and the thin and thicker sizes perfectly fit around the narrow top edge of the lid and the wider bottom edge. I stamped the border image on the striped DP and filled in the two lines with Rose Red to match the paper. The small round sticker I folder over the edge to make it look like a little snap closure.

I used more materials from the kit to make a matching tic tac toe board for the inside! I added one of the rounded square stickers from the set for the board, sectioned off using my Basic Brown Journaler. I stamped my hearts and flowers from Just So Hippy on the orange and moss colored stickers in the kit, colored, then punched with my 1/2" circle. I topped them off with clear round tile stickers by EK success (the images fit perfectly under them!) and stuck little round magnets on the bottom (1.99 for 16 at Hobby Lobby). You can also use clear flattened marbles, but they are are not as uniform in shape and are heavier.
The magnetic poetry set* (which you may remember if you've been following my work long enough!) I made for my first Altoid tin for the Dirty Dozen gallery 5 years ago!! (back before Altoid started making "bumpy" tops!!) The tin was in a junk drawer, I never gifted it and I'd never played with it! :(I know, WHAT are we gonna DO with me?!) So NOW I'm putting them in this "new and improved" tin, will keep it on my desk (to try and come up with very inspiring quotes for you!) and then tuck it in my purse on occasion to pull out to occupy the kids(and myself) at all those places we WAIT.


TIP! a GREAT kit/gift suggestion that came from my Mom**: "The inside of a survival kit tin would be a great place to list emergency info such as allergies to medication or important medical information such as doctor info and illness (diabetes, heart disease, etc) and of course it can contain critical medication (nitroglycerin for heart, baby aspirin for stroke, hard candies for diabetes, etc)..it could be a real lifesaver for moms, dads, grandparents, anybody! In case of accident or medical emergency..could also include tips on what to do in case of..or how to know if you're having a heart attack or stroke...baby boomers are prime for this so your readers probably have parents or grandparents who would love this kind of gift"


Isn't that a great idea?? (See? Mom's lookin' out, too!) ;) I haven't made one of these yet, please share your version of one if you do!

Next post follows shortly!!! I have A LOT to share before the weekend, so expect several entries over the next couple days! :)

* easily created stamping a word background like By Definition or small phrases like Everyday Flexible Phrases (both used here), stamped on white paper or waterproof labels, then adhered to a sheet of magnet, and cut out. Really easy and fun.

**Moms know best! More about her tomorrow!

Saturday, March 29, 2008

The Power of One*


"With great power, comes great responsibility." ~Uncle Ben, Spiderman

"Never underestimate the speed, reach or impact of the ripple you create." (me)

I have mentioned before I was a SU! demo for five years, and during that time I had less than 5 people (on average) attending my once-a-month workshops! (and it was pretty much always those same people! God bless them!!) I was always so much more interested in making art than money by trying to find new customers and hostesses for workshops, so my business never really grew without that networking piece. Staying at my stamp table in my room allowed me to develop my craft, but didn't give me an audience. Until I started my blog, that is.

Having a blog that people visit gives a person a lot of power. By "power" I'm not talking about the"I'm so much better than YOU!" kind of power! The power we ALL have to share information, about anything, with everyone in our network and beyond as fast as you can send an email or link someone! Working with Gina K who gives back in SO many ways, receiving emails from all over each day from people sharing their stories about why they visit this blog, and watching the hit counter rapidly rise makes me aware of the power and platform I have now to share something more than my crafting tips and stamps when I can.**

I don't thin I've ever been so excited to check my email (and it's always exciting!) as I have been the past few days to see messages coming from people both familiar and new to me ready to roll up their sleeves and help! WE are up to over 60 people participating in the Make Someone's day!! The WE is what's important here! Many that have written have said I have such a big heart for doing this, but I would argue differently, the credit goes to you! Please remember I am sending one card; the other 59 come from YOU. I'm asking you to help a person whose story has moved me, but you are signing up to help someone unknown to you because you already know how good it feels to give!! (If I were as generous as some of you might think, I wouldn't have that BIG basket of hoarded cards, remember?!!! LOL! But I'm working to change that!! and I couldn't do it with your help!) Your generosity inspires me to want to do more (and in this case, all I did this time was ASK a favor. Handing out a blog candy to one of you for this is a very small price to pay for the joy it is bringing me and the person who is receiving your artwork.) And it's gotten me thinking about even more things to do! I'm excited for what's coming next, and for everyone who joins me for the ride!

*The terrific writing and unforgettable characters make the book "The Power of One" a must read (although I have to admit I didn't like the last few pages, but only because I was liking it SO MUCH up until that! (You may feel differently, I won't give anything away! When you'll recommend a book you don't even like the ending for you really must think there's something in there worthwhile LOL!


**I want to be very clear I in no way think that bloggers NEED/SHOULD FEEL OBLIGATED to give away candys, arrange RAK requests, donate, or use their blogs for anything other personal enjoyment! Blogs are an outlet for people to enjoy creating in any way they want, reporting on anything they want, to any audience of any size they want. I've just been blessed in SO many ways this past year, many of which have come through the blogging process(connecting with peope I may have never met, learnign about things I might never have discovered), my cup is now running over, and I feel I'm being led to serve. Simply put, the reasons I had for starting a blog, (helping to market my stamps) have evolved. Now that so many more people are tuning in to what I have to say/think/can offer than I ever imagined would listen/be interested, I want to imagine something bigger than I ever imagined being able to do by myself for others. (Not to mention that I have the most amazing captive audience anyone could wish for! I've always said stampers/crafters are the nicest people!) :)

Thank you again! Have a great weekend!!!

PS: I almost forgot about the card! I've been meaning to make a quickie card with the Just So Hippy and Just So Hoppy using NO ANIMALS!! (Maybe not everyone wants to "say it with animals" ALL the time,) so how about a simple balloon-o-gram? I finally dipped into the odorless mineral spirits and Prismas for this! (They really do seem to glow, took a little more time than watercolor crayons, but the effect is VERY NICE!) These balloons are really fun to color, I find a large open, rounded space is one of the simplest things for ME to color/shade (probably because a sphere is the first 3 object I learned to shade/create in art classes, so I'm really comfortable with where the shadows are supposed to go!! LOL! This uses one balloon from each set, masked to give it a layered look. I'll be back with a tutorial of how I did the tin from yesterday, it just has a LOT of photos, haven't finished yet.