Thursday, May 30, 2019

Stamping Friends Trifecta Blog Hop


Hello and good morning! Today we are THREE companies and design teams strong, hopping together to showcase some of their fabulous new products and how well they all play together! Thanks to Picket Fence Studios, My Sweet Petunia and Gina K. Designs for this fun, creative opportunity! Each participating company has generously donated one $50 gift card to their online store, and the winners will be randomly drawn from all the comments at each stop on today's hop. Winners will be announced on the company blogs no later than June 7th. The more comments you leave today, the more likely you are to win a prize! Best of luck to you, I hope you win!

You should be coming from Karen Reategui's blog, but if you are just joining in, the full list is at the bottom of the post. I hope you have time to check out every stop and enjoy the different styles and ideas created for your inspiration today. :)

For my first card, I used the Picket Fence "Martini Stencil" along with stamps from the Gina K. Wishes stamp set . A rainbow of different Gina K. Ink cubes and one of Picket Fence Studio's Life Changing Blending Brushes filled in this cute drink background in no time. I think it's really cool how working the blending brush up against the edges of the stencil details creates such a realistic shadow on the edge of these glasses, with translucent color to look like blown glass!  Cardstock is GKD Pure Luxury Passionate Pink, Black Onyx, and White. My Sweet Petunia's new Cut-Align tool makes it so easy to create quick and perfect mats without measuring (I hate measuring, but I also hate wonky, uneven mats), just follow the line!


Gina K. Wishes stamp set 

My desk is pretty small, so my cardstock is in a file cabinet on the other side of the office, where I keep my big cutter with a rotary blade on top, no room for it here. With the Cut-Align I LOVE now being able to make perfect quick cuts and mats while I'm seated as I make changes to my design on the fly with a craft knife, instead of getting up and going back and forth, not to mention not having the precision of the Cut-Align with my current cutters, so the Cut-Align will be used ALL the time, not just for mats but long enough for full sheet of cardstock to create bases! I have a smaller guillotine cutter for cropping, but it isn't large enough to handle a longer piece of cardstock, but Cut-Align will accommodate any size and I love that it has not one but two rulers, to use the one you need, instead of always using a larger one. And you can make the teeniest of cuts mats, and trims. Iliana really put a LOT of thought into this tool based on a crafter's needs, which I very much appreciate!

 Can you current cutter do THIS? (Probably not) 
Without the Cut-Align I would not have attempted these tiny woven swatches, for sure!
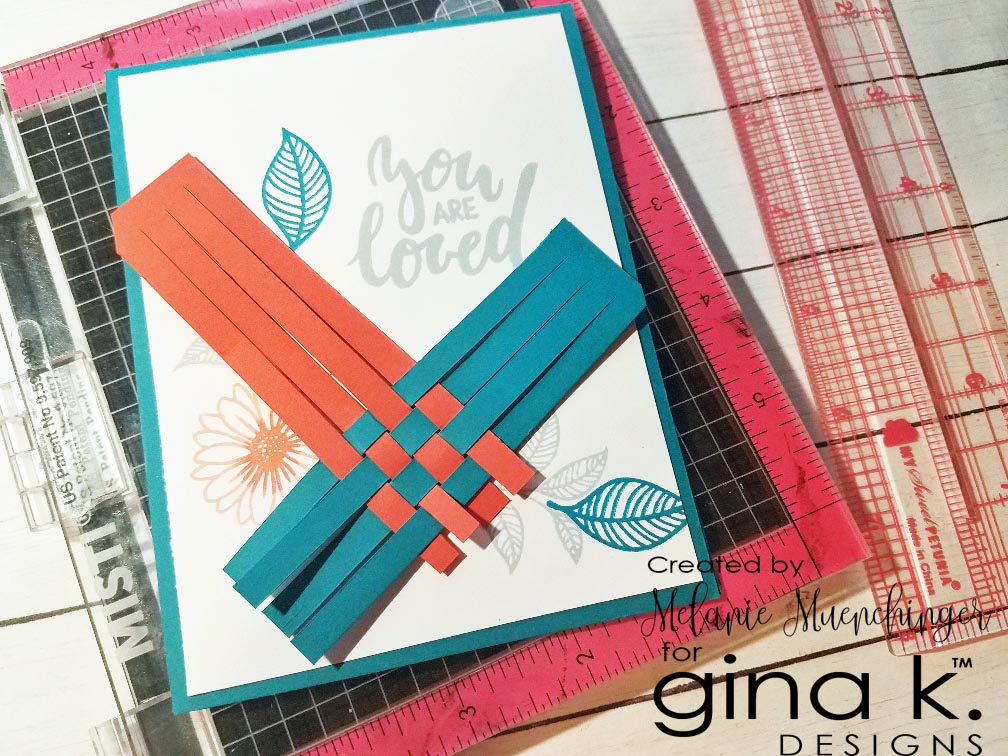
I made this card for a friend whose family is from Denmark and when she came back from a recent trip to Copenhagen, she brought me a kit to make some little woven basket hearts to put on the Christmas tree, papercrafting and weaving is very popular and old tradition there!  The woven baskets are much bigger and made out of thinner paper to do the weaving, but I wanted to scale it down and use Gina's Pure Luxury cardstock, so these 1 by 4 inch pieces of Coral Reef and Tranquil Teal were my compromise. Cuts are made every 1/4", with a 1/4" space at the top to keep the strips togther and the smaller Cut-Align ruler made it simple. I mounted it over my stamping with foam squares and think it's a fun graphic element to go with the flowers and leaves. I know she'll get the reference to her gift to me.  Adds nice texture and an intricate handmade embellishment.  Stamping with the GKD Elegant Asters stamp set is done GKD Soft Stone, Peach Bellini, Coral Reef, and Tranquil Teal.

As bright as the first samples were, I wanted the next to be very soft. I used some of the new pale Amalgam inks Gina carries, designed for watercoloring and no line coloring, but fabulous for other uses and elegant for your paper and card base choices, for my stamping and blending.  The round Waffle Squares stencil from Picket Fence Studios reminded in its shape and texture of a dream catcher, so I paired it with the dreamy greeting from Gina's Elegant Asters set. Cardstock is GKD Pure Luxury Stormy Sky, Barely There and White. Stamping is done in Gina K. Warm Glow, Peach Bellini, Barely There, and Soft Stone. 

Adjusting where you hold the long handle of the brush  shifts the pressure of your blending without you having to push a lot harder, which is easy on the hands and wrists, and allows for a much wider range or shades in your sponging with just one color. I love the control and the ability to add just a hint of ink with these!  The smaller brushes in the Fine Blending 6 pack assortment or full set of 10 allow you to work in tight areas and small stencil details without getting color in an unwanted area, so those are very unique and useful as well, had not used anything like that before!


I used My Sweet Petunia's Mini MISTI to stamp the greetings and images on all cards for a solid, crisp impression. :) All the gorgeous cardstock and inks in today's post can be found in the Gina K. Designs store.

I am really enjoying all the new supplies and grateful to be part of today's hop! Below is the full link list. I can't wait to see what the other designers have in store for us!  Your next stop on the hop is the Angela Bode!

Monday, April 29, 2019

Video: Create Simple Sign for Framing Sentiments with Puppies Galore


Hello! Today I'll show some very simple ways to create some adorable signage for puppies to hold, perfect for filling out your layouts and frame up all the fun sentiments in the Puppies Galore set. You will love using the different paws to change up the poses, the variety of this versatile set just expanded again! I also share some simple coloring. Gray puppy card also uses the Hugs Mini stamp set. I love the extended paws on this one to really convey that big HUG!  Have fun getting sassy by varying up where you position the head and paws, it will make such a difference, I promise (paw-mise!) Please enjoy! Thanks for watching!


Supplies:
Gina K. Designs Puppies Galore stamp set
Gina K. White cardstock
Gina K. Jet Black Amalgam ink pad
Spectrum Noir alcohol markers: IG5, IG7, TN6, BG4, fine line black pen
Optional: scissors, sticky notes for masking, rectangle or square dies 


Affiliate links are used for shopping convenience. I receive a small commission if you choose to purchase at no additional cost to you. Thank you for your support!

Monday, April 22, 2019

Video: Creating Furever Stamps!


Hello! Today I'm sharing how to make these fun and easy "Furever stamps" with my new Puppies Galore set and postage themed images from my Stately Flowers 11 set!

We'll mask and sponge to create depth and a postage border before stamping and some simple coloring and shading with alcohol markers. Please enjoy! I hope you will subscribe to my channel.


Supplies:
Gina K. Designs Puppies Galore, Stately Flowers 11 stamp sets
Gina K. Peach Bellini and Jet Black Amalgam ink pads
Gina K. Pure Luxury White 3 3/4" x 5" and Peach Bellini cardstock
Sponge dauber, Gina K. Acrylic blocks or MISTI, Gina K. purple tape
Spectrum Noir Markers TN6, EB6, EB3
Affiliate links are used for your shopping convenience. I receive a small commission if you choose to purchase at no additional cost to you. Thanks for your support!

Thursday, April 18, 2019

Day 2 Inspiration Hop: Elegant Asters Kit, Hugs and Wildflowers, and More

Good morning! Welcome back to our April release!  Today we are showcasing Gina's Elegant Asters Kit, Hugs and Wildflowers from Lisa Hetrick, and other wonderful new goodies!  We hope you are inspired as you hop through our team's links today, we've worked super hard to share our ideas and creations with you! Please leave comments with your feedback for chances to win a $50 gift certificate to Gina K. Designs!  It is not required to comment on every blog, but the more you do, the more chances you have to win!  Winner will be announced on Gina's blog April 19th.

No photo description available.
Here is everything you get in the Elegant Asters kit! These colors and images will take you right from Spring into Summer!


 Here are 4 cards I made by putting the flower in the MISTI and stamping it out four times in Jet Black Amalgam, on 4 squares of colored cardstock from the kit cut the same size  3 1/4" square. Next, cut them all in half and then half again, and piece them back together for four different focal points! I used both the stamped greetings, Smile stamp from the new mini kit in the same font, and the new scripty "hugs" die to make these. Such great colors in this kit! (I know I already said that, just..!) I used a white gel pen on all the centers and to make the script on the colored cardstock pop.


Next, I wanted to add the kit's gorgeous butterfly and greeting from the kit to my Open Book frame. Cardstock is GKD White and Tangerine Twist. After coloring and shading one to look like an illustration on the page, I die cut the second one to really take flight from the book.

Next up we have Lisa's lovely Hugs and Wildflowers !   I love two step flowers so my vision was to do those line art images in Prickly Pea like a gold, with clear embossed bold flowers over them to resist the blue ink and show those delicate yellow details of the flowers. 

Unfortunately, last embossing sesh I must have put the clear powder cap on the white EP jar, ooooops, and it covered up the line art when heated!  (In my defense the powders look pretty similar!)  Anywho, although the card didn't turn out quite how I planned, but it was pretty close, enough to keep going! I sponged on the Sea Glass and Blue Raspberry ink, then added a few more silhouette stamps in the blue inks or a more layered look. I did an ombre on the greeting inking in Wild Dandelion and Prickly Pear to look like shiny gold,and although pretty, it was abit hard to read in the yellow, so I stamped offset with the Jet Black Amalgam.  Love the contrast here! 

I noticed this stem-y border was the perfect length to stamp in my Triple Play Frame, so I stamped the border in GKD Jellybean on the Soft Stone stamped frame. I added the two- and three step stamps in GKD Jet Black Amalgam, Dusty Rose and Coral Reef, then inked the leaves in Jellybean and rolled in Fresh Asparagus.  

The circles in the frame spotlighting her greeting and help me place remaining floral elements for a balanced design.  Cardstock is White and Coral Reef. 
No photo description available.

Here is one with the new mini stamp set, Hugs and one of my puppies!


Hugs


Here is a sample with another new mini set, Spring Joy! The way the animals are rendered reminds me of stuffed animals or squeaky toys, so I just had to give another one of the pups, colored like my friends beagle, something to play with!  Cardstock is Lemon Drop, Black Onyx and White.


Image may contain: text
Spring Joy

Now let's go see what the rest of the team has for all these fabulous new products! Shop all the new goodies here


Melanie Muenchinger- you are here! Thanks for visiting!


Wednesday, April 17, 2019

Day 1 Inspiration Hop: Puppies Galore, For the Grad and More

Good morning! Welcome to our April release hop!  Today we are showcasing my Puppies Galore set, For the Grad from Beth Silaika, and other wonderful new goodies!  We hope you are inspired as you hop through our team's links today, we've worked super hard to share our ideas and creations with you! Please leave comments with your feedback for chances to win a $50 gift certificate to Gina K. designs!  It is not required to comment on every blog, but the more you do, the more chances you have to win!  Winner will be announced on Gina 's blog April 19th.


So I got requests from all over for a DOG stamp after Open Book came out, and honestly my first thought was, "Huh? I get it they like dogs but dogs don't really sleep on open books, it's kind of a cat thing..."*, but I looove a challenge, and honoring your requests as our schedule allows! Thanks all of you asked because I love the result so much! SO. MUCH.

This companion to Open Book is also an amazing stand alone set. One dog image just wouldn't do. While there are different breeds of cats, a single cat image can be pretty representative of *most* people's furry felines.  Not so much with dogs, they all look REALLY different!  I just had to come up with lots of different ears to change up not only their look, but their personality and mood. You'd be amazed how different the same ears can look when they are down, up, or both UP AND DOWN! That's a lot of exclamation points for one paragraph, but I AM EXCITED! ARE YOU?
Image may contain: drawing

I love how expressive dogs' eyes are, and how they use them to reflect pure joy or adorable begging/guilt.  You can capture any emotion you need with these puppies.
Who wouldn't forgive your belated card with this face? Nobody!
 

 I don't color the images I illustrate until the stamps arrive, and I gotta say I am really enjoying how leaving a lot of white space on these dogs (nose, tummy, paws, etc) makes your coloring more realistic looking and gives the dog more personality and individuality. Less to color, woo hoo!

Here is my walk thru video last night with tips for stamping the elements, including a very *minimal* coloring sample you'll love and explanation of the interactive puppy book mark shown below. 


(I over/understamped a few things, because I was super hurried to get to the facebook live, I didn't do these screw ups any other time with this set than when I was filming. Of course! Mea culpa)

Peek...


 I love those shaggy spaniel ears!
 Here, I'll save your place for you...

 Don't you just want to go make about a hundred different dog bookmarks now to stick in all your books? Whether you're in the middle of one or not. Just for company.
 (The Princess Bride is a good book. William Goldman is so funny. More detail than in the movie (which is one of my favorite movies) Although Robin Wright's Buttercup is much improved, imho. Buttercup in the book is kind of a ninny from what I remember) 

Both heads work on the dog that is sitting up. Heads can be tilted at an angle. As I demonstrate in the video, best way is to first stamp body (so the feet are straight and grounded with the edge of your mat), then add head (choose your angle!), then add ears, THEN add accessories. Coordinating ears are near each other, but a few can be mixed to look like the same ears but one up and one down. Add accessories last. The accessories in here are TO DIE FOR.  On this masculine yappy birthday card, I paper pieced the bow and hat with a plaid patterned paper.  Doesn't he look smart and ready to PARTY? Base is GKD Honey Mustard.

The samples I've shared so far are to represent  different coloring options or breeds, but I'll end with a card I made to look like someone's *actual* puppy, my bestie Carolyn's toy poodle Brett! Furball dogs get their own head topper and ears. :)  He really is this big next to a book.
Cardstock is GKD White and Sea Glass.

The stippling coloring is easy to do and makes it oh so curly, and of course you'll be getting a video for that, too. Referencing her photo, I drew on his shirt from before coloring his body. You'll have endless fun recreating your friends' dogs (with no shortage of inspiration, because you know people post more pics of their dogs on social media than pretty food or their kids!)
BRETT, the Wonderpoodle
(has his own Instagram. Natch)

(This is more than I usually show on the first day, but how could I possibly choose?  Pick a favorite among puppies? As if...)

Next up, we have Beth's For the Grad set!  Really useful not just for the graduation elements (when really nothing else will do because you NEED a grad card! Accept no substitutes!) but also for the dates, banner and circle frame elements AND all the encouraging greetings you can use year-round! The sky is the limit!
Image may contain: text

 Next year I will have a TON to make because JONATHAN and his friends will be graduating high school, ack! (He was in kindergarten when I illustrated my first set!) But here's one early, I'm ready! GKD Blue Denim and Soft Stone and Stormy Sky for our team's royal blue and gray, GO KNIGHTS!


I also had to throw the cap on a doggy's head from Puppies Galore because my younger son Will is promoting from 8th grade (high school next fall! ohemgee)  His school has a dog mascot, so this was perfect! (Their color is purple, too, hence the Wild Lilac collar and cardstock)

 You could also put the diploma in the puppy's mouth or under his paw! The numbers are easy to line up, and I really appreciated the "20" being a single image as I will be making NO cards in 2100 and beyond, that saves me *loads* of time! (especially with 2020 next year, see above!!) You can use these year numbers with my mini calendar in Stately Flowers 12 as well.

Here is one where I used her circle frame to highlight the greeting from the new Heart Mini Stamp set, along with the heart outlines in the set and a sprinkle of dots from For the Grad for confetti, using several bright Gina K. ink cubes.  Such a festive addition on any card!  I sponged in some GKD Red Velvet after masking the circle frame and added a little GKD Crystalline Drops on a heart in the middle. Cardstock is GKD White and Sea Glass.


Now let's go see the rest of the team creations! Thanks in advance for your comments today, tell me your favorites! (Or, tell me about your dog, you know you want to...)  
Shop new products here

Gina K.

Melanie Muenchinger - Puppies Galore-you are here!


Susie Moore

* Actual quote from Carolyn, while discussing my dilemma and agreeing with me: "No, dogs don't sleep on books, because they are smarter than cats. Dogs sleep in their beds" (Texts a photo of Brett in his bed)

Friday, April 12, 2019

Create a Page Turning Calendar with Open Book


Hello! Today I am sharing how to plan and add the mini calendar from my Stately Flowers 12 set to the Open Book frame to create an interactive calendar you can add to cards and gifts for just a few months or a full year! 

I shared this simple threading technique in my previous Page Turner video, but I show it again here.  Have fun adding any images in your collection, ones that coordinate with that month's season or holiday, or all flowers or another category to create a themed calendar like I did in this demo, or paper piece to make each month for bright quick color.
For the sake of time, I do not demonstrate coloring today, but for coloring samples and tips on these particular flowers, please watch my playlist for Stately Flowers 12. Thanks for watching! 

Supplies:
Gina K. Designs Open Book, Stately Flowers 12 stamp sets
Gina K. Jet Black Amalgam Ink pad 
Large or Small MISTI, scissors, needle and thread that matches ink, foam mat for piercing, acrylic blocks, scratch paper or sticky notes for masking
coloring medium of choice

We have an awesome release planned for you next TUESDAY night, the 16th, mark your CALENDAR, haha!  The new set works with Open Book, and fulfills a request I got from SO MANY of you!  Can't wait to share, it's a ridiculously fun set to play with!  Have an excellent weekend!


Friday, March 29, 2019

Page Turner: Interactive Open Book Card Video


This latest Open Book design is so simple to recreate, and doubles or triples your pages to stamp on, thus expanding your greeting, image and technique possibilities for a card your recipient truly will FLIP for! (pardon the pun)


 I used Fabulous Rose Frame set to decorate the pages because the rose frame fills it so quickly and the different greeting options allow you to put different ones that will make sense on each spread that flows to the next.  Small bold images add pops of color.  You can add more coloring to the line art images if you like, which I will do, but today I mainly just wanted to show how to construct, stamp and anchor the turning page (two ways, so be sure to watch to the end!) Please enjoy!


Supplies:
Gina K. Designs Open Book, Fabulous Rose Frame stamp sets
Gina K. Designs Jet Black Amalgam, Wild Dandelion, Jellybean Green, Soft Stone Ink pads
Gina K. Gina K. Pure Luxury White (2 mats, 4” x 5 ¼”), Wild Dandelion (A2 base, 5 ½” x 8 ½”, scored at 4 ¼” cardstock
Scissors, scoring board, Gina K. tape runner adhesive and foam squares or needle, thread, and foam craft mat or mouse mad, yellow, green and gray marker (Spectrum Noir CT4, IG4, IG5, LG5)

Friday, March 8, 2019

Video: No Line Coloring and Line Art Sketchbook Look


Today’s creation whisks you outside to a peaceful afternoon sketching in a lovely garden! The realism of the flowers in Stately Flowers 11 are just right for some no line coloring with our new Amalgam inks, and the book and pencil stamps from Open Book * are perfect to finish the illusion when you stamp the flowers again on the page in a pencil or ink pen color.  In this video, I’ll demonstrate the no line coloring and some simple sponging and adding grass to complete the scene.  Can you feel a gentle breeze?  Be sure to watch to the end for some variations I suggest for changing this design.


PS OOPS! I am SO SORRY I forgot to add the grass in my demo, ackk! A s you can see that detail really adds a LOT to this scene.  It took me 10 seconds after I’ve finished taping to figure out what was missing, lol! I promise it’s very simple: just do short flicking strokes with the 2 lightest greens (here CG1, CG2) using your brush of bullet tip marker, starting at the edge of the book and working outward, so it tapers off. Just like a blade of grass. Easy peasy! Using more than one color for the blades will add a lot of depth.


*In stock as of today, but if it happens to be out of stock when you view, please hit "notify me" button for an email when they are back, we will be getting more!


Supplies: 
Gina K. Designs Open Book, Stately Flowers 11 stamp sets 
Gina K. Designs ink pads: Jellybean and Ocean Mist dye for sponging, Warm Glow Amalgam for no line, Soft Stone Amalgam for pencil and sketch, Jet Black Amalgam for book 
Gina K. Designs White (3 3/4” x 5”), Black Onyx (3 7/8” x 51/8”), Ocean Mist or (Dusty Rose) cardstock
Spectrum Noir alcohol markers: CG1, CG2, DG3 (leaves), FS6, CR6, CR8 (petals), IG2, IG4, FS9 (pencil)
Large and small acrylic block or MISTI, scissors and copy paper for creating the book mask, jumbo sponge daubers, white pen, Tidy Towel, adhesive

 Please let me know in the comments which is your favorite. I hope you enjoy this video and post your own creations with Open Book on social media and our community gallery online, I’d love to see your ideas and works of heart!

Affiliate links are used here which means I receive a small commission at not additional cost to you if you choose to purchase. I truly hope these tutorials are helpful in planning your purchases and projects. Thanks for your support!