Friday, October 25, 2019

Gina K. Blog Hop, Day 3: Warm Winter Wishes Card Kit

Hello, and welcome to our final day of the October Holiday Blog Hop!  We are so glad you're back to see our ideas and art with you today, and thankful you are making time for it.  Please be sure to leave a comment on each blog letting us know you were here and what you enjoyed. This feedback not only helps us plan for future hops for you, but you might ALSO win a $50 gift certificate to Gina K. Designs!  One winner will be selected randomly from all the comments and announced on Gina's blog a few days after hops conclude. The more you comment the better your chances. Good luck!

You should be coming from Karen's blog.

I stamped these cuties and my popcorn string from Pallet Christmas and then colored with Arteza Everblend markers. Cardstock is GKD Pure Luxury White, Red Velvet, and Kraft.
Next I used one of the beautiful snowflakes and a greeting, for the sentiment, ink in Turquoise Sea then Tranquil Teal for the ombre effect.  Adding a stencil to snowflake takes it to a 100, really pumps it up! Be sure to center it with the center of the snowflake stamp for more impact, like a bulls eye. I used a life changing blending brush, and i'll be honest , this is what happens when you grab one that is the wrong color or you forgot to clean, there's a lot of green and brown in there, when I was only using Sea Glass but it gave such an aged vintage look! Even better!  Stencils usually look more interesting with at least 2 or 3 shades. Cardstock is GKD Pure Luxury White and Turquoise Sea.


Thank you for visiting! You can find all the 

Next stop is Beth's blog!


Thursday, October 24, 2019

Gina K. Blog Hop, Day 2: You Being You and You Warm My Heart

Hello, and welcome to day 2 of our Holiday Blog Hop!  We are so happy you are joining us again, and thankful you are making time for it.  Please be sure to leave a comment on each blog letting us know you were here and what you enjoyed. This feedback not only helps us plan for future hops for you, but you might ALSO win a $50 gift certificate to Gina K. Designs!  One winner will be selected randomly from all the comments and announced on Gina's blog a few days after hops conclude. The more you comment the better your chances. Good luck!

You should be coming from Emily's blog.


For this first card, I used Lisa's leaves to make butterflies.  The 2 leaf clusters lend themselves to front and side views.  I also sponged on a bit Wild Dandelion over the Snowfall Stencil and it makes the perfect dusting of happy glittery wonderful. Cardstock is GKD White and Turquoise Sea and ink Tangerine Twist, Wild dandelion, Turquoise Sea and Plum Punch. I drew the little bodies and antennae with a black pen, easy peasy. Highlighting parts of Lisa's pretty handwriting with a yellow marker makes it pop.

This uses Lisa McClelland Hetrick's You Being You hoop, a sentiment from Emily Loggans's Christmas Script, and my little houses from Pallet Christmas, they went so perfectly with the "our home" sentiment! After stamping all of the above in Whisper Amalgam, I traced the images with dashes in metallic gel pens to create stitching, the metallic ink looks like shiny embroidery thread. A gray alcohol marker for shadows of the folds and wavy trim create the illusion, finished perfectly with the NEEDLE from my Twine Time stamp set! Embossing in gold or silver would be even better but I was a stamping blur and my powder was on the other wise of the room! (I was going to add my scissors too, but had to move on to next card!) I also drew in the bit of thread and added a shadow and the "pokey hole". I loved making this card, and all these sets together 

I don't have the You Warm My Heart, but I am blown away by the samples and I'm sure you are, too!

Thanks for stopping by!

Next stop on the hop is Beth's blog.

Wednesday, October 23, 2019

Gina K. Blog Hop, Day 1: Holiday Trees, Pallet Christmas, and Christmas Script

Hello, and welcome to our Holiday blog Hop!  We are so excited to here our ideas and art with you today, and thankful you are making time for it.  Please be sure to leave a comment on each blog letting us know you were here and what you enjoyed. This feedback not only helps us plan for future hops for you, but you might ALSO win a $50 gift certificate to Gina K. Designs!  One winner will be selected randomly from all the comments and announced on Gina's blog a few days after hops conclude. The more you comment the better your chances. Good luck!

You should be coming from Beth's blog.  The full link list can be found on Gina's blog.


Here is my intro video if you did not see it last night! Build a room in no time, dressed and ready to celebrate!


There is SOOOO much you can do with Pallet Christmas, can you see the potential?  Elemental sets like these are some of my favorite to use because I can make such different looking designs every single time and my imagination runs wild!  I mentioned using the stocking hanger elements in the video to hang instead of the tied string, well here they are!  I also wanted to show you this set in landscape orientation with the longer board from Perfect Pallets as the mantle. To hang these fuzzy knit stockings, I stamped the bold taper candle image upside down in black to make the metal hanger, then used the small wooden block base and a different shaped ornament for each topper above the stamped board from Perfect Pallets. I kept the coloring very simple to give it a farmhouse feel but made the one stocking pop with red marker.  That's the person's who has the most Christmas spirit and faith Santa will come, I believe! ;)


I had to show you something without the board from Perfect Pallets so you know it is a standalone set and a lot more than just home decor! I call it, "Little Cabins in the Woods". :)  For this one, I stamped out three cluster of trees and houses, then cut into three sections with my hobby knife.  After sponging the sky with GKD Powder Blue and Blue Denim and adding my greeting, adhere the sky at top with your tape runner and then layer up your foam squares on the remaining sections, adding an additional layer of foam each time till you get to the bottom for a really 3-D effect! Base is GKD Pure Luxury Christmas Pine.

For this one, I wanted to show you a clean and simple card that you can easily mass produce.  I used Whisper cardstock, stamped with GKD Red Velvet and Jet Black Amalgam. (I used the metal ornament hanger for this card, but I also have a string one in the set and love how this hanger makes it look like each little figure has a hole drilled through it, like the painted wooden ones we made when I was little. I'll show that in another video!) I colored in the ornaments with a white gel pen ( you could make them all different colors, but I thought the white on this subtle gray paper was so interesting and unexpected!and stenciled on some snow with GKD white pigment ink and the Snowfall stencil in the new Warm Winter Wishes Card Kit.
The ornaments can also be hung from the board or even as accents stamped onto the pallets like a sign to frame and embellish holiday greetings.

For this next card I used one of Emily's beautiful greetings from Christmas Script with the new Tall Birch background stamp! Stamp the background in Stormy Sky onto a Kraft base and then again on a white mat and cut a curvy hills with a hobby knife and pop up over the base with foam squares. I stenciled on some falling flakes with the Snow Fall stencil from the new Warm Winter Wishes Card Kit and GKD white pigment ink using a Life Changing Blending Brush.  I thought it would be fun to add some greenery from Pallet Christmas set to the branches in Grass Green and my bold flying bird also from that set in GKD Red Velvet!  These little accents coordinate really nicely in size and theme with this new tree background and add a lot of interest and color to the card. I think I'll hang some of my little ornaments on the next one... :)


My favorite card with Emily's set and one of my faves I made from this whole release will be shared TOMORROW because it also features LISA's new set! Come back, because I know you're gonna wanna make it!

Next up, I love how these geometric trees in Beth's Holiday Trees are both modern and retro depending on how you stamp them and the colors you use.  Two tone stamping really create a cool ombre effect on these bold trees, and the little bits give lots of decorating possibilities. I used Lovely Lavender and Plum Punch, Grass Green and Fresh Asparagus, and finally Dusty Rose and Red Velvet for my combos. Always ink the lighter color first before applying the darker ink to your image, then stamp. Cardstock is GKD Pure Luxury White and Plum Punch.

Thanks so much for visiting today! 
You can find all the new products I mentioned in the What's New category.  come back tomorrow for more inspiration!
Your next stop on the hop is Emily Loggans!

Thursday, September 12, 2019

Day 2: Autumn Splendor Card Kit

Welcome back to our September inspiration hops, it's Day 2! As usual, Gina is giving away a $50 gift certificate to one lucky commenter! Thank you in advance for your comments as you hop along, and best of luck in winning the GC! 
You should be coming from Susie's blog.


Today we are showcasing the new Autumn Splendor Card Kit

For these first cards I enjoyed using some fall colors for the greetings and leaves, Faded Brick, Prickly Pear, I can almost hear them skittering down the street looking at these beautiful prints! On the card on the left I used Gina K. Embossing ink and Rose Gold embossing powder for the sentiment and top layer of the leaf. This color  powder looks gorgeous with an autumnal pallete.Looks so elegant! The one on the right I used the colored inks for a gradient, Pure Luxury White is the perfect clean backdrop.
Next, have fun with these two step leaves and a Wreath Builder template!  Leaves are stamped in GKD Sea Glass and Tranquil Teal.
These images look beautiful in any color, so I really wanted to show something nontraditional, enjoy them year-round.
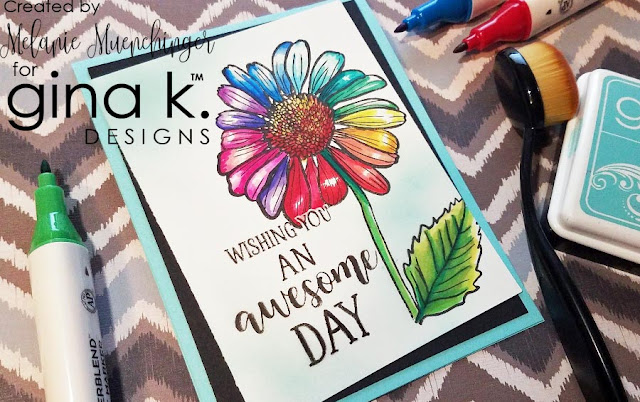
Finally, to go with this *awesome* greeting, I thought I should do some next level coloring on this flower!  Why stick to one color for petals? I used alcphol markers and cardstock is Black Onyx, White, and Sea Glass Pure Luxury.  I lightly blended on some Sea Glas ink with a Life Changing Blending Brush to suggest a blue sky. The wony offset layers are appropriate with this flower that dances to its own drum. :) 


Santana Rose-free incentive for a limited time 
with purchase of $75 or more
It will be automatically added at checkout.

Your next stop is Mindy's blog.

Just joining the hop? Start here at Gina's blog.

Thanks so much for visiting! 
Which card do you like best? 
I truly appreciate your comments and welcome questions!

Wednesday, September 11, 2019

Day 1: Majestic Peony and Happy Fall

Good morning and welcome to our September inspiration hop! As usual, Gina is giving away a $50 gift certificate to one lucky commenter! Thank you in advance for your comments as you hop along, and best of luck in winning the GC! You should be coming from Rema's blog.


First up, we have Majestic Peony. So many ways to color and use these huge flowers! On this first one, I used GKD Skeleton Leaves Amalgam ink to stamp the image on watercolor paper and colored them with Watercolor pans and water brush. Cardstock is Pure Luxury Black Onyx and Kraft and greeting is Jet Black Amalgam stamped 3 times with the MISTI so it's nice and crisp.


 This next card was inspired by my friend who had an unexpected pregnancy at 40, and is in love with her new little man, but still struggling with the big change of having a newborn. She told me she heard an analogy this week, about when "transplanted" to a new pot, the plant and roots go into shock for a short time, until the roots spread and go deeper, and then the plant can really grow.  This sentiment was perfect to encourage her to stay the course, blooming into something richer and more beautiful as her life and family has been enlarged. I did a spotlight technique and colored just the new part with bold alcohol markers. I tore the edge where the image overlaps to represented the uprootedness from the former life.  Cardstock is Warm Glow and White. Ink is GKD Amalgam Jet Black.


  For the last sample with this set, I did just a bit of coloring with two alcohol markers to really pop with the red greeting.  The gray shadows really emphasize the form and just one flower draws you in.  Sometimes simple is best! The absence of blending really creates a beautiful contrast. Cardstock is GKD White and Tomato Soup.


Next we are showcasing Happy Fall.  I did some stenciling (from the new Autumn Splendor kit) with GKD Tangerine Twist and a Life Changing Blending Brush for some pops to swirling leaves before stamping the old leaf in the same ink plus GKD Dark Truffle Amalgam.  I did an ombre effect with the two inks on the greeting and then traced I with a white gel pen.  I added some white dashed paths for the leaves for movement and popped one up for more dimension. Cardstock is GKD White and Kraft.

Next, I wanted to use the bold banner in the set a different way.  Trim off the hanging V and turn it into a pocket!  GKD Blue Denim ink tapped lightly onto the image allows for some texture from the surface to the pad, just like jeans! I used Wild Dandelion, Lucky Clover, and Tangerine Twist for the leaves. Cardstock is White, Blue Denim and Tomato Soup.
For the last card, I stamped Emily's beautiful greeting onto my boards from Perfect Pallets and cut them apart to split up the sentiment for something more unexpected. Stamp the greeting again over Red Velvet cardstock an cut out a little heart, then line it up over the first sentiment. Cardstock is Black Onyx, Kraft, and White. 


Next on the hop is Sheri's blog.

Just arriving? Start at Gina's.


Thank you for visiting today! Which card is your favorite? 
Tell me below!
Come back tomorrow for ideas for the new Autumn Splendor kit!

Thursday, September 5, 2019

StampNStencil Mix N Mingle Blog Hop


Hello and good morning friends, new and old!  
We are hopping with the Gina K and Therm-O-Web team for some fun new fall and winter  holiday products, I hope you've enjoyed what you've seen so far!  
You should be coming from 
Hannah's blog.  
I am the last on the list and very much appreciate you seeing the whole hop through, as I loved making today's cards for your inspiration and getting in the holiday spirit! If you are just now joining, you can go back to the beginning starting with 

Two random winners will be chosen from all of the comments on the hop today, so the more you comment, the better your chances! Entries are closed on Monday night and winners will be announced by September 11th at 10 AM Central.  
Good luck to you!

First up we have the Autumn Wishes collection, I so love making fall cards and look forward to it every year!

 Autumn Wishes


Lots of happy little trees and happy little leaves make me very happy! Tree and greeting are stamped in GKD Dark Chocolate and leaves are stamped in GKD Tangerine Twist.  Add some depth and texture with the gorgeous coordinating stencil and a Life Changing Blending Brush in GKD Kraft and dark Chocolate ink. Trace some white highlights with a gel pen for extra pop, and don't forget to glitz it up with the new Pumpkin Spice Glitz Glitter gel and stencil.  Cardstock is Gina K. Pure Luxury Kraft and White.
Pumpkin Spice Glitz Glitter Gel

Next is the Wishing You Joy Collection!

Wishing You Joy Collection

Love a lot of clean white space to go with these bold images! I used the GKD ink cubes Red Velvet, Passionate Pink, Lucky Clover to two step stamp the ornaments and holly and then did a direct to stamp ombre effect with Sea Glass and Tranquil Teal for the greeting, hangers and falling snow.  Holiday Pine Glitz Glitter Gel and the matching stencil make the ornament and holly sparkle! Cardstock is GKD Pure Luxury White and Sea Glass and Lucky Clover envelope.


Holiday Pine Glitz Glitter Gel


...and that's the end of our hop! 
I hope you enjoyed it and will also check out our teams' 
STAMPNSTENCIL MIX N MINGLE INSTAGRAM HOP 
TOMORROW at 10 AM Central 
for more samples with these sets, stencils, dies and glitz!  
Two more winners will be chosen from all comments on the Instagram hop as well, so plan on joining in the fun and maybe walking away with a wonderful prize!

Thanks for visiting and I truly appreciate your comments! 
Which is your favorite?


Thursday, August 29, 2019

Video: 3 D Wall Art, Gifts and Boxes with Perfect Pallets


Hey all, get out your scoring board to make some gorgeous 3D wall art with the Perfect Pallets set! I could not be more pleased with how these turned out! These will make great home décor or giftables, or even gift packaging or storage when you nest two of these pallet boxes together. They look just like the real thing, but are lightweight and use less than a sheet of cardstock. Little to no measuring involved (I'll show you both ways), these stamped canvases take your images or favorite quotes to another level and are super fun and easy to make!  You can hang these with a pushpin, and on the wall, the Your Wings one brings a smile and This Too Shall Pass is a gentle reminder when small or big things get in the way throughout the day. Please enjoy! I hope you will subscribe to my channel. Thank you for your likes, comments and shares.

Affiliate links are provided for your shopping convenience. I make a small commission if you choose to purchase at no additional cost to you, which covers my time and effort making videos.  I truly appreciate your support!


Supplies:
Gina K. Designs Perfect Pallets, Have Faith, Your Wings stamp sets 
Gina K. Pure Luxury cardstock (5 ¾” x 6”, scored 1" in on all 4 sides shown here, but size varies, watch the video to make yours!)
Gina K. Obsidian Amalgam ink pad
white gel pen, Cutter, scissors or hobby blade for trimming, Scor-Buddy, tape runner or Scor-Tape, straight edge or CutaLline tool, MISTI or acrylic blocks

Formula: Boards measure 1x  3 3/4" and 1" x 5 1/8". For a pallet with a 1 inch reveal, for the width, add one inch to the measurement of the board of your choice on both ends, and for the height, measure 1 inch for each board you are using for the front, plus 1 inch per board at both the top and bottom.  For a 2 inch reveal, add 2 inches to all sides, etc...


Affiliate links are provided for your shopping convenience. I make a small commission if you choose to purchase at no additional cost to you, which covers my time and effort making videos.  I truly appreciate your support!

Saturday, August 17, 2019

Coloring with Arteza Everblend Art Markers Video


Hello! Today I’m sharing my coloring tips as well as my opinion of the Arteza Everblend Art markers, the big 120 set, as well as the Gray and Skin tone sets of 36! These are the most affordable alcohol markers I’ve seen! (Sale price I mention in video may not be available later, heads up!) They come in a fantastic carrying case which allows both travel and full time storage in your art space. I point out several features I like as well as demonstrating how the two tips work and a short coloring tutorial with one of my stamp images, the Brown-eyed Susan from Stately Flowers 9 (used 949, 9424, 9433, 2491, 2492, 5947, 543, 753 from set of 120), stamped in Obsidian Amalgam ink. (You'll see Perfect Pallets, Spring Basket and Puppies Galore in this video, too! AND, Perfect Pallets will be back in stock next week! Make sure to click "Notify Me" if you are waiting for that to restock!)


Can't wait to color the whole series of Stately Flowers and other Gina K. images with these markers for you! (The extra 10% off Arteza code I mention in the video is no longer valid, but the markers and other products are already deeply discounted for their sale, and Gina has her own B2S sale through the 18th! Use SCHOOL20 at checkout for 20% off your order, everything in the store! Go grab those stamps you've been wanting!!) I highly recommend this assortment of alcohol markers for all types of art and crafts. Their website shows a swatch of each, but to help you, I’ve created a color chart you can download and fill in to reference as you play with color! It is so helpful to see what you have to work with when selecting markers for your projects, as well as how they blend on your cardstock. I review my color charts every time I start a project to choose shades and as I work usually select more markers that will add even better contrast. This pdfs below are free for you to print on your preferred cardstock (GKD Base or Layering Weight is mine! Please enjoy this gift from me!
Arteza Everblend Markers 120 Colors chart pdf here. Arteza Everblend Gray and Skin Tone chart pdf here. Looking for great marker storage for your current collection? They sell just the case that holds 144 markers here!

The code I mention in the video is no longer valid, but Gina has her own B2S sale through the 18th! Use SCHOOL20 at checkout for 20% off your order, everything in the store! Go grab those stamps you've been wanting!! This video contains affiliate links. When you purchase through these links, I receive a small commission on the sales for my time and effort at no extra cost to you. Thank you for your support!

Thursday, August 1, 2019

Day 2: Pop Art Flowers Card Kit and Main Squeeze

Hello! Welcome to you second day of inspiration hops! 
Today we are showcasing the Pop Art Flowers Card Kit and Main Squeeze stamp set.
Be sure to comment on each stop, each one counts as an entry to win a $50 gift certificate from Gina K. Designs. Winner announced August 2nd.  Good luck!


So many different looks to make the different sets and tools in this kit!  (I used the kit's stencil in yesterday's post before I realized it was part of this kit! Scroll down to see on balloon card) For this first card, I stamped the card kit's beautiful line art flowers onto a white mat and also on Sandy Beach mat.  Next I stamped three boards from Perfect Pallets in Kraft ink on the Sandy Beach cardstock, with the flowers centered in the middle, and cut it out.  It's as easy as cutting a square or rectangular mat, you can use your trimmer, CutALine tool, or scissors.  Here I went in with scissors for each little notch between the three boards. 
I stamped the greeting and added some white gel pen to just some of the petals and around "thank". Doesn't it look gorgeous with just that little bit of white? So quick and simple! Then I lined it up with the first image popped it up with foam squares. Trace around the white mat's flowers at the bottom for extra dimension, and that's it. 
Card base is GKD Ocean Mist.


 Next, the new Electro Pop Neon inks are fun with the kit's 2 and 3 step flowers!  I began by stamping the leaves from the card kit in Hello Yellow, Loud Line and Screamin Green, then adding the roses in Orange Glow and Raging Red. Next I stamped out three boards from Perfect Pallets together in Sea Glass ink on white cardstock, trimmed one off to make a handle for my wooden planter, and left the other two together to make the holder. 

I used a cool gray marker to make a couple stripes on each board just loosely following the  wood grain in the illustration for a very silvery, weathered look.  I love that you don't need to completely color them in to get cool look!  These are popped up on foam squares. 
Celebrate is stamped in the new Obsidian Amalgam.


I used the the third stamp set in this kit to make this card. I went tropical with the colors on this pallet to go with these joyful vacay blooms! Boards from Perfect Pallets are stamped in Charcoal Brown on white cardstock, then two step filled with the bold board using Sandy Beach and Wild Dandelion (left the middle board with sentiment white to make it pop more and easier to read).  Flowers are stamped with Passionate Pink, Sweet Mango, Wild Dandelion, Grass Green (also stamped off for lighter green) and Obsidian Amalgam inks. I added Crystalline Drops for dimension and shine.  Cardstock is White, Black Onyx and Passionate Pink.


Next up, this fun design with Hannah's Main Squeeze set.


(I don't know if you've watched Stranger Things 3 yet, but after I finished the card, it totally made me think of Eleven's cute 80's rompers, down to the colors, shapes and wonky 80's layers!)
(Right??)


Splatter in the background is from the Tiny Textures set, I thought these made the perfect juicy sweet and sour squirts!  Stamping is Loud Lime, Hello Yellow, Raging Red, Orange Glow, Jellybean Green and Wild Dandelion. I used the matching die set to cut out and pop up the fruit. Cardstock is GKD Wild Dandelion, Black Onyx and White.


I also wanted to show you a sample with the new incentive Layered Eucalyptus set! 
 I stamped out some boards from my Perfect Pallets on White, then covered the bottom with a sticky note and three step stamped the eucalyptus layers in Lovely Lavender, Wild Lilac and Wild Wisteria.  I think this look so pretty on the sign. I "hung" it with the tied bow image and colored with alcohol markers. I used a mix of greetings from both Perfect Pallets and This Girl Is. Butterfly is from my Women of Faith set.


Layered Eucalyptus-Free Incentive set with $75 or more purchase


Electro Pop inks

Thanks for stopping by! Shop all new products here.

Now on for more more inspiration from the team:

Gina K.-Pop Art Flowers
Hannah Schroepfer-Main Squeeze
Melanie Muenchinger-you are here!