Monday, February 25, 2019

Mega and Mini Wreath Builders

Hello! Today we have a special hop to share some fabulous new templates for Gina K. Designs: MEGA and Mini Wreath Builder! If you are addicted to wreath building, these templates are for must have! Enjoy our hop and please leave comments along the way, each one will give you a chance to win a $50 gift certificate to the Gina K. store!  Winner announced March 1st.

 The mini template is oh so tiny, what a cute template! It also includes some stencils on the same sheet, which is a nice bonus.


I made this small card for a baby shower we had for a friend this week! I inked the flower and leafy bits form the Mini Wreath Builder stamp set with GKD Tranquil Teal, Lucky Clover, Fresh Asparagus and Seaglass ink CUBES, they are the perfect size for these little images.  Sentiment was stamped in Jet Black Amalgam and cardstock is GKD White, the new Stormy Sky and Tranquil Teal. (I misplaced my circle die this size, so I used a 1 3/8" circle punch, which took off just the rim, the image is slightly bigger.)  Card measures 3 1/4" square.


Mini Wreath Builder Stamp Set


The Memory MISTI and Mega templates are huge! So many possibilities! Here is Sadie checking it out. I needed to clean my desk off to make room and it would be a good idea to keep it on my desk so I clean up after each stamping session.  ;) (The magnet is on the back when you unbox it, heads up! Store these large templates inside the MISTI, my tip)


The foam in the MISTI are a perfect surface for stamping with clear stamps even if you are not using the door. For this card I used the template where you cut your mat to 4 3/4". I love how all the sizes are on the back of the packaging. Hang on to that for reference! I used the A Year of Flowers 2 set to stamp all these flowers with the new Whisper ink, it is the palest gray you can still see, which I really need for no line coloring right now ( I was seriously seeing double after a long day of editing my last stamp set, ugh). It is easy to complete color to cover or quickly and loosely fill in color like I have shown in my A Year of Flowers 2 videos so you can still see a hint of the lines like a pencil sketch.
I colored with Spectrum Noir trying to make it look very much like watercolor rather than real flowers.  Sentiment is stamped in Jet Black Amalgam. I traced the greeting and all flower elements for a drop shadow, I love how transparent and watery it looks. I add a few Crystalline drops for dimension and shine.

Cardstock is Coral Reef, and Lemon Drop. Finished card measures 5 1/2" square. Greeting is from Emily's Lettered and Lovely set.


This next design I used the 6 1/2" size template and greetings and a butterfly from my Women of Faith set. I originally I had a lot more stamping in mind to create a kaleidoscope of butterflies (the actual term for a group of them, I love that, so appropriate!) but I couldn't find the smaller two.  The medium one I located after clearing my desk (to make room for Mega MISTI) and then it went AWOL WHILE I was cutting my cardstock to make the card, ack!*  So I went much simpler with just the one. I love a lot of white space in design however, so I'm not disappointed with how it turned out.  I'm glad I can at least show an example of how you don't have to fill the whole space just because you are using a larger piece of paper! You will need these larger templates to do the rotation technique of wreath building on larger mats, but it doesn't require that it be stamped to the limits! :)

GKD inks from the top going  clockwise: Ocean Mist, Sea Glass, Turquoise Sea, Bahama Blue, Blue Raspberry, Tranquil Teal, Slate and finally Whisper. I love the progression of blues and symbolism of transformation, both in the butterflies and transformative power of prayer.I love how she included 2 large circle templates for the center to allow you to perfectly center your greetings, and sponge in come color to really make your design pop. I used Ocean Mist at the top and Turquoise Sea at the bottom. I didn't want to go too dark and lose the detail in the butterfly wings. I layered my stamped mat on Black Onyx and Blue Raspberry cardstock. Each of the black layers are popped up on adhesive foam squares.  
Finished project is 12" x 12". You can put this in an album cover or scrapbook page frame, or what I did is mount it on a white wood laminate sample I got from a thrift store. I put this up on a storage cabinet in my craft room and it reminds me both to pray for the people on my prayer lists, and that Jesus is also lifting me up and interceding. :)


Let's see what the rest of the design team made with these fabulous stamps, templates and tools! Shop here!


Gina K.  -  Mega and Mini Wreath Builder 
Melanie Muenchinger-you are here!
Susie Moore

* found it! :)

Affiliate links in this post are used for your shopping convenience! I receive a small commission if you choose to purchase at no additional cost to you. Thanks for your support! We hard  to demonstrate what these awesome products can do. :)

Thursday, February 21, 2019

Day 2: To the Moon and Back and Wonderful World

Welcome back to another Gina K. hop!  I hope you enjoyed yesterday's ideas and got all the stuff on your wish list!  There's more in store, today we are featuring To the Moon and Back and Wonderful World by Hannah Shroepfer. Be sure to comment as you hop through for more chances to win a $50 shopping spree at Gina K. Designs!  Winner announced a few days after hops conclude, good luck!

For this first card, I stamped the moon in GKD White Pigment ink onto the Black Onyx cardstock and then stamped on the two step craters in  Soft Stone ink.  I doodled a little border with white gel pen and heart arrows to show the direction to bring you around and back again to the sweet sentiment. (The Guess How Much I Love You? book has a *very* special place in my heart) Greeting is stamped in Jet Back Amalgam on white cardstock and cut to look like a little cloud or though bubble.  I stamped and cut out a couple hearts from Open Book with Red Velvet for a little love and "pop".  base is the new GKD Soft Stone Pure Luxury cardstock, such a soft gray.

For my first  I used the earth image with the globe stand (stamped in the new Soft Stone ink, perfect for a "silver"), and grabbed the long solid bar from Emily's Cake Toppers  set again. (I liked how it turned out yesterday, so why not try it again?)


  I stamped it across the GKD Jet Black Amalgam globe in Red Velvet, Tangerine Twist, Wild Dandelion, Grass Green, Tranquil Teal and Wild Lilac.  Just a fun and unique way to fill it in, and easy additions color to your design!  I cut it out and popped it up on my mat and then added the greeting. Cardstock is GKD Pure Luxury White.

For this next card I stamped the flowers in Jet Black Amalgam and noticed the details were sooo small I was going to need to pull put my Zig Clean Color markers with the pointy tip! (My eyes are changing, ugh, no fun!) I would have used watercolor paper if I'd planned ahead, so it didn't blend as well as I'd hoped in some places, but oh well!  I fully intended to use this with the globe base stamp, but then noticed it was just the right size to go in the new Heart Circle die.

I decided to pull out the purple and pink from my coloring and created a background using the smackin' acetate technique and the 4"x 6" acrylic block and Plum Punch and Passionate Pink ink cubes and a mister. (I did use watercolor paper on this mat allow for the colors to blend and move)  I think it's really fun to mix up something more modern and messy like this spray paint effect with the delicate floral, unexpected and packs a punch! I love how you see all that gorgeous color through the heart cut outs, really makes you notice the detail in the die. Cardstock is GKD Pure Luxury White, Black Onyx, and Passionate Pink.


Check out all the new products here

Now let's see what the rest of the design team has with these beautiful sets!

Melanie-you are here, thanks for visiting!


Wednesday, February 20, 2019

Day 1: Cake Toppers and Crafty Notes

Good morning, and welcome to our first day of February hops! Today we are showcasing Cake Toppers, Crafty Notes, and a few other new goodies so let's get to it!  Up for grabs is a $50 gift card to the Gina K. store, so be sure to comment as you hop through for more chances to win!  Winner announced in a few days. Good luck!


First up Cake Toppers by Emily Loggans. There are so many ways to use the different layers and two step elements to stack your cakes, but I decided to use the small medium and large bars on their own to create this fun rainbow cake. (I really am going to make one of these one day in real life, I am! That's the kind of epic project I'll try out on grandkids) No outline gives it a very contemporary feel, but the candles with their flower flames (I love how the dotty two step images make them look like SPARKlers!) It definitely reads "cake", even without a stand! I left a space in between each to suggest some white frosting I used the ink cubes pictured for each layer.  Greeting is stamped in GKD Slate and card base is GKD Pure Luxury Tranquil Teal.


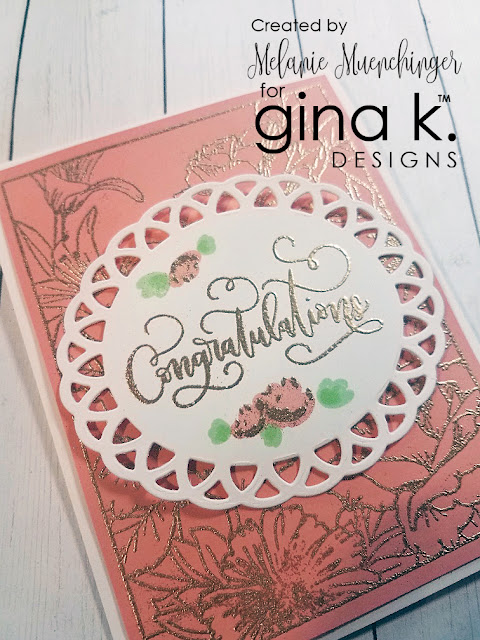
On this next card I used this beautiful new Elegant Oval die for the greeting, and then embossed both the sentiment, two step flower elements and my Arranged with Love background with Versamark and the new Gina K. Champagne embossing powder. Sooo purty and sparkly!  Leaves are stamped in GKD Applemint and flowers in GKD Peach Bellini to match the embossed mat.  I LOVE the Arranged with Love frame with all theme and all greetings in the set, very elegant!  Each sentiment is large enough when popped up on a mat or die cut to cover the floral card in the frame image both portrait and landscape style. Arranged with Love has 8 of its own occasion greetings, but I'm really excited to use these larger ones of Emily's with it!


Card base and die cut are GKD Pure Luxury White.


Next, the Crafty Notes pieces are super fun!  First, here is one I had to try out with the hot glue gun 
AND MY REAL HOT GLUE GUN! 


 I stamped the sentiments in the middle first and glue gun below, then drew on all the glue elements. (If you do the glue first, it may be tricky trying to stamp around it as a large blog might hit it the dried glue.) It was really fun winging this freehand heart and border, but you could trace around a die or draw with a light pencil before to have something to follow. I added the little bold heart from my  Open Book set and stamped off in GKD Red Velvet to match the cardstock base.  I used a gray marker to create shadows on the gun, hearts and word "stick".


This next single layer sample uses the Open Book frame as a base for the Crafty Notes paint palette and greeting. I stamp the book in the new Soft Stone and the image and greeting in Jet Black Amalgam, this combo soften the pages and make the palette image really pop. I colored the paint set with alcohol markers and then used Peerless watercolor and a large and small brush to do the purple, yellow and turquoise treks and the red squiggle. I outlined the word "colorful" with a white gel pen to make to easier to read on the deeper purple. Book is shaded with GG2, GG3, and IB3. Cardstock is Pure Luxury Heavy Base Weight White.  I am loving the size of all these crafty saying and images to go with my book! :)


Shop for all your goodies here
Thanks for stopping by! 
Next stop is Mindy. Below is the full link list of our talented Gina K. Design Team! 

(Don't forget to comment before you go! 
Thank you, I love hearing from you! )

Emily-Illustrator of Cake Toppers
Melanie-you are here!

This post contains affiliate links which pay me a small commission if you choose to purchase at no additional cost to you. 
Thank you for your support! :)

Friday, February 15, 2019

Coloring a Clowder of Cats Video!


Open Book is back in stock, woo hoo! *Today I am showing you some tricks for coloring some very realistic looking and adorable cats with ease! I think you will love this video! We’ll do some simple masking to make the Open Book cats snuggle, then shadow, add patterns, and finally create a fuzzy texture with a regular pencil. 

This is a very quick card made with minimal supplies and this dozing pair design is sure to be appreciated by any animal lover, friend, family member or your sweetheart. Please enjoy! Let me know in the comments which cat pattern is our favorite and how you would like to see one colored in a future video.  I appreciate your feedback!
Don't forget to stamp the inside!


Supplies:
Gina K. Designs Open Book stamp set
Gina K. Pure Luxury White (4 “ x 5 ¼”) and Sweet Mango (4 ¼” x 11”, scored at 5 ½”) cardstock
Gina K. Jet Black Amalgam ink pad
Alcohol Markers (Spectrum Noir: GG2 (shadow), FS9 (ears, nose and beans), TN2, GB5 (orange tabby fur) and IG8 (tuxedo)
Adhesive, printer paper and scissors for mask, 3”x 4” acrylic block, pencil, black pen or white gel pen optional for touch up

Note: I mentioned an optional white and black pen in the video but did not use. The masking came out perfectly, so no need!  But I had them handy in case I had a "skip”, which could easily be connected by the black pen, or went over the edge of one cat, and needed to be covered with the white. Easy peasy! 😊

Open Book

*I think the set is going to sell out soon again at the rate it's going. Don't delay if you can't wait to play!