Wednesday, August 25, 2010

Day 4: Lean on Me and You are Not Alone

Hello, thank you for joining us for our final day of Gina K Designs sneak peeks! Today we have two sets from Gina K, a card kit set and Free with Three. The first is "Lean on Me", an elemental flower set with clean and simple lines and sentiments. I love the "Lean on me" sentiment, so I chose to stamp the smaller flower leaning into the other, one of the stems has a perfect little curve at the top to do this. Ink up the images with your waterbased markers and thump a darker color over the bottoms of the flower before stamping.
I loved the lines of these tall graceful flowers so I framed them in a tall panel and kept the card free of prints, just gorgeous solid Pure Luxury (White, Black Onyx, Red Hot, and Fresh Asparagus) to make these colors really pop. I stamped just a few of the leaves tone on tone to the green layer.

Next we have the Free with Three set (which means this set is FREE when you buy three other sets!) "You are Not Alone" , heartfelt sentiments that we all need for our cards, plus bold nature images each framed in an open circle. They have a really serene, Asian feel to me so I went for another clean layout. This is a 5 1/2" square card made from Pure Luxury Ocean Mist.
Start with a piece of Pure Luxury White cardstock measuring 4" square, then cut in half, and half again so you have four 2" squares. The circled flowers fit perfectly on these. Stamp in four colors and stamp our greeting in the darkest color over the lightest colored image. Adhere these onto a 4 1/4"square panel (Chocolate Brown) and use your Scor-Buddy to add scores at 1/2" on each side to add more detail and frame up your stamped mat. Last I added a clear taupe button in the middle tied with jute twine for texture and shine, placed in the middle it also unifies the four elements and echoes the round images.

For more samples with the stamp sets being previewed tonight, please check out these participating designer's links:


You are invited to join us for our Release party tomorrow night, August 26 from 7-10 central time for contest questions, challenges, and chatter along with tons more samples! The party leads up to the new products featured this week on our blogs being available for purchase online through GinaK Designs at 10 pm. See you there for all the fun! It's almost time to party!

Tuesday, August 24, 2010

Day 3: Autumn Splendor Stamp TV Kit

Day 3 of our Gina K Designs peeks, welcome back! Today we have the StampTV Kit "Autumn Splendor". This set is full of greetings and images to remind you of harvest and abundant blessings. For today's sample, I chose this bucket of juicy apples. Spilling over, this image was perfect with the sentiment "We give thanks for unknown blessings already on their way".
I colored the image with Copics (Cardinal, Coral, Strong Red, Moss, Olive, Sand, Light Walnut and W-3 for the shadows, almost exactly what I used for the barn yesterday LOL!) Cardstock is Pure Luxury White, Black Onyx, Red Hot, Green Apple and Fresh Asparagus. I stamped these bold leaves in the kit over both green cardstocks in olive ink to make a subtle leafy background and added some stitched red ribbon. Sides of the Fresh Asparagus panel are stamped with In Stitches to give it a more homespun feel. The little wire clip worked perfectly with the bucket handle and the different buttons from the red mix mimic the apples and remind us of our many blessings, great and small.
For more samples with the stamp sets being previewed tonight, please check out these participating designer's links:

You are invited to join us for our Release party this Thursday night, August 26 from 7-10 central time for contest questions, challenges, and chatter along with tons more samples! The party leads up to the new products featured this week on our blogs being available for purchase online through GinaK Designs at 10 pm. We hope you'll make plans now to be able to join us in all the fun!


Thank you for visiting me today, just one day of previews left and then it's time to shop!

Monday, August 23, 2010

Sneak Peek Day 2: Farm Life, Boo, and Faithful Florals

Welcome back, thank you for hopping through Day 2 of our sneak peeks this month! Lots to share today, first up is the newest set from Theresa Momber, "Farm Life". Drawn in her signature vintage style, you will love these charming pastoral images. I started with this beautiful barn, which is stamped on Pure Luxury White, colored with Copics (Cardinal, Coral, Strong Red, Moss, C3), and sponged with Antique Linen Distressing Ink.
I chose a very fancy label for this stately image (Labels Four) to die cut my image and then used my Scor-Buddy to score lines every half inch on the Lipstick Red CS to make the planks of a barn. I swiped a Cream White pad over the paper to tone down the brightness of the red as well add a few more lines and give it a worn look. The little photo turns add the hardware to create the illusion of the door. Card base is Pure Luxury Ivory and Stitched ribbon. Greeting is part of a sentiment from Tami's set, which you'll see in a moment! I almost added more to this card, but restrained myself, thought the simple life depicted here should be presented somewhat simply. :)

Next up we have Asela Hopkins "Boo!" I don't think I noticed the scaredy cat up in the tree until Gina peeked it the other day LOL! I knew I wanted to use the little haunted house framed up in a circle, and she has this straight little row of BOO pennants like a banner, but when you cut the rubber out you can curve the image on your block so I stamped it this way under the die cut. I colored them with Copics and added a shadow to give it dimension, then sponged over the house with yellow and orange inks.
I stamped some of these fun swirly bats, added some gingham and made my own little pumpkin embellishment to finish the card, very easy to do! Locate a two hole button from orange assortment and draw on a nose and mouth with a black glaze pen (which I also used to draw the little loopy ties on the sides of the banner). The grooves and stem were done with Copics. Isn't he sweet? Card base is Vibrant Violet.

Finally we have Tami Mayberry's "Faithful Florals", a set with three flower silhouettes and sentiments and scripture. use the direct to stamp technique and color the rubber with markers to get the different colored blooms and stems before stamping. this first card is clean and simple, cardstock is White, Red Hot and Ivory.
Next I have a "kicked up" version. I turned the card, stamped "Faith" in black over the image, which really pops, and added some gingham to tie in the black. Last I added a red button.
( If it looks like I got a smudge on the inside of the card, that is actually more of the flowers peeking out that I stamped inside, hee!) Totally loving these colors today!

For more samples with the stamp sets being previewed tonight, please check out these participating designer's links:


  • Miesje - *our CenterStage Guest Designer!*


You are invited to join us for our Release party this Thursday night, August 26 from 7-10 central time for contest questions, challenges, and chatter along with tons more samples! The party leads up to the new products featured this week on our blogs being available for purchase online through GinaK Designs at 10 pm. We hope you'll make plans now to be able to join us in all the fun!
See you back here for day 3, thanks for visiting my blog today! I hope you enjoyed these projects, such wonderful sets to work with!

Sunday, August 22, 2010

Sneak Peek Day 1: Wild at Heart, Fanciful Tags, and Grand Damask

Welcome to our first night of Gina K Designs Sneak Peeks! First set we are peeking is my "Wild at Heart", a new frame set with greetings that is sure to inspire! Symbolizing beauty and freedom, wild flowers have always captivated me. Planted by the wind and often growing in difficult, unlikely places, they are as lovely to me as ones that are cultivated. Whether they are weeds or flowers is in the eye of the the beholder! My mother had a little framed flower in our home when I was younger with the sentiment "Bloom where you're planted" (which I've included in this set) which reminded me growing up to do your best with what you have where you have it. I think these flowers and sentiments are perfect for creating cards for friends and loved ones to wish them a lovely day or to give them strength in hard times. The bold background lends itself to countless techniques, new and old, and will have you reaching for some products I'm sure you have but may not have played with in awhile!
This first sample was created with a brayer and a spectrum pad, I'd been waiting months to try one of those spectrums out with this stamp! Simply ink up your rubber brayer on the spectrum pad then roll over the frame til you've inked the entire image, and stamp! I love the beautiful blended look this creates and how the white flowers and stems pop out! If you don't have a spectrum pad, you can roll your brayer over a couple different pads to create a two tone look or use your sponges to daub on whatever colors you choose in the areas you want. Cardstock is Grass Green and White.

This next card I took advantage of how the vines split the frame into different sections like panes of glass, so I created a stained glass effect by coloring the different sections with markers.

Although it is difficult to see on the red rubber because I chose warm tones, this is a completely inked up stamp after coloring with my Memento Markers, it goes faster than coloring paper because the ink just glides over the rubber, you can go quickly without having to worry about going outside the lines, you just stop when you hit the edge LOL! Hopefully you can can see the dark and light areas, I hopped around so that the the same colors would not be touching each other, with Memento Angel Pink, Potters Clay, Canteloupe, and Rhubarb Stalk on the background, and Lilac Posies for the flowers.
I went over the border too before stamping with a black marker before stamping to make it pop. I added some yellow and orange Doodlebug glitter tothe centers. I'm in love with this look!

Just like in "Inspiration Mosaic", there are "open" areas in the pattern which are natural places to add a greeting to I've done in the sample above, but you can layer a sentiment or image over the flowers as well. Cardstock is Sweet Corn and Black Onyx.


Here I made a quick gift set of cards in different colors, these were SO quick and simple to make!
I stamped the frame directly onto Pure Luxury White in different colors and placing a small square of white onto the middle of the stamped off frame before cleaning it to get the lighter shade. Then mat it with a coordinating color, add your greeting and line it up over the frame to match up the flower images. Easy peasy!

I purposely kept today's cards simple and only used this set in creating them and used almost no embellishments and very few layers to show how few supplies you need to create something gorgeous with this set, but I've made about 20 cards with it so far and haven't done the same technique twice! I really look forward to sharing how you can use your other stamp with "Wild at Heart" and go deeper into techniques after the release (kissing, anyone?), it is so versatile! :) To read more about how I came up with this set, read this post.


This next peek uses Nina's "Fanciful Tags", a set of three images to fit the Fancy Tags Nestabilities Dies, plus oodles of sentiments to fit in each. This is a wonderful stand alone set that you can use to create a greeting tag for any other stamps you have, the classic fonts will match everything. Below I used the "Just Because" over my "Wild at Heart" frame, this time I traced over just the border, flowers and stems with Memento Markers , spritzed with water and then stamped to create a water colored effect. Cardstock is Pure Luxury White, Pumpkin Spice and Chocolate Brown, ribbon is Stitched Last, we have Nina's"Grand Damask", which is a wonderful stand alone set as well, with flourishes and a large design element that will make all your cards look extra fancy inside and out. I have been waiting for a great flourish set from Gina K Designs, and this really fills that need! Here I used Pure Luxury Black Onyx and Ivory, stamping the damask and a single flourish in Memento Tuxedo Black ink.

I stamped the rectangle border and greeting from "Fanciful Tags" onto Ivory and trimmed it out to layer the Black Onyx Fancy Tag die cut. I used a border punch for the side and embellished it with just a few adhesive pearls.


So elegant!


For more samples with the stamp sets being previewed tonight, please check out these participating designer's links:


You are invited to join us for our Release party this Thursday night, August 26 from 7-10 central time for contest questions, challenges, and chatter along with tons more samples! The party leads up to the new products featured this week on our blogs being available for purchase online through GinaK Designs at 10 pm. We hope you'll make plans now to be able to join us in all the fun! More peeks tomorrow, thank you for visiting!

Behind the Scenes...

I hope you are having a blessed Sunday. This past week I have been entertaining my father who is in town, enjoying the last week of summer with my boys, readying them for school, and preparing for our Gina K peeks which start tonight. One of the sets we are previewing this evening is mine, and I want to share how it came about. Since I know you will be hopping and we have other sets to show, I thought I might go ahead and write a separate post about it so tonight's doesn't get too long! I have been having the most wonderful time creating with it this past week, and still am not sure which samples I will share with you first! Although I don't like choosing favorites, because I enjoy my sets for different reasons, I know if my house were on my fire there are a few I'd grab first, and this one would be one of them!

I drew this set while the pain and numbness I was experiencing in my hand a few months ago was at its worst. If you read my blog, you know it really threatened what I would be able to do in the future crafting wise, and was really a trial and test of my faith. (I have to credit attending my Bible study every week that I wasn't totally overwhelmed with fear about the pain or worry like I sometimes tend to be without God's help. I really wasn't sure if the injury was something that I was supposed to press through or a sign that I should put designing and illustrating aside to focus on my family. Even though I loved what I did so much, I was able to align my will with His and tell Him honestly I would give it up and be happy with or without it and grateful for whatever was in store for me.)

I was actually trying to finish up another set that I'd sketched over a year ago but never finalized, but was finding that I didn't have the strength or steadiness to make the drawings the way I wanted. (I'll admit, that was a little worrisome) I prayed and stepped away from it for awhile, before coming back to draw something entirely new, and using a different process: this time taking away color like an etching (much like I also had to carve away at my heart and remove some layers of myself!) The result is the set we are about to release, with an image and sentiments and scripture (which you see above) that are very personal, because something new and beautiful grew out of that hardship. The result of that time and this new set is so precious to me, because it really forced me to press into the Lord. As you know, he restored my health, but also made me dig deeper and become a different and better person and artist. He answered me, that I would not be the same afterwards, but that it would ALL be for my good.

One more verse on my heart today:
"We can rejoice, too, when we run into problems and trials, for we know that they help us develop endurance. And endurance develops strength of character, and character strengthens our confident hope of salvation. And this hope will not lead to disappointment. For we know how dearly God loves us, because he has given us the Holy Spirit to fill our hearts with his love."

Romans 5: 3-5

See you tonight! :)

Monday, August 16, 2010

Wave your hands in the air

like you just don't care! Here's a cool pic of me and the boys Paul snapped turned around in his seat on Space Mountain at Magic Kingdom in Disneyworld.
My kids are such speed freaks, there is nothing they won't ride! Yup, my 5 year old rides the big coasters with no hands! (I keep mine up but poised near the grab bar for close calls) Yes, we are back home now and although I've missed you I am having a hard time getting back into blogging since I dug myself out from all our post vacation laundry! Ugh! Luckily, new rubber arrived today for our release next week so that should get the juices flowing!!
Here is a magical night of fireworks in front of the castle.... turned out like a post card!

And here we have two drummers drumming at Animal Kingdom the next day.


If you have never been to that park, that Tree of Life you see behind Jonathan is just spectacular, hundreds of animals sculpted into that magnificent, ginormous trunk!!

My little Vikings in "Norway" at Epcot (we never miss an opportunity to get a photo in a cool hat)...

Be afraid, be very afraid!!

The three of us at Hollywood Studios. I know my smile is totally crooked, I think I was talking but glad it turned out as well as it did, could have been worse! (You know, I wish Paul had told me to crouch down a little bit, it would have totally looked like I was wearing that big sorcerer's cap behind me! hee!)

Finally a pic of all of us together! This was taken inside the Sci-Fi Drive in Dinner theater, I totally recommend it if you go to Hollywood Studios, what a cute restaurant, wish we had one in Austin!
They show old monster movie clips, previews and drive in ads from the 50's and it felt like you were out under the stars in these convertibles even though it's indoors, the kids loved it!

And just a couple more pics of the kids clowning...
William was throwing the peace sign/ bunny ears up in almost every pic, where do they learn these things??

Jonathan thinks he's getting a hug here, little does he know!
We did DisneyQuest, the downtown area and Blizzard Beach too, but I don't have any pics from these places. (I may share some other favorite pics later, but right now I am just pooped, ran errands all day in 100 plus degree heat and I am fading fast!) Still, a good time was had by all, no one got lost, and we were very happy to return to our home in Austin by the end of the week! What more could you ask for?


Thank you so much for your prayers for the Jensen family, I will update you on Jess's condition as soon as I hear from Nancy again. She posted her snail addy and a heartbreakingly beautiful poem her sister-in-law wrote for Jess on her blog, well worth reading if you have a few minutes! (and passing along to others you know who might get great comfort from it) I DID find my phone moments before we needed to leave for the airport, literally (thank you for praying about that, too!) and it was so precious to receive your emails that you were lifting up prayers for that family each day while we were away! God bless!


More later!!! Cards soon, I promise!

Saturday, August 7, 2010

Urgent Prayer Request


We are leaving shortly for the airport but couldn't go without posting a very urgent prayer request for an online friend: Many of you might remember a young man who was dying and his family I did a RAK request for my first year of blogging, Marcus Russell. So many of you lifted up cards and prayers it really helped the family and him before his passing. This is a picture of him with his cousin Jessica, who just turned 22, but has been terminally ill her entire life and was not supposed to survive as a child, so her mom Nancy has always called her Miss Jess "Miracle Child". She really needs our prayers now. She has congestive heart failure and Ischemia of the bowels, plus a host of other medical issues I can't fully explain now, but she is currently in starvation mode, can not eat. Unless things turn around, she doesn't have much time left. You can visit Nancy's blog here, although she has not updated it in the past couple months as she has been so busy tending to Jess, so the extent of how bad things have gotten aren't recorded there, but she sent me an email the other night of how much pain her daughter has been in this past week, how much weight she has last and that she is now in hospice, many signs a couple days ago that the end of is near. However, she started improving a bit yesterday! Please, please pray for healing, comfort and relief from this pain will continue for Jessica Jensen and strength for her family, Nancy, Karl, Justen, and Brandon.


I will be gone all week and unfortunately can't help with sending RAKs but if you get in touch with Nancy you might leave a request for their address if you want to send a card. Thank you so much!!!!


PS a much smaller prayer request: that I find my phone! Lost it yesterday! has all my contacts, photos , videos I've taken since January of the kids events on it
:( Plus enabling me to check email and blog from it, I won't be able to do that while I'm away, so please understand if you email and don't hear from me! I am praying it will turn up when we get home!

Friday, August 6, 2010

Pretty in Purple*

Hello! Here's a card I made with "A Beautiful Life", I don't think I'd done the tulips in these purples yet! (BV02, BV04, BV13) Cardbase is Lovely Lavender. I punched some wave flourishes out of Grass Green, I am really enjoying and getting a lot of mileage out of this new punch! I popped up the butterflies and did the gradient on the word beautiful with my markers, I love this effect!

I am on vacation with family this week, so hopefully I can get a few more posts up, but if not, see you soon!

oh PS! having fun shopping with that awesome coupon?? :0 what'd ya get? I'd love to know!

*Just doesn't quite sound the same, does it? ;)

Thursday, August 5, 2010

Blast from the Past Day 5

Day 5 of Blast from the Past! I hope you've gotten lot of new ideas for your favorite sets from our team this week as well as adding some new (well, new to you anyway!) sets to your wish list! :) Tonight I am getting Gina's "You Know You're Old When... " set inked up for the first time, I finally got it recently! This woman in the car cracks me up, and unfortunately, my friends and I are experiencing her problem all too often lately! (The punchline inside is "...when getting lucky means you found your car in the parking lot."LOL!) I found a sheet of DP in October Afternoon Boyfriend pack, that I thought with these arrows going every which way was too perfect!! I used this palette to choose my Copics for coloring. Then I punched out some circles to go over the dots spotlighting some of her possible locations (hee! this looks my path to find mine somedays, thank heavens for a panic button on my remote!) Cardstock is Tempting Turquoise, Black Onyx and White. I know this silly set will help me not take things so seriously sometimes...stamping should be fun!! :)

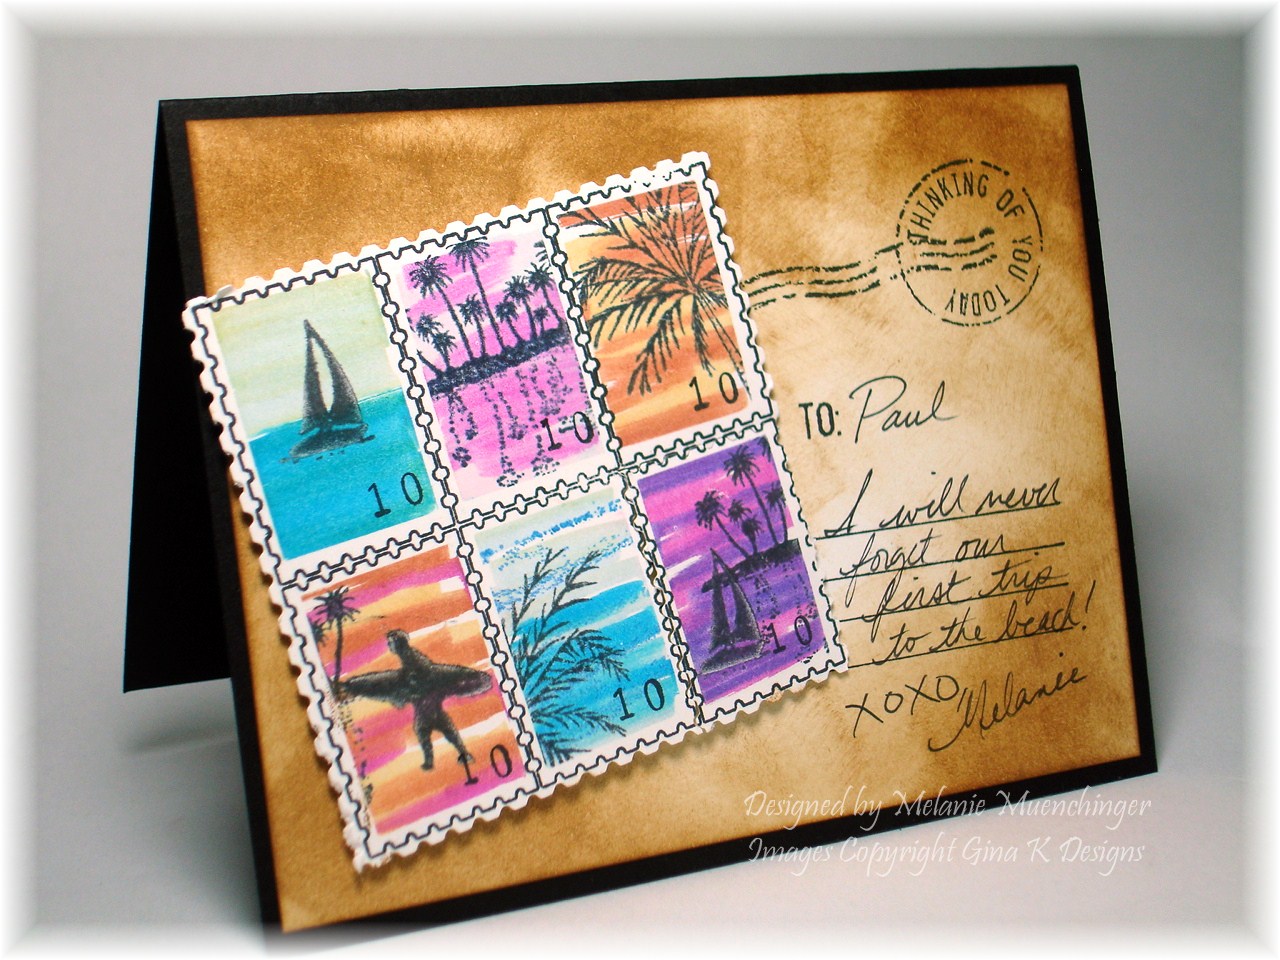
I also decided to use Tami's "Special Delivery" and "Special Delivery Additions" tonight to make a card for my husband, our anniversary is coming up and I wanted to create something reminding him of a special trip we took to the beach. The big postage block in the "Additions" set is fun to add different images to, I chose to use the small images from Theresa's new "Aloha" set. Instead of having to mask these scenes in, I colored the bold shadow stamp rectangle (which is used to fill in these boxes) that comes in Tami's set, making quick stripes with Memento Markers to make the different sunsets and kissed the little tropical images onto the rubber in black before stamping. Aren't these cute? Be sure to clean the stamp each time before inking you and adding your next little vignette!
I sponged the white layer with the postmark (from "Special Delivery") and journalling lines with Ranger Vintage Photo Distress ink, love the nostalgia and aging this pad adds! This would make a great layout for a larger scrapbook vacation page if you added a couple photos to it! Card base is Black Onyx.

For even more samples of some of our favorite 'Blast from the Past' GinaK Designs stamp sets, check out these participating designer's blogs:


And how about a coupon??? Is Gina the most generous stamping supplier ever?? Better go fill up those carts, stuff is going to be flying off the shelves tonight! :) Be sure to go check out our Blast from the Past Challenges and Questions in the StampTV forum this weekend! :)

Wednesday, August 4, 2010

Blast from the Past Day 4

Hello! Welcome to Day 4 of our Blast from the Past Hop! Tonight we are featuring some favorite sets from Carolyn King and Asela Hopkins.


My first sample tonight uses one of Carolyn's earlier sets, "Framed Flowers". It is such a versatile set and so fun to use the little window to frame up the many sweet bold flowers in the set, grass and greetings. These images are perfect for the direct to stamp technique using your waterbased markers.
After going through my DP trove, while many would have been a lovely match, you can never go wrong making your own background to match using your stamps , especially with bold stamps, it goes quickly and couldn't be more perfectly coordinated! Aren't those little flowers so precious? In apricot on Ivory they have such a retro, vintage feel. TIP: If you want more contrast after coloring your rubber and stamping, you can go back and trace over certain parts with your fine tip markers. I first intended to make a card just using earthy colors, but then I reached for this Sweet Corn striped ribbon which had these lovely blues as well and realized using a Little Boy Blue card base would be so much more interesting! So thank you, ribbon! I masked the frame and sponged in a bit of blue ink to bring just a hint of that color into my focal point, then added some punched Grass Green flourishes, some punched curved corners, and a paper flower I colored to match. Finally a few Pure Luxury buttons and I'm done! :) Love this card, love this set!


Next I have this card using Asela's "The Journey". The quote about "faith unlocking the door" inspired me to try cutting the door open on three sides with a craft knife and fold back the last side so it could stand slightly ajar, allowing just a sliver of the golden yellow Wild Dandelion mat to show from behind...
Before coloring I also snipped some diagonals from scratch paper and placed them over the the left side of the door which I covered with sticky notes. I sponged on some yellow ink and then removed and colored my image. Now I have some rays peeking out, suggesting a glimpse of the glory and wonder that is revealed and doors that are opened when we put our faith in Him. What a comfort that promise it!
For even more samples of some of our favorite 'Blast from the Past' GinaK Designs stamp sets, check out these participating designer's blogs:

One more day to go!! Aren't you curious what will be at the end?!! Thanks for visiting today! :)

Tuesday, August 3, 2010

Blast from the Past Day 3

Day 3, we're midway through our "Blast from the Past" week! today we are showcasing StampTV kits Gina has designed, I chose "Eclectic Summer" because I love this hot air balloon! They are so popular and this is the only hot air balloon stamp I have (and only one I need, hee!) A tent topper card (a square card with the top cloud mounted to fit inside an A2 envelope) was the perfect design for this uplifting concept! (greeting is from the "Eclectic Summer" greeting set)
I stamped the balloon in Vivid Inky Blue and pieced it with October Afternoon "Report Card" DP. Then I die cut the three clouds with the Large Big Scalloped Oval Nestabilities dies and sponged them with a little ink on the bottoms before removing the dies. Don't these make great clouds?? I got these dies recently and haven't used them near enough, now I'm just gonna call them my "cloud dies"! When you do all different sizes for one project, you can die cut them all in one pass, which is great! The Cosmo Cricket "Boyfriend" DP with the paper airplanes as sky makes it more whimsical, but this card is bling-free again, because it's for my other son heading back to school! cardstock layer and base is Pure Luxury Red Hot and Creme de Menthe.
TIP: Be sure to use pop dots here for dimension, it really creates the illusion of the clouds drifting by and the balloon hovering...

For even more samples of some of our favorite 'Blast from the Past' Gina K Designs stamp sets, check out these participating designer's blogs:
Thank you for visiting me today!!

Monday, August 2, 2010

Blast from the Past Day 2

Welcome back to our Gina K Designs Blast from the Past Hop, we're on day 2! First illustrator we are featuring today is Theresa Momber, so I made a mad dash for "Autumn Beauty"!
Sometimes a single image is all you need for inspiration, and all your card needs if it's the right one, I even left it greetingless! I framed the sunflower with two pendant dies cuts in Wild Dandelion layered on top of each other to echo her beautiful flower I'd colored with Copics. The Grass Green layer is stencilled with the Impressabilities Flourish, sponging olive ink over it before removing. Layered finally on Pure Luxury Chocolate Brown and White, and embellished with some gingham, punched wave flourishes, button and adhesive nail heads, I'm in autumn heaven!! I think I may have to send this card (measures 5 1/2"x 7") to a really beautiful illustrator I know...! ;)

Our next featured illustrator is Rupa Shevde. Last year she released the adorable "Back to School" which I knew would be perfect for making a card for my son William, who starts (gulp!) kindergarten in a few weeks! Here he is graduating from preschool, just a couple months ago...(sniff!)He is excited but some days has seemed a little apprehensive. Letting him pick out a new backpack, however, seemed to make any worry go away, so I thought I'd try to recreate the one he chose for his card!After stamping the backpack image onto Pure Luxury White, I wanted to paper piece the pockets to match, so I stamped it again onto the cover of a Star Wars LEGO kit directions pamphlet he had, carefully placing the inked portions I wanted to be on the pockets over the LEGO logo and storm trooper faces. I glued the pieces on after cutting them out and finished coloring the image with Copics. This super cute DP from the October Afternoon "Report Card" pack is so similar to all the worksheets he's been doing in Preschool, I knew he'd associate it with school immediately, more than a boyish print! I stamped the little shooting star in red at the top and layered it onto Pure Luxury Red Hot and Black Onyx.
I used R46 Strong Red and R59 Cardinal to color the straps and trim, and C5, C7 and 100 Black for the pack. Instead of adding bling, I just circled the correct answers on the paper with a pencil to make it a little more personal. He loves this card! (Yes, he's already seen it, came in when I was working on it and stole it as soon as I was done taking the photo LOL! I'll have to steal it back so I can write something before the first day, he is very proud of how well he can read many words by sight or sounding them out)


For even more samples of some of our favorite 'Blast from the Past' Gina K Designs stamp sets, check out these participating designer's blogs:

The entire GinaK Designs team would like to invite you to the virtual Release party we'll be having this Thursday, August 5th on StampTV. It will be a bit different than our usual release party, but we'll still have challenges, contest questions, and designer samples that you won't want to miss out on! More information on that event will be shared by GinaK soon, so stay tuned to her blog for all the details this week.

Thanks for dropping in!! Found any new sets you want set? And who will we feature tomorrow??? See you soon!

Sunday, August 1, 2010

Blast from the Past Day 1

This week the Gina K Designs team is pulling out some of our favorite sets of the past from every illustrator, which promises to be a week long celebration of "greatest hits"! First up, I chose to use my "A Year of Leaves" set. Although I use these leaves and sentiments year round on masculine and sympathy cards, this set really works overtime when Fall comes, there's nothing I like to stamp and embellish my cards with in late Summer and Autumn than beautifully colored leaves!
Here I just used one leaf image from the set and the simple greeting "Thanks", in one of my favorite fonts of all time! These small greetings are perfect for making tags, and I love how this one turned out, using a Labels Eight die on Pure Luxury Ivory, then punching a border punch on all four sides and stamping the word in the middle! I scored the background in a diamond pattern for more interest and texture and added some stitched ribbon and brads. Base is Wild Dandelion. Popped up, these leaves look like they are gently drifting to the ground...

I also like using them with favorite floral sets, here the same leaves and another greeting take the set "A Beautiful Life" from Spring to Fall...
Drawn in the same style and scale as "A Year for Flowers", these sets are just perfect for mixing and matching!

And just to revisit a few of my faves I've made with the set (which are now coming back around, so to speak!), here is a card and matching acorn and leaf earrings I created that are currently featured in the "Stamping Savvy" section of the newest issue of CardMaker Magazine (p.28-29) These are definitely some of my favorite images for Polyshrink!
"A Year of Leaves" was also featured in the recently released book "Interactive Cards". This is probably one of my favorite projects ever! The little caterpillar image from the set morphs into a pop up butterfly (this butterfly is from "Take Flight", a favorite Gina K set from the past!).

I've also had several designing friends offer to share new samples they've created with some of their past favorite sets of mine, thank you SO much ladies for sharing your talent again with us today!

Brenda Turner

Carla Suto

Carolina Buchting

Geri Utterback

Karen Knegten

Libby Hickson

Linda Payne

Melissa Shultz

Selma Stevenson

Sharri Seffens

Sue Van DeVusse

Tina Gilliland

Next, we have one of my favorites from Nina from last year: "Lord of the Season". I stamped this fall topiary in Vivid Coffee Bean and colored it with with earthy Copic colors inspired by this beautiful Basic Grey Indian Summer print. Those little spots are color are perfect with the tiny details of the fruits, flowers and leaves in the wreath. TIP: when coloring a wreath, select several colors but just use one at a time, putting that color in several different places to balance it out and draw your eye around, so you won't have lots of clumping in just one area, before moving to the next.
Cardstock is Pure Luxury Pumpkin Spice, Chocolate Brown and White, which is sponged around the edges with Wild Honey Distressing Ink. I used a Nestabilities border die and some Pure Luxury ribbon for the bottom. I would have liked to match it to the pink I colored the ribbon in the image but didn't have anything like I thought! good thing there were lots of other colors to choose from LOL! I just love breaking out all these fall colors! It's been a long, hot summer!


And finally more 'Blast from the Past' Gina K Designs stamp sets, check out these participating designer's blogs:


The entire GinaK Designs team would like to invite you to the virtual Release party we'll be having this Thursday, August 5th on StampTV. It will be a bit different than our usual release party, but we'll still have challenges, contest questions, and designer samples that you won't want to miss out on! More information on that event will be shared by GinaK soon, so stay tuned to her blog for all the details this week!

Baby Carriage

Here is a little baby carriage I made for a recent "Button and Bows" pub call. I posted a card similar to this before using my "Hip to Be Square" baby face and Tami's "Special Delivery" for the punched wheels, but this time changed up the layout, colors, and papers . Cardstock: Pure Luxury Ocean Mist, Turquoise Sea, Creme de Menthe. DP is DCWV Citrus.

Happy Sunday! I posted the winner to the challenge on StampTV, thank you again everyone who played! :)

Blog hop tonight!!!! See you at 10PM CST!