Friday, February 17, 2012

Card Candy and Candy Winner

Good morning! Thanks everyone for entering the Spellbinders blog candy and letting me know what is most helpful and enjoyable for you to read here, I will certainly use your feedback as I move forward! The winner of the dies, randomly drawn is

Joan V said...

Your posts are educational and inspiring for me. Everyday I try to read and learn something new, in this craft area. Love your designs that you have done for Gina K. I would love to know how you draw and submit your designs to get made into rubber stamps.

I have been a follower for a good while. Thanks for the chance.

Congrats, Joan! Please email ASAP wih your addy, thanks! To the rest of you, you know there'll be more candy soon, stay tuned!

Now for a simple CAS cards with punches. This is a card I made in a flashfor my son's 4th grade teacher Mr. Reese's birthday. While I don't know if these are his absolute favorite candy to eat were it not for the name, he definitely likes to associate himself with the brand and refers to his students as "Reese's Pieces" (their field trip tie dye shirts are of course brown , yellow and orange!) it's pretty cute!I used a Pure Luxury white base and popped up several circles I punched with a 1/4 inch punch, form Pure Luxury Chocolate Brown, Sweet Mango, and Wild Dandelion. Don'tcha just love circles? I have both circle dies and punches in almost every size, they certainly go with everything! This would be a fun way to make an M&M card for your sweetie, kids birthday, etc, in different colors. Now, so it's not just blobs of color (and you want a touch of the unexpected and wink of the candy), I notched out the bottom circle with a scalloped circle punch to create the nibble and rounded the card base with a small corner rounder punch. Greeting is from my Fun Year Round set and stamped in Memento Rich Cocoa.

Enjoy! Hope your day is SWEET!

Thursday, February 16, 2012

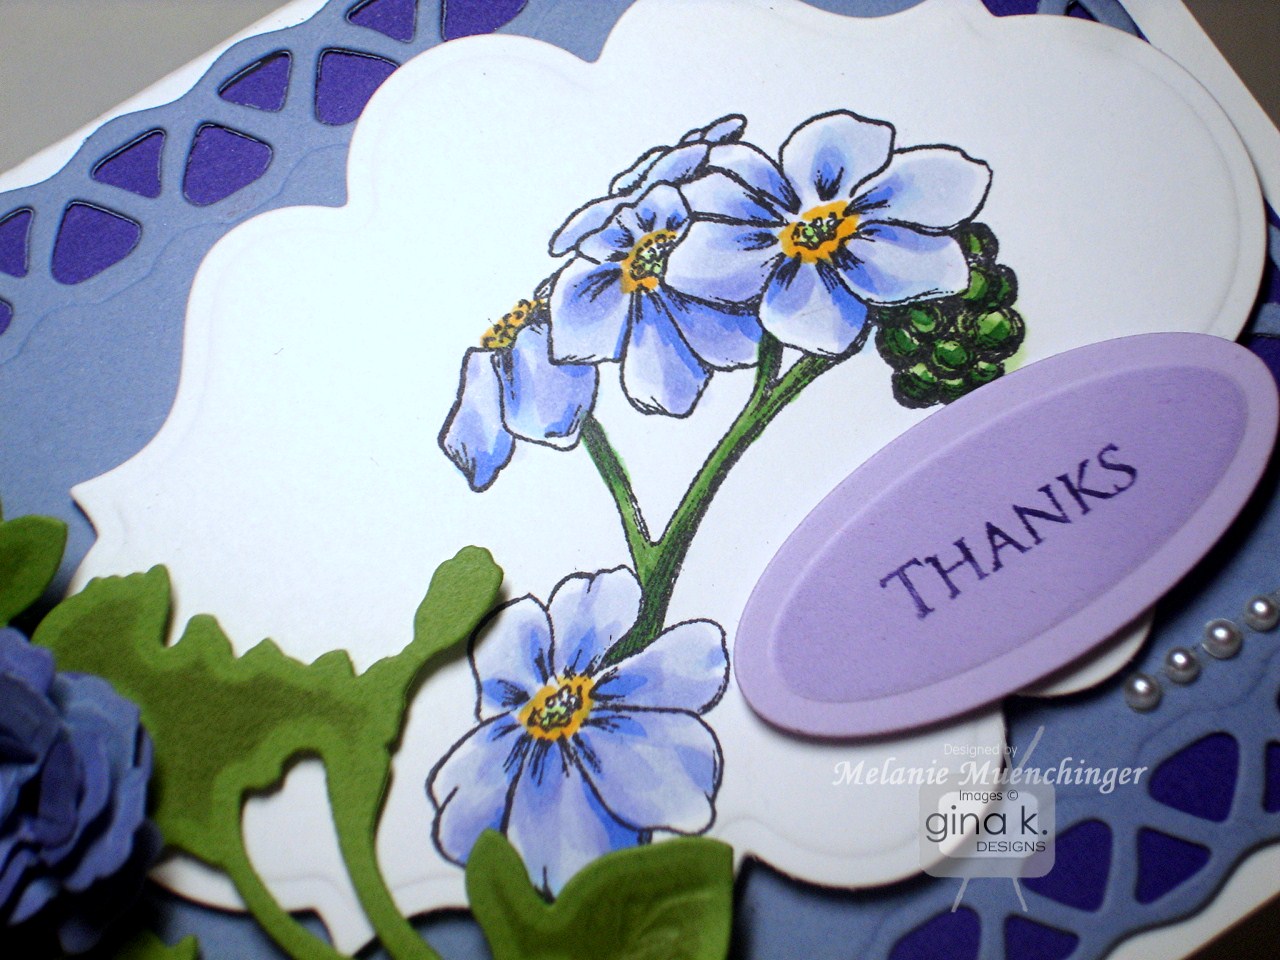
Forget-me-not (You didn't!)

Good morning! I am finally getting around to sharing a card I made with some Forget-me-nots I'd colored from my new Stately Flowers 3 set a few weeks ago. I really wanted to wait until I got some new Spellbinders dies on my list to create a real impact on the design, and I am SO glad I waited! :) These are the first time for me to use the Lattice Rectangles (oh, how I love this set!!) Labels 20, Shadow Flowers (these stems will be the perfect "flourishes" with ALL my flower images! Like tucking little pressed flowers under my mats, isn't that delicate die cutting so lovely?) and the new Bitty Blossoms. You've seen me use these Petite Ovals a bazillion times, my "go to" for small sentiments! the latticed and rolled blossom are cut from Pure Luxury Little Boy Blue and layered over Vibrant Violet, stem is from Grass Green and tag is Lovely Lavender.
The Copics I used to color the flowers are B63, BV02, B66 (lightest to darkest on flowers, see how I just trace the lines in the image in the middles of the petals with the darker color to create the folds and trace the undersides to cast shadows fro the petals above?) Y17 for middles, and YG11 and G07 on the stems and seeds. There is so much shading on the stem in the image already you really don't even need to different shades, saves a lot of time! Looking at the closeup, I realize now I forgot to create a shadow around the flowers (oops! Oh well!) I also skipped sponging into my label die, keeping this card clean and bright. Finishing touches are just some tiny adhesive pearls to the corner and center of rolled flower.

Hope this inspires! Thank you for visiting today! Be sure you have entered my Spellbinders blog candy from Tuesday's post (scroll down), I will announce a winner tomorrow!

Wednesday, February 15, 2012

The Next Great Baker

Good morning! Don't forget to enter my blog candy in the post below if you have not already! Thanks for all the good feedback I'm getting in the comments to help me plan posts!Had to share some photos of my William decorating his first "fondant" cake for his 7th birthday this past weekend at Foodie Kids. He shared his "vision" for his cake with me a few weeks ago, with a both a sketch and description ("I want 3 stacked tiers, 8, 10 and 12 inch, fondant covered, piping, jungle cake with a 3d snake made of modelling chocolate", can you tell who's been watching "Cake Boss"?) Well... THAT was all waaaay beyond my capabilities (or supplies! or budget!!)

Fortunately, Foodie Kids, which I have told you about before on my blog (used to be called Kids Cook) offers a really nice option that he agreed was the perfect compromise: an 8 inch tier in your choice of flavor (already baked by them and fondant covered), and then the ability to use all their supplies and three colors of fondant for cutting, modeling and three different types of candies to add. Although they didn't really have many cutters specifically designed for his jungle theme, we were able to easily improvise with a lot of what they did have (part of a peace sign cutter to make a tree trunk (when flipped upside down, etc. The letter cutters were a big hit!)

He chose Skittles and Nerd ropes for the bottom, (which the woman at the store thought was just the prettiest, cleverest way to ring the cake, especially for a jungle!) We were there for a little over an hour, allowing him to add all his details, draw on the cake with edible ink markers, plus decorate the cardboard cake box, for 21.99, I thought that was a great deal! Yes, I could have made a boxed cake from the grocery store for about 5 bucks, but when you take into account the price of all the candy, fondant (this is super expensive), decorating glitter, which is so gorgeous and sparkly in real life!) etc I thought the cake and experience was a steal! His focus in this next photo is what Buddy would call, "being in the zone"!He loved having it on the spinning turntable, too "just like Buddy's" (although he did almost spin it off at few times, getting a little overexcited, that was nerve wracking!) Although at first it looked a little small compared to the layer cakes we normally have, it was just the perfect size for our family birthday at home (big party was last weekend) plus having a couple slices left over for after school snack the next day. (Kind of nice actually not to have tons of cake hanging around the next couple of days, you know?) :)

We would definitely go back and do that again for a special occasion! (I hear they are franchising so you might have one in your area soon!) Highly recommended!

So much to catch you up on! (Will have to see if I can upload video from our video camera of me doing back handsprings at his Jumpoline party!!) Thanks for visiting today! :)

Tuesday, February 14, 2012

Blog Candy!

This blog candy is now closed. Please check this post for the winner, thanks!

Okay, I am so excited from all your comments to learn that the many different ways you've all used to follow and read my blog in the past seem to be fully functional now
(and catching up all at once! hee hee) Hearing from so many of you on a day we don't have a hop feels like the phone ringing off the hook after sitting in a dark quiet room with the utilities turned off for weeks LOL! Love it, thanks for the support and welcoming me back! I felt so hopeful that something good would come out of the blog getting turned off, and now that it's get back on all the problems I was having seemed to have been solved! God is good!

So now, here is some blog candy to celebrate: brand spankin' new Star Circles dies from Spellbinders! Simply leave a comment below telling me what you would like to see (see more of) on my blog in the coming year! Get an extra chance of you are already a follower/subscriber, or if not get an extra chance if you sign up today! Don't forget to spread the word about the candy!

I will draw a winner on Friday! Good luck, and thanks for playing! I'll be back shortly with a quick card and really fun post about William's birthday!

(Have a good idea for a tip/tutorial but I really need to look back through my archives because I totally can't remember if I have shared it with you yet or not!