 Today we are sharing samples with Basket Additions 3. My design today also uses Holiday Basket, newly released in clear photopolymer.
  I used the matching Silhouette cut files for both Basket Additions 3 and Holiday Basket to make this cut window. I will show more about how to position the cutout on the card base in the following sample and stamp the image inside, but first I want to show you how you can fuse together the tops and bottoms from these sets into one cut!
 Open both files in Silhouette Studio. Under Edit, hit Copy after selecting each image you want by clicking with your mouse (school topper and basket). Open a New file, and Paste both images in. Move them on the screen with your mouse so they are touching each other.
 Now click on the eraser tool that's on the left hand side of the screen.
 Now position your mouse over the line in the middle you want to get rid of, and this big gray dot will appear.
 Holding down the left click button on your mouse, begin dragging across and watch the line magically disappear!
 Once you've removed the entire line and have one outline for the whole thing, go just above the image top left, hold down the left click button on your mouse and drag to right right lower corner to create a box around it. Go to the toolbar at top, click Object, and then in the drop down menu, select Group. Now these images are attached and you can drag it wherever you want on the screen. (You can also do this before you erase if you want.)
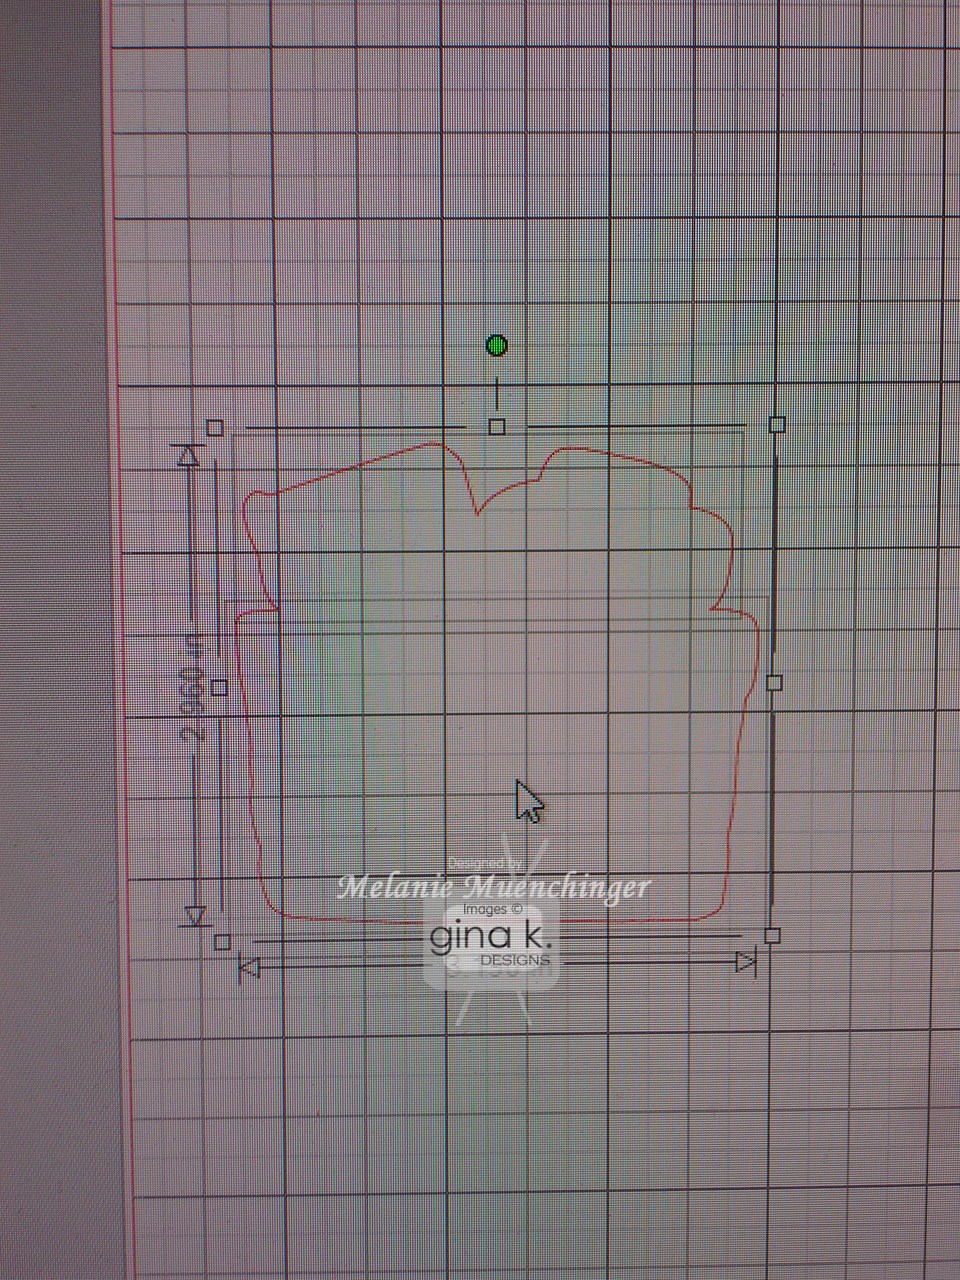 Save this file if you want (ex: "schoolbasket") so that now any time you'd like to stamp these images together, whether as the cut out to stamp on or the window for the images to show through, they'll be cut as one piece! Just be sure not to change the originals, make copies first! :)
 If you don't have the Silhouette Cameo, simply stamp the images on white cardstock, color and cut out, then mount on top of the red base popped up. I added some school supply touches like a rubber band and a binder clip, just dug them out of our junk drawer, love the ease, affordability and style of office embellishments! Cardstock is the new Pure Luxury Cherry Red.
 I also wanted to show a fun hinged card I made using the Create a Cauldron print and cut file with the Halloween image from Basket Additions 3. (If you don't have the Silhouette Cameo, simply use the digital image version and cut with scissors.)
Boo! Surprise! Cauldron and mat are Pure Luxury Smoky Slate and goo is Pure Luxury Key Lime. Patterned paper is from the Gina K Hello Sunshine pack.
 The top layer is attached with a brad and hidden by the bubbles. Now that I've finished this hinged card, I'm inspired to show you another hinged design using Holiday Basket, check back for that soon! :)
Next up, we have Theresa Momber's Country Roads, one of my favorite sets she's ever done! She really captured the pastoral feel of the country with the images and I love the fonts, particularly the graceful calligraphy. On today's sample, I used the covered bridge image and the matching Silhouette cut file to create a window to frame it. Using not just the cut outs themselves but the negative space as well, strategically placed on your mats and card bases, is so striking (and uses ALL your paper, no waste!)
 Let me show you how! After opening the cut file, click on the bridge image and select "Copy" under Edit on the toolbar. Open a New file, then hit Paste. This will add the bridge to the new file. Considering this top fold card will be 4 1/2" X 11", position the images within 4 1/2" from the left side of the square on the mat, and the bottom half of the card, which will be the front, spanning from about 6 1/2" to 9". The grid helps you position is where you want.
 Now place your cardstock (4 1/4" x 11") portrait style on your mat aligned with top left corner, hit "Send to Silhouette" and "Cut". Pull your cardstock off. Save the cut bridge for another project. Save this new file you made if you want to use it again, as "Bridge Card", or something like that.
 After the Silhouette cuts it out, score at 5 1/2" as usual for an A2 card and fold. Now cut the white layer to go inside, 4" x 10 3/4" and score at 5 1/4". Adhere to inside (just the back, front is free to move)
Hold the layers down and stamp the bridge (inked in Memento Espresso Truffle) inside the cut out.
 Fold back front and color with Copics. (I used most of the same colors as Theresa used in this post. I also added little darker blue stripe under the bridge to cast a shadow on the water.)
Last, add the greeting in Memento Tuxedo Black and add some trees around the window with Versamark. Create pierced rows for detail with Scor-Bug tool. Cardbase is the new Pure Luxury Honey Mustard.

- Gina K
- Melanie Muenchinger - Illustrator Basket Additions 3 (thanks for visiting!)
- Theresa Momber - Illustrator Country Roads
- AJ Otto
- Beth Silaika
- Cathy Tidwell
- Deb Felts
- Giovana Smith
- Jimmi Mayo
- Lee Murphy
- Lori McAree
- Sharon Harnist
- Tami Mayberry
- Tina Gilliland
- Vicki Dutcher
Wow! This post is packed full of great techniques! Gorgeous cards - LOVE you new set!
ReplyDeleteYou are brilliant Mel, love love love all your cards!!!
ReplyDeleteThat hinged card is so fun
ReplyDeleteThanks for the idea
These cards are truly inspiring. They're gorgeous. Thanks so much.
ReplyDeleteLove the new sets! the Halloween card is so cute! Thanks for sharing.
ReplyDeleteabsolutely love the hinge idea - I really enjoy creations that "move"!
ReplyDeleteI am amazed at your talent - Thankyou for the inspiration
ReplyDeletelove the covered bridge image!
ReplyDeleteFABULOUS designs, Mel!! Great help with the cuts too! This might be my FAV basket set yet! *HUGS*
ReplyDeleteI love how you did the hinged card and the covered bridge. Great cards!
ReplyDeleteSuper cards they are all great but my favorite is the Halloween card thanks for sharing these
ReplyDeleteLots of great information in your post and wonderful cards!
ReplyDeleteSuper article, Melanie -- makes me want a Silhouette! Love the bright back to school card and the fabulous hinged card for Halloween. And the Country Roads scene is so serene - terrific "h" on that font!
ReplyDeleteWonderful cards, I love the covered bridge peeking out of the cutout!
ReplyDeleteWhat great tutorials! I just love the basket additions, the cauldron is just too fun and love the beautiful autumn card. So much fantastic inspiration!
ReplyDeleteWhat great tutorials! I just love the basket additions, the cauldron is just too fun and love the beautiful autumn card. So much fantastic inspiration!
ReplyDeleteI love the detail in the basket. You don't find many that will give you that depth appearance.
ReplyDeleteI am in awe of all of your gorgeous cards. I can tell already which sets I would love to have,. Alice Roushia
ReplyDeleteAll your cards are wonderful. Love your basket stamps.
ReplyDeleteWow such stunning cards and the tutorials are wonderful, you guys are really giving me the confidence to use my silhouette more and more, thank you so very much :-)
ReplyDeleteAmazing, thank you for the great info on the Cameo
ReplyDeleteI like all of your samples. I am very new at this but am learning more and more each day. Thank you
ReplyDeleteBlessings,
Kat
What fun cards. There goes my budget--I have to have Basket Additions 3.
ReplyDeleteGreat cards - I can see I may have to make a purchase - I love that covered bridge :)
ReplyDeletethanks
holy crap! LOL!!! Your cards are stunning!!! I love how you cut on the card around the image with your silhouette! I might have to get that machine now LOL!! Gorgeous cards!
ReplyDeletelove the techniques. Thanks so much for sharing
ReplyDeleteThe Halloween card is so cute with the top opening! And the covered bridge is so pretty - love the colors.
ReplyDeleteThanks so much for the instructions. This sure helps us know how to use the stamps, the machine, and even how to make the cards without the machine. Love the cards! Great ideas for the hinged card. Thanks again.
ReplyDeleteWow, Melanie! The cards are excellent!
ReplyDeleteWow this new machine does awesome things and you make awesome cards Melanie!
ReplyDeleteYour basket stamps have always been one of my favorite collections, and the cut-outs you did for today are wonderful.
ReplyDeleteLove, love , love!!! Can't keep up with all the new machines though, so need to keep the cutting tools handy!! Love that hinged card!
ReplyDeleteMelanie, you are one talented lady. Love the hinged card!
ReplyDeleteSuper Awesome project love the Tutorial and love the Steps on making it. the Details are Super. thanks for sharing and for the chance to win
ReplyDeleteGreat cards, you rock..
ReplyDeleteWOw love this post. Some really awesome cards and I think im gonna get in trouble, I need that covered bridge stamp!! TFS :)
ReplyDeletewow!! Must find more time for my cameo! LOVE your cards Mel, and your tips! :)
ReplyDeleteBeautiful cards, as always. Enjoy seeing the milage one can get filling baskets!
ReplyDeleteGreat ideas for the Silhouette. Sure makes me want one!
ReplyDeleteYou filled this post with a ton of great info! I absolutely love the caldron opening up like that!
ReplyDeleteoh my, these are awesome cards, the country roads is my favorite, love that technique too
ReplyDeleteBrilliant, as always, Melanie! And so easy to understand for those of us with NO computer knowledge to speak of. Thanks!
ReplyDeleteI'm still praying for all of your projects, cards and otherwise. Hug your kids for me, even though that have no idea who I am! They'll be grown and gone in the twinkling of an eye. Love you!
I just love all the sets. The country roads is a gotta have set. Also the basket is great and will go on my Christmas wish list. Great job on all the cards.
ReplyDeleteYour cards are beautiful and I'll have to figures out another way to cut, maybe fuzzy cut. Great ideas. Well done.
ReplyDeleteOh, good grief -- how clever you are! I'm totally going to do these cutouts -- thanks so much for the tutorial, Mel! Fabulous cards!
ReplyDeleteGreat cards. I love the cauldron of goblins
ReplyDeleteOhhhhhh fabulous fabulous fabulous!!!!! You are a genius I swear!!! And step by step directions too! I am sooo gonna try these!!!! And the next VSN is Back to School theme....I'm gonna use that image!!!
ReplyDeleteLove the hinged card and can't wait to try it. Great designs!
ReplyDeleteGreat work Melanie! These new sets are awesome! I love the tutorials that accompany your samples. Thanks!!! Sean
ReplyDeleteThe cards are so wonderful. I have to place an order soon I can see as you did such a fantastic job of creating them. You inspired me. But mine will be handcut and not done with the machine. Can't afford that and a new computer too to make it function correctly.
ReplyDeleteLove fall scenes--great cards.
ReplyDeleteThank you so much for the detailed step-by-step. I got a Cameo JUST days ago and am hungry for any and all information I can get on ways to work with it, ESPECIALLY how to work with cut files and stamps together!
ReplyDeleteAwesome cards! Great motivators - love the bridge in the window look.
ReplyDeleteMelanie, your cards are just gorgeous. I just love that caldron, so cute for Halloween. Thanks for sharing, you have inspired me.
ReplyDeleteWow, wow, wow! I don't know where to start! I love the cutout of the shape with it stamped underneath...amazing. And the hinged card? Ingenious!!
ReplyDeleteBeautiful cards Mel!! I really need to get a Cameo :)
ReplyDeleteWonderful cards. I really like the hinged cards. Although I don't anticipate getting a cameo or similar machine, I enjoyed your cards and the great detailed instructions.
ReplyDeleteWow! What amazing cards. It's clear that with the silhouette you can add so many more techniques to our cardmaking. Gorgeous cards.
ReplyDeleteFabulous directions on using the silhouette cut the image. Beautiful cards!
ReplyDeleteAwesom! Can't wait to use them! Thanks for Sharing!
ReplyDeleteVicki
You will never know how much I appreciate the Cameo Instructions. I have been intimidated with mine and you make it look so easy,that NOW I am going for it. Thanks so much!!!
ReplyDeleteBeautiful cards!
ReplyDeleteOh I have so much to learn. You are such an inspiration. Really like these cards.
ReplyDeleteWow! Absolutely gorgeous work and the cut files just make everything pop!! So amazed:)
ReplyDeleteThat covered bridge stamp set is a dream!
ReplyDeleteI love these sets, especially the flowers and basket and the covered bridge.
ReplyDeleteOh, wow, not just great cards,but great instructions! Love these new looks.
ReplyDeleteWOW ! ! WOW ! ! WOW ! ! !
ReplyDeleteJam-packed ---YOU have been busy.
As usual your cards are great and your tutorials are..... W O W ! !
Jean McGee
wow great post and lots of info. thanks for sharing.
ReplyDeleteRosieG(gramig05)
the window is such a good idea!
ReplyDeletethanks!
Holly
Way to use your Cameo! I am SO BUMMED I didn't get that one!! Gorgeous work!
ReplyDeleteLove your Halloween card!
ReplyDeleteGreat ideas, love the way, you open the the covered bridge card.
ReplyDeleteGREAT cards! You are getting so clever with your Cameo. I've got one in the house, a replacement blade, inspiration.....now I just need some time! :)
ReplyDeleteBeautiful Cards! And wow I the use of the cut out with your Silhouette. TFS AJ~
ReplyDeleteWow! Inspiration and education all in one. Thanks for the great info and sharing your lovely work.
ReplyDeleteIncredible post - beautiful projects with great instruction. Thanks!
ReplyDeleteThese are great! I may have to start thinking about getting the silouette.
ReplyDeleteMelanie----what a stunning art and Cameo lesson!!! Thanks so much!!!
ReplyDeleteWow Wow Wow talk about packed with inspiration! Totally love the hinged card1
ReplyDeleteWonderful cards. Always so nice of you to share your techniques. Love both cards and must get the basket toppers.
ReplyDeleteYour cards are super cool.
ReplyDeleteLove the COuntry Roads stamp - what great cards - gets my card juices going !:)
ReplyDeleteFabulous cards! Awesome new set - lots of fun and cute images!
ReplyDeleteSuper cards-wow, fantastic. Thanks for sharing, particularly the tutorials; will have to try the cut-out card front--love it! Great stamps.
ReplyDeleteJust, WOW! I love that 2nd one especially! That cut out...genius! When I get my machine, will you come be my personal Silhouette trainer!?
ReplyDeleteAwesome cards! Thanks for the tutorial, now all I need is a Silhouette :). That's on top of my wish list.
ReplyDeleteWow, all of these cards, techniques
ReplyDeleteand stamp sets are awesome. Thanks for sharing.
Wow! I am so impressed with your creations. Especially how you made the Country Road card. Well done, Melanie :)
ReplyDeleteWow! Beautiful cards. I love the hinge. Very creative!
ReplyDeleteOh, my! I love the bridge card! So lifelike!
ReplyDeleteThe hinged card is cute, too!
Really nice work. Thanks for the tutorial.
ReplyDeleteGreat cards and I love the tutorials! Keep them coming!
ReplyDeleteGreat cards!!
ReplyDeleteAngela
http://angelascraftyspot.blogspot.com/
Wow - wonderful cards. I just love that cauldron! Thanks for the tutorial on the Silouette, I might just have to add that to my Christmas wish list!
ReplyDeleteWow! What great projects. I really like all that can be done with the Silhouette. Unfortunately, that isn't going to be a possibility for quite a while. Beautiful work!
ReplyDeleteI really loved the cauldron hinged card. I appreciate directions you give along with your sample cards.
ReplyDeletethe hinge card is great and the bridge tunnel effect is amazing! You mae my night!
ReplyDeleteYour coloring on that Country Roads Set is absolutely stunning!
ReplyDelete