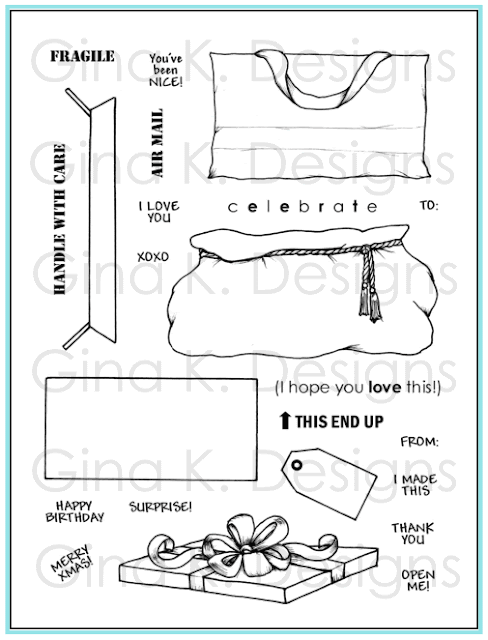
All topper images from my basket series can be used with these new containers in Beyond Baskets 2, now available at Gina K. Designs! Woo hoo! Now you have approximately 9 million more combinations ;) (Give or take) I have a Silhouette cut file for this set as well! The one file has BOTH mats and masks, meaning you will be able to cut all these images exactly and with a 1/8" border around, same file! :) Here's what you'll get:
No toppers? Use real tissue paper or patterned paper crumpled and coming out of the top of the bag or box like a beautiful stuffed gift. Be creative! There are so many stamps in your collection already that you will have a blast stamping and peeking out of these boxes and bags!
Bag with handle:
Paper piece this to make adorable gift bags for birthdays and showers (Basket Additions 2 or Basket Blessings), or even use to represent a beach tote, gym bag, or diaper bag!
Stamped on Kraft and it looks like you are brown bagging it, perfect for the craft supplies or fall veggies from Basket Additions!
Any of the flowers toppers coming out of this bag can look like a very modern, fresh arrangement!
Bag with rope tie:
Santa's bag-stuff with appropriate toys, seasonal decorations, paper piece or color with jewel tones like velvet
Color with earthy colors or paper piece with Kraft and it looks like a burlap bag the animals from Basket Buddies or the Halloween spooks from Basket Additions 3 can be popping out of.
Cuttlebug the paper to give a textured, fabric look.
Rectangular box:
Paper piece it to look like wrapped package and place the lid with the tied bow askew as if it's been removed. It works at so many different angles to make the box look very dimensional and give you more variety for your layouts. In this case, stamp the lid first, cover with mask, and stamp the rectangle over it.
Box with the ribbon can be used on its own like flat shirt box.
Use the long image with the flaps, stamped first, and add the rectangle below to create a box where the flaps are open. Draw a line with a marker underneath the front flap to cast a shadow. So cute with the toppers popping out! This box is great for a masculine, we moved or welcome to the neighborhood card!
This long image with the flaps can also be inverted, with flaps pointing down to look like a bed tray. Perfect for putting the spa products on from Basket Additions 2, or a small vase of flowers, perfect for a relaxing or get well!
Stamp just the rectangle on the card front, and then show it open on the inside of the card-surprised!
Stamp on Kraft or brown paper to look like a packing box to stamp the fragile or handle with care or airmail for a sweet care package.
Use Gina's idea to have a real gift card coming out of one of the gift bags or boxes. Perfect for gift giving this time of year!
All the tiny sentiments fit on the tag and cover a wide variety of occasions. Cut it out on pop it up over the handles, the tied cord, or tie on with baker's twine. Pierce the circle with a piercing tool or punch through with a 1/16" hole punch. thread twine through or add brad.
Use the "I made this" on the back of your cards above your signature (followed by the "xoxo" if you choose!
The "Celebrate" greeting works for any occasion. All of these long greetings look terrific stamped on a strep of ribbon or skinny die cut.
If you want to send a naughty card, use a red marker to cross out the "nice" in the stamped you 've been nice tag. The meaning is clear. Add black cut cardstock as coal to sack.
I will have more tips for this set for sure! See you next week for our Inspiration hop for all the new sets!! Thanks for stopping in to our party!


Of course it's all so FABULOUS! And don't forget about that bed table! lol Use it for a "get well card" and such! Lots of guests this weekend but this will be in my shopping cart come Monday. Enjoy this lovely day!
ReplyDeleteOh my goodness,,,,, How adorable!!!! Do the puppies come with the card? LOL!! What a super cute idea for a super special touch! This is one ( if you don't mind?) I would like to remember so I can use it on one of my cards.
ReplyDeleteThanks so much for the wonderful Tips sheet. I have it printed off and waiting on my stamp set. I've already gotten a ship notice on it! Such a fun stamp set!
ReplyDelete