Wednesday, September 30, 2009

Sneak Peek: Warm Winter Wishes and Holiday Hospitality

Today we have two sneak peeks for you, the first is Carolyn King's highly anticipated set, and her second to benefit the Alzheimer's Association: "Warm Winter Wishes".

This card uses Pure Luxury White for the adorable snowman image and the new Cranberry Tart for the base. Background DP is from the Cosmo Cricket Jolly by Golly pack, isn't that cute like a festive front yard?? I cut the Copic colored snowman out and made a sloping bank of snow using a rotary cutter to make a curvy cut and running a black marker along the edge to match the line art snowman. Then I made a popped up little "thought balloon" for his greeting (because only Frosty can talk, you know!) made from a Petite Scalloped Oval Nestabilitie, an oval and Cropodile punch! I loved the scene just the way it was, so decided not to add any more to it.But I had to make a little coffee sleeve with another sheet from the pack so I could use the little coffee cup from the set! TIP: if you save a cardboard sleeve from a coffee purchase, you can easily wrap it with your DP without needing to measure or make a template by putting Scor-Tape along each side and then pressing to the back of your DP and cutting around it. This DP has little cups and snowmen on it anyway, then I made a little medallion by masking the cup and stamping this fun "Love" word background (also from the set!) over it, then die cut with my Classic and Scalloped Circle Nestabilities. Be sure to attach the medallion with Scor-Tape as well, to keep it from popping off. Now you or your recipient will have a cute coffee wrap they can use all season! Deliver the hot drink with the card or fill the empty cup with candy!
The next card uses the Free with Three "Holiday Hospitality" set, one of the main images is this large ornament, but today I did something a little different with it. I have to give credit to my 4 yr old William for this idea, who was checking out the new un-inked rubber on my desk. "What's that?" he asked pointing. I held it up by the top to look like it was hanging and replied, "See?" thinking he would figure it out on his own looking at it that way. "Oh! a candle!" he said immediately. Well, I thought that was pretty cool, it does look like like one of those little ball oil lamps! (That's m'boy, out of the box, at age 4 LOL! it's a family thing... ;)* So I colored the hanging loop to look like a little flame and covered it with Stardust Stickles.
I colored the different sections and added these 2 mm adhesive rhinestones strips to the spaces in between, these will be fun to bling up with your different embellishments! Card base is the new Pure Luxury Vibrant Violet. The "Hip to Be Square" background border is colored with red to make the focal point look like it's triple matted, I love that! I popped up the "candle" and colored made a little shadow underneath. TIP: I used the lines of the square frame image for placing my focal point, with the vertical running through the middle of the flame and the horizontal going through the rhinestones, really pulls your focus to the bling and greeting.

Head over to GinaK's blog to add your comment to her blog entry for a chance to win the stamp sets being previewed tonight our blogs! Then, check in on Carolyn King's blog - the Illustrator of Warm Winter Wishes.
Here are the rest of the links to the Design Team Members participating in the hop tonight:


CenterStage Spotlight Designers:

Joy Hadden
Lori McAree


We'd love to have you join us at our Release party Thursday over on SCS starting at 7pm CST. There will be lots of chatter, samples, contest questions, and challenges - you won't want to miss it! Check out Theresa's discussion if you're new to our Release parties for some helpful information to get you started.


* and after he said candle, he thought of one other clever thing you can make with the image, not an ornament, can you guess? :)

Tuesday, September 29, 2009

Sneak Peek: StampTV Kit Holiday Cheer

Today I just used one image from the new Gina K StampTV Holiday Cheer kit and some of the beautiful ribbon and card stocks included. Instead of holly, I decided to make this hanging sprig mistletoe* so I could accent it with the new 3mm white pearls (an exact fit for the berries in the illustration!), perfect to hang on the tree or over a doorway! :) I colored it with Copics, adhered the pearls, and outlined the ribbon with Versamarker and embossed to give it this festive gold edge. I cut it out and popped it up on the Pure Luxury White pendant diecut, and then adhered that to my Rocket Red Scalloped Square, aren't those Nestabilities die cuts gorgeous layered?! I mean WOW!

Here is the closeup. I added a few more pearls to accent the base and punched a hole through the top with my Cropodile for the ribbon. This project took very little time and money to make, but I think I will be creating a lot of these ornaments for friends, as well as to decorate our own tree. Using the assortment of Christmas images in the new kit, you could do an entire collection of them using the different designs. (I better get on that!) ;)

Head over to GinaK's blog to add your comment to her blog entry for a chance to win the new StampTV kit being previewed tonight our blogs! Then, check into StampTV for a new video technique showing shimmering background paper with an image from the new StampTV kit!
Here are the links to the Design Team Members participating in the hop tonight:

Carolyn King
Cathy Tidwell
Cindy Lawrence
Donna Baker
Emily Giovanni
Erika Martin
Jessica Fick
Kurtis Amundson
Lee Murphy
Lynn Mercurio
Melanie Muenchinger
Tami Mayberry
Theresa Momber


The party is almost here, thanks so much for stopping in!
*I know mistletoe doesn't have leaves this, but I HAD to use those pearls!! :)

Monday, September 28, 2009

Sneak Peek: "Hip to Be Square" and "Lord of the Season"

Eeek, I get to show you my newest set today!! This month includes a new frame I've designed with your square cards in mind (or a smaller focal point on a A2 size), called "Hip to Be Square"! This new grid has a symmetrical layout (one of my favorite layouts for square cards actually) that is perfect for framing up images, greetings, buttons, flowers.... anything you like! It has some similarities to the popular "Inspiration Mosaic", and will be a must-have add-on to that set, or a terrific stand alone. I'm also happy to report, a smaller grid this month allowed room for even more images and greetings to go with (or use as tags), and they fit all occasions! You'll love all the new little borders like the stars you see below (think new "stitches" too!) and "stamp embellishments" (this time they look like eyelets!) that you can mix and match with the original mosaic set. Fun, fun!!Here I stamped the new grid onto Cosmo Cricket Jolly by Golly DP, using the 6x6 grid line block made it easy to center it over the candy cane pattern. Then I colored the border with a Copic. This card is just two layers, plus the popped up images, and all the images and greetings you see here are included in this set! The circles can double as snowmen, ornaments and much more(see below). It's wonderful to be able to stamp the faces and nose in separately this way, see how you can "turn their heads" just by stamping to the left or right flipping the carrot nose? :) Card base is the new Pure Luxury Fresh Asparagus. Last I added some tied craft thread (thank you, Donna!) to the ornament toppers (I'd punched through with my Cropodile) to make it look like they are tied to the top of each frame.
This "Christmas quilt" above looks pieced, but it's not, and only uses a few layers. Using Vivid Inky blue, I stamped the "Hip to Be Square" frame onto Basic Grey JuneBug DP and then stamped out four of the smaller square outline image from the set on 3 different prints from the same Basic Grey pack. A 1 1/4" square punch or die is a perfect fit for this little squares, you'll love how fast these go!! Now, if you turn each punched square at a 45 degree angle before adhering them in each larger square, the 4 simple panes becomes a beautiful quilting block with triangles in each corner! I stamped "Very Merry!" in the bottom one, and cut out the little ribbon image from the set I'd stamped in Vivid inks on Pure Luxury White for the other three to make them look like gift boxes, you like? (Change up the color and patterns and the Christmas presents magically turn into birthday gifts LOL!) Centered this way it leaves a "5th box" in the middle, I colored the corners next to each of the green squares red as well as the double border to make the pattern a little more complicated. Last I mounted it onto the new Gina K Pure Luxury All Spruced Up and White. Stitched trim around the edges is an embossed Cuttlebug border.

I had to share just a simple few projects without the frame, too! Above are some more circles I stamped to make some holiday goodies. Punch them with a 1 3/8" circle and layer onto scalloped punches and you have these easy lollipop or peppermint patty favors! You can also make pumpkins or kids or baby faces. TIP: Make striped knit caps for these round faces by snipping off part of a punched circle of DP and adding a button to the top, isn't that sweet? The buttons and ribbons you see here are from the new Gina K companion collections coming out this month! And, these Hinged window tins can be purchased from Gina K, they will fit 6 decorated patties, and make a wonderful and inexpensive gift!

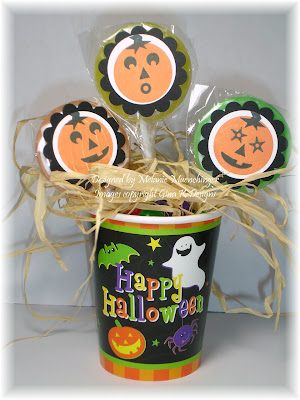
Last, I have a few suckers I put in a paper Halloween cup with some raffia and jelly beans(because Halloween IS up next LOL!) , there are little bits in the set you can substitute for the eyes, mouths and noses, have fun "carving" your own pumpkins! (stamped in Vivid Butterscotch and Memento Tuxedo Black) pumpkin carving tips to come, stay tuned!! Be sure to join us for our release party Thursday night to see lots more unique layouts and uses for this set! :)


Want to win "Hip to Be Square"? Leave a comment on this post with your guess of what else you think you'll find in this set or holidays you'll have covered I have not shown here! (or if you think you may have found all of them going through the hop, tell me what type of occasion card or project you would make with it first?) I will announce a winner tomorrow night!

Next, Nina's newest set "Lord of the Season" includes topiary for all seasons, and a holiday one has this beautiful wreath topper, but I just couldn't resist "pulling it out of the pot" and hanging it from her "Elegant Post" from a couple months back, isn't that perfect? (Just carefully ink up the wreath only, omitting the pot and stamp!) After coloring it with Copics, I added some accents with my Stardust Glitter pen and covered the fruits with Crystal Lacquer. Card Stock is all Pure Luxury: White, Rocket Red, Fresh Asparagus (base) and All Spruced Up. I inked up just part of one of the greetings to frame it on a Fancy Tag die cut. Ribbon is from the the new kit and I also added a punched Large Flourish and some adhesive nail heads. I created the border with some decorative scalloped scissors, Cropodile and some punched fern sprigs.


Don't forget to head over to GinaK's blog to add your comment to her blog entry for another chance to win the new stamp sets being previewed tonight our blogs!
Be sure to check out Nina Brackett: Lord of the Season
and Design Team Members participating in the hop tonight:
Carolyn King
Cathy Tidwell
Cindy Lawrence
Donna Baker
Emily Giovanni
Erika Martin
Jessica Fick
Kurtis Amundson
Lee Murphy
Lynn Mercurio
Theresa Momber
CenterStage Spotlight Designers:
Giovana Smith
Janice Melton

Sunday, September 27, 2009

Sneak Peek: Very Merry Christmas, Special Delivery & Special Delivery Add On

The September peeks have begun! Our first peek of this release is Theresa's newest set: "Very Merry Christmas", in her vintage style you love! I stamped these beautiful jingle bells and curling ribbons on Pure Luxury White and colored them with Copics.

Gina carries the new Cosmo Cricket Jolly by Golly DP pack, and although it has lots of funky modern holiday prints, it also includes more traditional ones like this sheet music paper! It was perfect for the bells. I stamped "hallelujah!" from the set in Memento Tuxedo Black on the line in the print that looked it was just waiting for a greeting LOL! and popped up my cut bells. I tore across the top and bottom of the sheet (to give it a pop of white, some texture and look like it wasfrom the middle of a page of music) and mounted it on two new Gina K colors coming out this month: Pure Luxury Cranberry Tart and Good as Gold, you will love these new colors!!! This is the first card I made when the sets came, and when I finished it I was ready for Christmas and humming carols!! :) My favorite card I made with her set though includes another set in our release you have not yet seen, so you will have to come to the release party Thursday for that one! ;) (yeah, I'm a big tease!)
Our next two new sets are from our newest illustrator at Gina K Designs: Tami Mayberry! She really delivered with these special postage theme sets: "Special Delivery" and "Special Delivery Add On"! The main set has some postage outlines with images and words to put inside, the add on set has a large block of 6 stamps together and some journalling lines. I decided to use both on this one sample. I used the large block of 6 and then stamped the outline and ornaments into each frame. Next I cut out the inside of one of the rectangles from some scratch paper and placed it over each framed up image so I could sponge in a yellow or green background. The set also includes numbers to create your own postage rate! I cut them out and then colored in the ornaments and the spaces in between the stamps with a Cardinal Copic to match my background as if it's showing through, this is the new Cranberry Tart again. I also used it for my base. For my mats I used Kraft and the new Pure Luxury Fresh Asparagus, also debuting this month. I Cuttlebugged it with the Argyle Folder and rubbed some Cream White on it to make the pattern pop. The saddle stitched ribbon and buttons you see are "sneak" sneak peeks of this month's new StampTV kit (reveal coming soon!), aren't they beautiful? Last I stamped the "Happy Holidays" postmark down the side, this is juts one of many greetings included in the set to fit your occasion.


Stop by GinaK's blog today to add your comment to her blog entry for a chance to win the new stamp sets being previewed tonight our blogs!

Then, check in with the Illustrators of our two stamp sets featured tonight:
Theresa Momber: A Very Merry Christmas
Tami Mayberry: Special Delivery and Special Delivery Add-on
Design Team Members participating in the hop tonight:
Carolyn King
Cathy Tidwell
Cindy Lawrence
Donna Baker
Emily Giovanni
Erika Martin
Jessica Fick
Kurtis Amundson
Lee Murphy
Lynn Mercurio
Melanie Muenchinger
CenterStage Spotlight Designers:
Kay Simmons
Linda Payne

Thanks again for stopping by, enjoy hopping! :)

Saturday, September 26, 2009

Bean Thinking...

Oure sneak peeks are starting Sunday night, eeeek, so excited!* So that means I'm doing Mosaic Monday" a little early, hope that works for you! ;) Today I used the "Inspiration Mosaic" with two images I had never used from Rupa's "My Cuppa Joe", (can you believe it, I always go for the mugs LOL! But the "to go" cup is sooo cute pieced, here I used Basic Grey.) The grid shows me exactly where to put my images and sentiment.

I used two Long Rectangle Scalloped Nestabilities behind my Creamy Caramel mat, to match my scalloped punch under the circle. I stamped just the beans repeatedly at the bottom to make a big pile and then colored them with two brown Copics. Card base is Cool Caribbean, I love pairing aqua with brown. The dashed lines at the corners and around the greeting rectangle are fun to match with the border on Rupa's labels.

Coffee...mmm mmm good!

Friday, September 25, 2009

Like Dew on a Leaf...

This square card using "A Year of Leaves" is made of Pure Luxury Ivory, embossed with the largest Labels One Die. I layered two Pure Luxury Green Apple Labels Four die cuts over that, (isn't that staggered pattern pretty?) finished with a third Labels Four in Ivory again for my quote. I am still just so excited how beautifully these labels Four die frame all the sentiments in this set and how the curved and points mimic the leaves. The leaf is colored with Copics (Olive, Pale Olive and New Leaf) and popped up, finished off with a couple "dew"drops of Crystal Lacquer, you just gotta have that with this quote, your recipient will have to touch it to see if they're real! :) Punched sprigs between they are layers are the Martha Stewart Fern punch (thank you, Tina, for this wonderful gift!)


Have a wonderful weekend!

Thursday, September 24, 2009

Final Week with Melissa Shulz

Melissa has created this bright sports card for us today, these beautiful sporty patterned papers are found at Target Dollar Spot!! I got a pack last year to cover all the big sports, the prints were similar but not quite the same and these have some new fresh colors! She used two eye-popping patterns in the layout here that match but have such great contrast. I also love how she used the three different colors for the jersey from "Just So Sporty" and the shoes from "School, Sports, Spirit!" to coordinate. Greeting from the new set is inked up with white craft. The roughed up diamond plate Cuttlebug background (isn't that fun and unexpected in yellow?!) and stitched ribbon are such great little touches. Pure Luxury Card base is In the Navy.

Thank you Melissa for sharing this great Target bargain and wonderful card! You were the perfect guest designer for this set and I look forward to more amazing tshirts, sweatshirt and sporty creations in the future! :) Let's go see what else she has today!

Wednesday, September 23, 2009

Final Week with Geri Utterback

Look what Geri made for us today!!!!

I just can't get over how amazing thes images from "A Year of Leaves" look with these tiny faux stitches! What a "wow"!

Geri's Design Notes:

"I wanted to make my card a quilt card, I saw a quilt done with maple leaves and it was so beautiful that decided to try it. I stamped the image and cut them out, then I sponged them leaving the middle. After I glued them down I ran it through the cuttle bug with the Paisley folder. I then made the stitches with a black pen. On the inside of my card "The fall of a leaf is a whisper to the living" I just love that!!"

Supplies:
Ribbon-Gina K.
Gina Pure Luxury Pumpkin Spice and Green Apple
SU So Saffron and Garden Green


Thank you, Geri, for sharing your gifts with us this month! It has been such a pleasure!! Here is another project from Geri, click to open!

Tuesday, September 22, 2009

Stamping All Stars: Dawn Lusk

Something I've been wanting to share on my blog for quite awhile now are talented designers who have worked with my sets in the past. While I usually only have one "official" guest designer each month, someone enormously gifted (you might not be familiar with but SHOULD be IMHO!) who I've seen working with my sets and really deserves a spotlight, I also send a set to a few other friends and designers I admire whose style is a perfect match for the set to really rock the house! :)

When "Arranged with Love" came out, I just had to send a set to Dawn Lusk, fellow Dirty Dozen Alumni peep and fantastic stamper, she had been doing such gorgeous things with "A Year of Flowers"! Here is a new creation with the set from Dawn, her watercoloring is always magical!

I love the beautiful contrasts of the colors she chose and covering the sentiment card with the buttefly to add a smaller tag at the lower left.

Here's a little more about Dawn:


FAVORITE TECHNIQUE: so many! But I’d have to say masking is right at the top of the list

COLORS/COLOR COMBO: LOVE Fall colors!

FAVORITE GINA K SET BY MELAINE: just one?! I guess "Arranged with Love" with her new "A Year of Leaves" close behind!

FAVORITE GINA K SETS (FROM ANY ILLUSTRATOR): Autumn Beauty (there are those Fall colors!) by Theresa Momber

CRAFT SUPPLIES I CAN’T LIVE WITHOUT: Copics, Reinkers, Prismacolor pencils, Spellbinders, Cuttlebug…

I’VE BEEN STAMPING FOR (HOW LONG): about 7 yrs

I GET MY INSPIRATION FROM: a lot just from nature

THE MOST IMPORTANT THINGS I’VE LEARNED ABOUT STAMPING/CARDMAKING ARE: to have fun! Work with images you truly love and it will show in your work!!

SOME OF MY STAMPING/CRAFTING GOALS ARE: #1 fine tune my coloring #2 use more patterned paper and stop hoarding it!!! haha

FAVORITE THING TO MAKE THAT AREN’T CARDS: hmmmm, this could apply to the previous answer too..I need to do more things that AREN’T cards! Lol! I’d say, altering items like clocks, picture frames.

SOME OF MY STAMPING/CRAFTING ACCOMPLISHMENTS: I’ve been published numerous times in Crafts n’Things, had a cover shot on CardMaker and have been in several other magazines as well. I’ve been a designer for Rubbernecker, Cornish Heritage Farms, Artful Inkables, Dirty Dozen on Splitcoast, guest designer for High Hopes, Gina K Designs, Our Daily Bread Designs (currently), freelance for Janlynn (Stamps Happen) and Creative Cuts & More, and am DT coordinator for Mudd Puddles (just getting a team started).


Thanks for sharing, Dawn! You're truly an All Star! Look for more All Stars coming soon! :)

Monday, September 21, 2009

Let's hear it for the boy!


Today I have pics from last week when my little William officially got "sporty" for the first time, 4 year old soccer, here are pics from his first game! Here is pre-game, love how when they are little their socks come up to their thighs!

I kind of remembered 4 year old soccer being an "adorable disaster", it takes a while for kids to figure it out when they are starting if you never been to little one's soccer games, but he and his team (the Blue Jets) really had it going on! Here he is, scoring his first of FOUR goals! He did a little victory dance after each, so cute! I think this is the second or third one I can't remember which LOL! Then he ran over to give me a hug, too :)

Of course, I HAD to kick off the season with some Sporty cupcakes! ;0 Flag, "Go team!", and ball (punched with 1 1/4" circle) are from "Sporty Accessories" . Simply cut out the pennant (stamped on Brilliant Blue and accented with Inkssentials white pen) and glue to each flat toothpick with Mono Multi! They were a big hit! It was easy but they made me look like Soccer SUPER MOM! (don't worry, I'm not doing that every game, LOL!)

Here he is with his cupcake! I can't believe how lucky I got with this shot, he always moves when I try to snap a pic so you never know what your pic will look like, and I love how the ball ended up right in front of his eye! Score!
Post cupcake shot with me! Do I look proud of him or what? When I get my color printer working again, you can bet I will be scrapping some sporty soccer pages for the blog (and baseball, with Jonathan , too!)

Thanks for letting me share! :) Have a good one!

Sunday, September 20, 2009

NO CUT Holiday Quilt Tutorial

Today I'm sharing the easiest possible way to quilt this mosaic! Stamp the "Inspiration Mosaic" grid over a light patterned paper, this is from Basic Grey Wassail. Then choose two or three colors from the pattern, here I chose tan and green Copics, and colored in some of my boxes, I love how the delicate pattern shows through, now you have tan and green swatches of a matching print! Card base is a Cranberry to match the patterned paper. I added some 5/8" chocolate grosgrain and frayed the ends after cutting to match the scarf on this popped up "Warm & Cozy Christmas" kid.

TIP: The snowflake is a white paper flower, I folded it into quarters like we did in school, snipped out some little squares and triangles, then unfolded it and added a button to the middle to give it a homespun feel. Last I stamped the little circle from my set into the corners and added a drop of Crystal Lacquer on top of each to look like brads.


Hope you enjoyed this holiday card and Mosaic Monday! :)

Saturday, September 19, 2009

Simple Beauty

With a thick, luxurious piece of Pure Luxury White as your card base, little more is needed to create a special but simple card for a friend. An easy cutaway adds a bit of whimsy. Here I stamped Theresa's mailbox from "Autumn Beauty" on the front of a 4.25" square card, about 2/3 over. I cut straight up and down to the middle of the mailbox image, then around the right side to give the front this interesting edge, gives the illusion that the mailbox on the post is sticking out towards you...

Open the card to reveal her scarecrow and fun greeting! Shirt is paper pieced from plaid DP and overalls from a textured tan CS. Notice how the Copics on the front didn't ruin my white space inside? For card bases, be sure to use BASE WEIGHT Pure Luxury and you can color with Copics inside or out with confidence, the underside will remain pristine, that's a promise! :)

Hope you're having a great weekend!

Friday, September 18, 2009

Fruitful Harvest Blog Hop

Thank you for joining us for the "Fruitful Harvest" blog hop! The quote about love being a fruit in reach every hand inspired me to put these juicy apples with a pair of the hands from my "Hand in Hand" set! Reaching across the top corner eliminated the need for a ribbon treatment. Images were colored with Copics and cut out, the sentiment is framed up in a Labels Nine die. I left the die on after cutting and sponged on some Antique Linen Distressing ink and stamped a little of the crackle image from "Bold Flowers" to add a little patina to my tag. I loved how these red octagons on the Basic Grey Offbeat print looked a little like apples. :) Card base is Pure Luxury Soft Sand.


For even more inspiration with the Fruitful Harvest stamp set, head over to Asela Hopkin's blog, the illustrator of this beautiful stamp set. She has also asked her friend Deb Felts to share a card with us tonight too!

Then, take the time to check out all the other GinaK Design Team Member's sharing projects tonight on their blogs:


and our CenterStage spotlight designers:

Thursday, September 17, 2009

Week 3 with Geri Utterback

Week 3 with Geri and this is my favorite project of hers with this set YET! I'd thought a wreath of leaves would be cool, but look how sweet it is with ACORNS! Love how they are still this new, pale green with the little highlights, and the ribbon treatment she did is just to die for! The layout is so clean and classy, I could seriously look at it all day! (I'm so CASEing this later in its every detail!)
The "Fall Acorns" supplies are:
Gina K. Pure Luxury Chocolate Kiss, Green Apple and Vanilla
Basic Grey button
Craft store ribbon
MS Fern punch
Copics
Nestabilities
" AYear of Leaves"

Design Notes from Geri:
"With a 2 inch circle from Nestabilities, I stamped friend and arranged my already colored and cut out acorns around the circle. This was a lot of fun to make, I made two different ones and I was thinking a Christmas wreath theme would look good, also makes a great ornament. "

Geri has another fall project today with "A Year of Leaves", let's go see! :)

BTW, you can find the winner of the "School, Sports, Spirit!" set from yesterday's hop HERE.

Wednesday, September 16, 2009

"School, Sports, Spirit!" Blog Hop!

This contest is closed. The winner is:
Giovana said...
Beautiful cards Melanie!! I've never been a sporty girl, LOL, well, I practiced Gymnastic when I was in high school, but after that I decided to change it for the medical supplies.Anyway, now my daughter plays Soccer!! and I love it very much, as a Latin girl, we pretty much love soccer the whole year, yesterday during DD practice time, she made a GOAL!!! It was a very great moment for me and my daughter was so happy to see me happy.Thanks for the chance to win!!God blessGiovana
September 17, 2009 3:10 PM

Email me your snail mail addy Giovana and I'll get the set to you!
Everyone else, thanks so much for sharing your special sports moments me, they had me laughing and crying! :)

One of the first images I drew for the "School, Sports, Spirit!" set was this letter jacket, so "the guy could get the girl", so to speak (cheer outfit from "Sporty Accessories"!) I think this little couple (cut to fit so they're holding hands inside his pocket, see??), would be so adorable for sweethearts, anniversaries, Valentines, etc. The color scheme I chose for today is a nod to "High School Musical", hee hee! (but also happens to be one of my fave combos: red, white and black!) I stamped the little "yeah!" on the outfit and MVP on the jacket, these little words in the set are so fun adding to the different strategic spots on all the sports gear LOL! The striped twill ribbon on the clip is the perfect print and texture to match the sporty stripes on the uniform and stretch cuffs on the jacket. I went the whole school theme and hand wrote "Will you go with me?" on the Gina K Pure Luxury White I'd spiral punched, base is Black Onyx to look like a clipboard.
On the inside I used the rectangle part from the backboard image in the set (see it in full in the next sample) to create just ONE "check this box option": "Yes!!" :) I added the new little "CONGRATS!" greeting from this set on a red pennant (from "Sporty Accessories") at the bottom. (DH and I are celebrating 10 years next week BTW) :)

Next is a card made with the set and the basketball from "Sporty Accessories". I made a little dotted line toward the popped up call to add some motion and Cuttlebugged the Tiny Bubbles background onto Pumpkin Spice Pure Luxury, perfect color for a basketball! The scoring at the top and bottom bring attention to the additional greeting and make it "extra sporty"! :) The popped up backboard above the mat adds the illusion of some height to the hoop. Nail heads add a little man bling to this card.


I've said before I'm not really all that sporty myself (although I am really good at the basketball challenge at Chuck E Cheese!), but sports analogies are great analogies for life, so I find myself using thse different sports stamps to make cards for people or kids even if they don't play that particular sport, it is a fun way to say "Go for it!", "You're a star!" or "Just do it!" and everybody gets the message... :)


Would you like to win this set? Tell me about a great "sports" moment for you: maybe it was finishing a cure walk, from high school glory days, one of your family member's victories, watching a historic sports event, or just beating your high score at skeeball! I will post a winner tomorrow night!

Now hop over to my guest designer Melissa Shultz's blog for a special card she'll be sharing with us tonight.
I have also asked a few members from StampTV to join us in showcasing the new set, so please check out her friends' blogs here:

Then, stop by these GinaK Design Team Members' blogs participating in Melanie's blog hop tonight:

Tuesday, September 15, 2009

Leaves to Butterflies

I love the caterpillar and its matching quote in"A Year of Leaves", so I wanted to share a simple way you can create a butterfly using just the images in that set! I stamped two of the oak leaves for top wings and two of the rounded leaves for the bottom ones, colored with Koh-i-Noor pencils, then cut out. Then I popped up the little caterpillar in the center where the body would be as if he's just walking across a little pile of leaves. I love the illusion this hidden picture creates, leaves to butterfly and back again. Jute and Pumpkin Spice CS are from the StampTV kit Signs of Autumn, card base is Pure Luxury White and DP is from the Basic Grey Offbeat pack. typically I pair brownas and oranges with ivory to empahsize the earthy yellow under tone, but paired with white like this gives it a very fresh, modern feel.
"School, Sports, Spirit!" blog hop coming up tomorrow night! :)

Monday, September 14, 2009

Elegant Verses Blog Hop!

The Gina K team and guests are hopping tonight with "Elegant Verses", thank for joining us!


I finally got around to making the card I'd been thinking about since I first saw the "Elegant Post" set: when Nina came out with this lamp verse in "Elegant Verses" this month, I couldn't put it off any longer LOL! I stamped the post on Vellum CS and then flipped the paper over and stamped it again to create the two sides of the chandelier. I added the pair of birds right side up and upside down to make it a little more ornamental and then added all the self adhesive rhinestones and some little crystal stickers from Stampendous I had. The tiny rectangle and tear drop shapes on the strip were perfect to make the lit candles! I don't have ay chandelier stamps but they've been a very poular trend for awhile now, so I was really pleased with how this worked out! Verse is framed when a die cut Fancy Tag, CS is Pure Luxury White and Black Onyx. The Textile Cuttlebug folder pattern really does look like chandeliers, I embossed it into the card base and the vellum strip under the focal point. It's a beautiful folder for vintage cards.


For even more samples of the Elegant Verses stamp set, please visit the Illustrator of the set, Nina Brackett's blog. Nina will be offering her new stamp set as blog candy tonight too - so we hope you'll take the time to comment on her blog for your chance to win this beautiful stamp set!
After visiting Nina, hop over to her good friend Silke Ledlow's blog for some special projects she'll be sharing with us tonight.
Then, stop by these GinaK Design Team Members' blogs participating in Nina's blog hop tonight:

Sunday, September 13, 2009

Polished Stone Mosaic

This shimmery card uses specialty papers and the polished stone technique! Begin with glossy CS, drop dots of metallic and colored ink from reinkers, here Gold Encore and Regal Rose, then take a cotton ball soaked with rubbing alcohol and dab and twist onto the paper to blend the colors together to get this marbling effect, it's like magic watching the paper resist and create beautiful patterns before your eyes. Next I stamped the "Inspiration Mosaic" grid in Black Staz On over it, now it looks like an opulent marble tile floor! The mosaic stamp is just perfect with polished stone, you must try! I reverse masked the boxes and stamped in the "Tropical Silhouettes" flowers, then added the greeting. The silhouettes are stinkign stamped directly onto the polished stone. Last I matted it onto Retro Black Glossy Lustre , Retro Gold Glossy Lustre (the wavy lines on this are really cool with the gold marbling ) and Azalea Metallic CS, all from Paper Temptress. With all the shimmer and texture in the stone pattern you create, you really don't need any embellishments! What an easy card, less than 10 minutes!

Hope you enjoyed this "Mosaic Monday"! How would you like seeing a new mosaic each week? :)

See the Polished Stone technique video here on StampTV.

Saturday, September 12, 2009

Week 2 with Melissa Shulz and Geri Utterback

It's great having two guest designers in one month, makes for such fun and different eye candy! :) I love how both, (unbeknownst to each other!) chose to use just one image and one sentiment from the set they are working with to create their cards today! It's all in the details!

Melissa Shulz has such a great eye for detail and always makes such wonderful, whimsical cards! Today she has a festive card using "School, Sports, Spirit!", so cute how she hung up the skates with some cord and a brad! Makes a wonderful holiday card and I love that she used these fresh, trendy colors! The non traditional lime really pops on this wintery aqua card, and the glitter, snowflakes, brads and dry embossing make it extra"cool!" Her layout and little clip treatment for the sentiment are so unique. Great card, Melissa! Definitely makes me wanna get my skate on! ;) (Around Christmas is about the only time I ever do, but I've always loved watching figure skating, one of the first movies I ever saw at a drive-in was "Ice Castles" when I was realllllly little, anyone remember that movie??! ) You can see another card using this set on Melissa's blog, I haven't seen it yet, so we'll both be surprised!! :)
Geri Utterback is great at creating scenes or coming up with clever uses for stamps, but she is another master at creating a just plain GORGEOUS card with one image, a greeting and lots of carefully chosen details. Check out this beauty with "A Year of Leaves"!!


The details, straight from Geri:
Stamps - A Year of Leaves
DP is from Memorybox Twilight
Martha Stewart punch
self adhesive nailheads- from Gina
ribbon- from Gina
Tim Holtz ink
Oval and square nestabilities
Pure Luxury Pumpkin Spice and Chocolate Kiss

I made a 3 inch square, punched out once on each side. I made a inside square using two sizes of squares. I stamped and sponged the leaf using Tim Holtz ink. Applied a sticker strip in copper around the edge.

Sounds easy, right?? Easy on the eyes, for sure! Sigh, ...sooo pretty!! Love those patterns, punched frameand muted cooring on the leaf! Okay, let's go see another lovely, leafy creation at her blog! :)

Thank you, ladies, for your time and talent!!!!

Friday, September 11, 2009

Autumn Beauty Blog Hop!

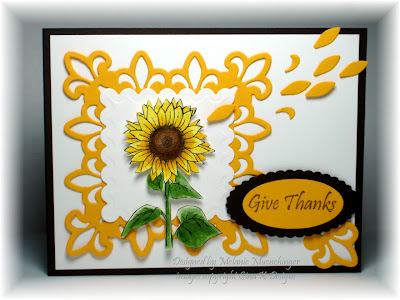
Today we are doing a blog hop for Theresa Momber's Autumn Beauty set! It was fun how this card came about: I didn't know what I would make but I knew I wanted to use the sunflower so I stamped, colored and cut it out. After looking at it for a minute, I realized the petals of the flower would look magnificent framed with the points and curves of my brand new Fleur de Lis Pendant die, a chance to use my new toy, hurray!

After die cutting the pendant, I had to poke out all the little pieces with a piercing tool, and I noticed how perfect these little pieces would be to use as petal embellishments on the card! Theresa's flower is beautifully drawn, slightly asymmetrical just like the real thing, see how there's a little space at the top right where it looks like a few are missing? So I adhered and popped up several of my new little "petals" as if they are blowing away, but it also looks like they are being swept up right out of the die cut, like a petal explosion! I just love the energy it brings to the card. The greeting from the set is stamped on a yellow oval like another petal, card also uses Pure Luxury White and Chocolate Kiss.

For more inspiration, please check in on our Illustrator of Autumn Beauty, Theresa Momber. She has also designed a beautiful digital paper pack called All About Autumn that is available for purchase as well. Be sure to leave a comment on Theresa's blog for a chance to win this stamp set!
Theresa has asked several guest designers to join in on the blog hop tonight:
Pam Imholz
Karen Knegten
Jennie Harper
Melissa Shulz
Brenda Turner
Then stop by these Designers' blogs to see the projects they are sharing tonight on their blogs:

Gina Krupsky
Emily Giovanni
Jessica Fick
Carolyn King
Kurtis Amundson
Lee Murphy
Lynn Mecurio
Melanie Muenchinger
And finally, check out our CenterStage Spotlight Designers joining us with cards tonight:
Geri Utterback
Shelly Wilson
Tina Gilliland
Hope your weekend is filled with beauty!

Winner from the Gina K Blog Hop!

The winner from Wednesday's night hop is:

Juls said...
this is gorgeous I especially love the torn edge
September 10, 2009 11:24 AM

Congrat Juls! please email em your snail mail addy so i can send your "A Year of Leaves" stamp set!

If you have not yet seen the hop and challenge from PCP, be sure to scroll down!

And, another hop from the Gina K team, coming up tonight at 10 PM!!

Thursday, September 10, 2009

Best Wishes to and from PaperCraft Planet!

A bit of sad news: With mounting family and designing commitments, I have had to make the difficult decision to scale back on my other teams so I can focus solely on my designing and illustrating for Gina K Designs, which includes stepping down from the Paper Craft Planet Supernovas. :( (I never dreamed when I started illustrating in January of 2008 with my first set that a year and half later I would have 22 sets out!) BUT, I am so glad for the experience and friendships I've made through Paper Craft Planet, thank you Susanna and all the ladies of PCP for the opportunity and support! I know Paper Craft Planet will continue to thrive and grow and I will keep sending people your way!


Now some happy news: the PCP ladies are throwing a little going away "Best Wishes" bash for me in the form of a blog hop today featuring my two newest sets "A Year of Leaves" and School, Sports, Spirit!" Aren't they the best?? There's nothing like having people wish you well when you are making big choices for the future, I am SO grateful they are helping me do this with their blessing!! :) So blessed!! I'm playing along too since I wish only the best for PCP and all my peeps there!

I used "A Year of Leaves" to make a simple fall card with "Bless You", this covers so many occasions and best wishes, too! Leaves are watercolored with peerless watercolors, and I stamped the background mat with the different leaves in Vivid Coffee Bean ink. CS is Pure Luxury. I made 2 little pairs of matching earrings from Polyshrink (stamped in Stazon and colored on the backside with Copics) to go with it using one of the leaf images and the acorn, oh my goodness you should see the acorns in real life: they shrink up so tiny, look like little gem stones, so sweet! (I know what i;m makign for gifts this year!!) I pierced some holes through some matted matching CS to coordinate the presentation.

This next card uses "School, Sports, Spirit!", but in keeping with today's theme I didn't go "sports" or "school" with it, just sending lots of love and spirit with this girly, feel good card! "Go for the goal!" is stamped right side up and then turned over to make a complete circle four times on the mat, and then I layered on some Cuttlebugged heart and circle punches inside each. Really fun to frame up little images and punches with this sentiment! Go for it ladies, take the 'Planet to the top!!
To top it all off, Gina K is sponsoring a challenge this week on Paper Craft Planet with a chance to win one of Melanie’s newest sets! Upload a new project with a "Best Wishes" or good luck theme to the PCP gallery with the tag GKDBW by Monday, Sept 14th, 10 EST. A winner will be announced Tuesday, that person will win their choice of “A Year of Leaves or “School, Sports, Spirit!” Hope you will play the challenge!

Now please see more beautiful samples the Supernovas created with my new sets here:
Adela Rossol
Lynn Mercurio
Kim Burmeister
Wendy Price
Jen Tapler
Tammy Hershberger
Erika Martin
Lori Tecler
Jessica Fick
Sankari Wegman
Susanna Boyd

Thank you again, SuperNovas!! :)