Here is the beginning of my tip sheet for
this new set. I will be adding
to it as well as demonstrating the tips and techniques I'm suggesting over time here on my blog. Refer to the image sheet below as you read the tips.
 Making Shells
Stamp shells in black for the most contrast or brown or gray for a softer look.
Uncolored on white or ivory paper will be very pretty, or add color to the bottoms leaving some areas white near the top for highlights.
Stamp them in a color like purple or pink and then soften with a watercolor brush, for a beautiful blended look.
Color options are almost unlimited, look at shell photos online for inspiration when coloring.
Stamp onto glossy card stock and they will look like shiny realistic shells.
Cover your colored shells with a layer of
Versamark and clear
EP and heat.
Stamp out a bunch of shells, cut out and keep them in a little tin, box or basket. You can dip into this stash any time you are wanting a little natural looking embellishment to add to the corner of your card, greeting or tag, color to match! Perfect "man
bling"!

Try stamping the sand dollar or star fish on sand paper.
Use the coral bits behind your shells clusters on either side like a little natural "flourish".
Substitute the star fish anywhere you would use stars on a card for a bit of whimsy.
Making Cards and PapersStamp the shells all over a white, neutral or colored card stock in one to three colors for a sea themed background or base. add the speckle around them to look like grains of sand or give theme paper, a natural recycled look.
Earthy natural colors will make beautiful mats and bases for sea themed cards, as well bright and ones for a more playful and sunny beach palette!
Not just for "sea" cards: ANY time you get a tiny smudge or boo boo on one of your mats , ink up the speckle stamp in a similar color and dab on a few more colors, your mistake will blend in to a beautiful random speckle pattern!
Create texture on your cards by tearing and distressing your papers and mats to look like weathering from the wind, water and sand.
Add hemp or jute twine for rope accents.
Try creating interesting knots either by twisting and making your own or looking up different sailor knots online for added realism.
Punch a hole through a stamped shell and tie to the end of the jute.
Mesh and various netting gives a beautiful beach look. Adhere to card in sections or try sponging ink over the netting and remove for a beautiful background.
Making BordersThe border in this set is perfect for creating a quick strip to coordinate the base inside of your card or envelope with your sea theme.
Stamp just one of cover the entire mat to make a quick background.
Use scalloped die cuts, punches or decorative edge scissors to cut around the humps of the images for a scalloped border.
To add a pop of color, ink up the shells in one color and the sand dollars in another.
To add variety and versatility to the border, ink up just a few of the shells or sand dollars leaving some open spaces and stamp. Then stamp your other favorite small shells from the set in the spaces in between to create a completely new border.
To add a lacy or fancy look to a wide ribbon (or strip of card stock or DP): stamp the shells pointing down along the bottom of your card, put your ribbon above that then stamp the border again above it, this time with the shells pointing up. Now you've created scallops on either side. Stamp them in the same color as the strip or ribbon to make them look like they are one element or in a contrasting color to show the separation.
Making WavesCreate waves with layers of torn vellum over blue, green, or aqua card stock.
Brayer your vellum with cool tones.
Sponge blue for waves and tan for sand leaving a white or lighter spaces in the middle for foam.
Sponge over a torn edge to create the tops of waves and repeat again and again to make your waves move back in the distance.
Use a white gel pen to add little zigzagging accents to create crests on your blue colored or water colored card stock.
Create foam by adding lines of Liquid Applique and heating.
Cut scallops with
decorative edge scissors in shades of blue or turquoise and layer your cut
card stock (using the
opposite side of the scallops so you have curves and points like waves) overlapping for a more whimsical looking seascape.
Making SkySponge areas with a dauber and then stamp the birds in black, gray or brown.
Stamp off the birds to make them look like they are in the distance.
Add the
smaller group of birds to the top area of your card or the area you want to appear farthest away.
Use a cloud stencil for a more whimsical look, a torn edge or just freely add the color until you get the effect you want.
Make a sun or a moon by placing a circle over your mat, sponging aorund it, and removing.
Brayerign a beach sunrise or suneset with a spectrum pad on plain on glossy card stock would be fabulous!
Making SandStart with a sandy colored card stock, wheat, Kraft, tan or white and stamp on the speckle image in a
sgade of brown or gray, repeating all over until you have the desired look and texture. It is a good idea to gently ink up this stamp or roll onto our pad and use of soft touch when stamping to avoid creating clumps. Either way, just make sure your speckles overlap and you will have a seamless look.
Rip the card stock along the top edge and adhere to your mat or at an angle to create what will look like a little pile of sand heaped up at the bottom or in the corner, perfect for a few of your stamped shells to rest.
Add real sand to your project using a layer of sticky paper, wide
Scor-tape, or heat and stick powder and then adding natural or colored sand and shaking off the excess. Then add your stamped shells on top.
Mixing with Other Gina K Sets:all our new water themed , fish and fishing sets will look great with this, even if they are more whisical , mixed together with a few shells will still be a great look!
Gone Fishing, Quite a Catch, Guiding Light (somebody mentioned a lighthouse, here it is!), You are My Sunshine, Special Fathers,
several greeting sets (Not Forgotten, Masculine Messages, A Beautiful Life, Friends, The Best Things in Life, Inside and Out, Love Notes etc) just stamp a greeting and add a shell or some birds!
Match it with:
The following Cuttlebug folders have textures and patterns that are reminiscent of water or natural elements would be fabulous with these images and greetings:
D'Vine Swirl, Diamonds in The rough, Distressed Stripes, Herringbone, Houndstooth, Forest Branches, Mesh, tiny Bubbles, Tiny Mosaic and Script
I'm sure you've all seen the gorgeous Seascape Impressabilites plate by now, for stencilling and embossing, a must have with this set!
Making projects
Makes gorgeous framed art or shadow boxes.
Wonderful to complete the decor of a room with a nautical theme.
Try a clock with the hours marked by the different shells.
Stamp shells into Sculpey Clay to make charms to add to decorative items.
Make quick gifts for a beach lover or when visiting someone on vacation: coasters, Polyshrink wine charms, jewelry, etc.
Use the waterproof labels to stamp up a beachy label for a wine bottle with one of the sea quotes to give your host or drink on your trip or remember a vacation from the past.
Create invitations, gift wrap and matching party dinnerware for a beach party.
Simple vacation scrapbooks or frames for beach memories.
Decorate a box or glass jar and fill it full or shells you've collected.
Stamp shells on tissue paper to make a candle.
This is the beginning! I welcome your comments, ideas and tips as always! Looking forward to seeing your creations, there are already more beautiful "Gifts from the Sea" projects in the STV gallery, not to miss!! :) I look forward to having some "quality time" with this set we had family in town and now my younger son is sick, please send up some prayers if you are able that his fever goes away...
Thank you for visiting!

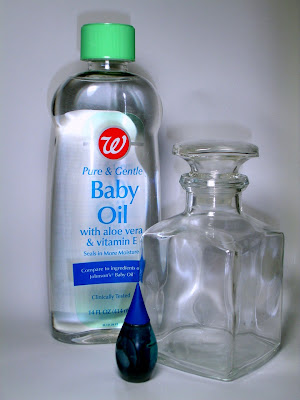
 First, just add water! Fill the container about halfway.
 Now add the food coloring, a few drops at a time, until you have your desired shade of sea blue.
 Add the oil.
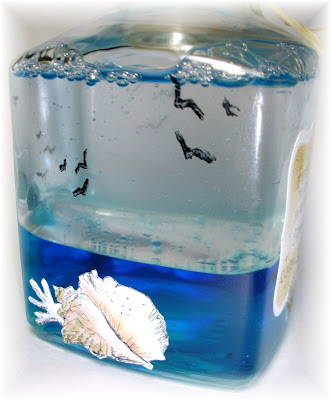
 Here I've tied on some raffia around the neck and added a stamped waterproof label I die cut with a Labels One Nestability, which was perfect for these square sides, and a little cut out shell (all images were stamped on the waterproof labels). If you have a tall bottle, an oval or rectangle would look nice, for a wider container, a Labels Four, etc.
 The stamped sand dollar was perfect for the large stopper. I just love it!!
 Then I adhered a few stamped and colored shells to the bottom on each side. I wondered before starting how the the shells on the other side would look from behind since they'd be white where the adhesive, but was thrilled with how they look through the blue water (there are some on the far right below), like coral further away on the ocean floor. :)
 Another really cool illusion you can create that shows through all sides of the bottle, stamp some of the seagulls using Stazon directly to the glass.


