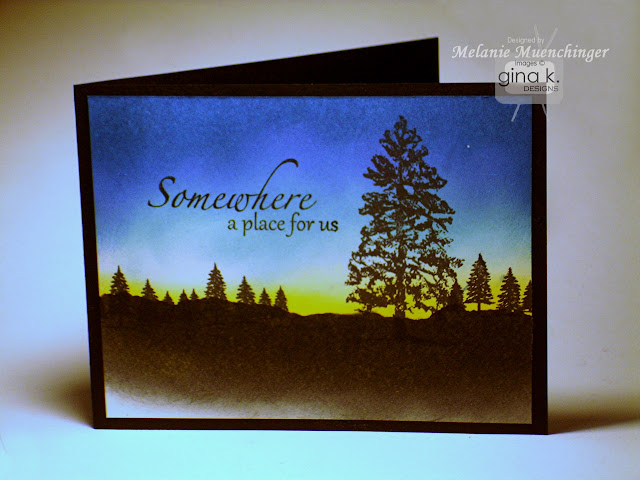
Today we are sharing samples with Theresa Momber's The Northwoods and Becky Oehlers' Poster Board Sentiments. First, here are step step photos for creating the background for the card I made with Theresa's set...
Begin sponging Dandelion 1/3 way up on your Pure Luxury White mat.
Add Ocean Mist to top of mat, leaving white space in between that and the yellow.
Darken the very top with Danube Blue.
Cover top of mat with torn scratch paper and sponge on black ink, concentrating ink along the torn edge.
Just add trees! And a greeting. If you look carefully, I added one tiny point of white ink pen at the top right. I always love spotting Venus first in the evenings...always give me a feeling of smallness but connectedness at the same time (there's a place for us...) :)
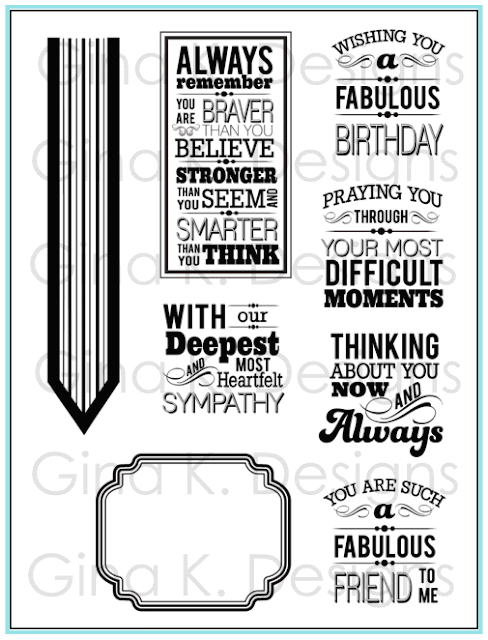
And here is a very simple card I made with the Poster Board Sentiments and the Gina K. inks (in order, Red Hot, Honey Mustard, Fresh Asparagus and Powder Blue) and banner stamp image as a background. Stamp the sentiment in black in on several scraps of colored cardstock, and then trim individual words to mount over the greeting stamped on white. Base is Pure Luxury Black Onyx. I love how this card turned out! (Love this quote, made if for my soon-to-be middle schooler, sniff!) The v in the banner point is just so dynamic, conveys great energy.
The Northwoods
Poster Board Sentiments
If my lighting in photos looks a bit wonky this week, I apologize. My OTT Lite bit the dust, and the replacement bulb I bought for it does not work. At all. I am scrambling and surviving with some very yellow lighting from all the house, that is very tricky to make look normal when I go to edit. Hope to remedy soon...
Now please check out more designs and inspiration from our team for these new sets!
Remember to leave comments for more chances to win the prize from Gina!
- Gina K
- Theresa Momber – Illustrator The Northwoods
- Becky Oehlers - Illustrator Poster Board Sentiments
- AJ Otto
- Beth Silaika
- Carolyn King
- Carolina Buchting
- Cathy Tidwell
- Debbie Corbari
- Latisha Yoast
- Laurie Schmidlin
- Lee Murphy
- Melanie Muenchinger-you are here, thanks for visiting!
- Sean Fetterman
- Sharon Harnist
- Tami Mayberry
- Valerie Stangle


I love these! The inked background on the first is so gorgeous!
ReplyDeleteYou are amazing Mel! Everything you do is always so crisp, clean and beautiful! Hugs! Sean
ReplyDeleteStunning! I love how you did that background. Gorgeous!!!
ReplyDeleteWhat a gorgeous scene you created! I see Venus I think! (little whtie dot...was it accident?)
ReplyDeleteOk went back and read, lol! Love the touch of Venus! :D
ReplyDeleteLove the scenery card, thanks for the technique and the white dot is perfect. Love the bright colors in the second card!!
ReplyDeleteLove the inked background on the first card and the colored individual words on the second.
ReplyDeleteYour work and illustrations are so beautiful - you make it look so easy. Love your videos, I hope you do more. It is such a joy to see a true professional explain your process and how you "see things" through the eyes of an artist.
ReplyDeleteBeautiful scene you created, Mel, and I love all the bright banner colors in your 2nd card -- so cheery!
ReplyDeleteGorgeous cards! Love them both!
ReplyDeleteWow! These are blow me away BEAUTIFUL!!!
ReplyDeleteSo beautiful!
ReplyDeleteAbsolutely beautiful card. Love the dusk background. Just beautiful
ReplyDeleteYou rock! These are the most amazing cards. Just beautiful!
ReplyDeleteYikes, amazing, Wow - so inspired!
ReplyDeleteWOW! Great card beautiful shading.
ReplyDeletemelanie, you have a showstopper card here, gorgeous!!!
ReplyDeleteAwesome cards, Melanie! Thanks for the photos of how you did the background. I love the little white star for Venus. Every detail counts! And also love the banner card. That's such an amazing sentiment to send to your kids! Thanks for the inspiration!
ReplyDeleteBoth your cards are wonderful. thanks for sharing how your created the Poster Board and also the background on the tree card. GlendaJ
ReplyDeletebeautiful cards with the trees
ReplyDeleteI love the Venus touch. It's just like you to add the dreamers touch.
ReplyDeleteAnother set of great cards. Thanks for the background tutorial.
ReplyDeleteWOWZERS! GORGEOUS!
ReplyDeleteStunning card! i love how you added Venus! Thanks for sharing
ReplyDeletemarianneDOTwanhamATgmailDOtcom
Absolutely wonderful! Love that you showed the background process. I never get tired of seeing how artists accomplish what they do. Love those banners in different colors!
ReplyDeleteLove the night scene! The set is AWESOME!
ReplyDeleteBeautiful scenery card and very nice of you to make tutorials for everyone.
ReplyDeleteSecond card, good use of vibrant colors, nicely done.
Thank you for the step-by-step tutorial. I loved it. I can see that sponging is going to be a great tool for getting the most out of my Northwoods stamps!
ReplyDeleteJust wanted to say that the photos were fine so don't stress.
I loved your cards!
LOVE the tree card--can't wait to get my set!!! And I really like the look of the banners as a background on your other card! Beautiful!
ReplyDeleteThe sunset is absolutely beautiful! You are an artist for sure!
ReplyDeleteI liked both of your cards, but the first one is simply breathtaking! Thank you for sharing the technique! I think I need to start saving for this set of stamps!
ReplyDeleteSuch lovely cards Melanie! You created such a beautiful sponged sunset in the first card and I love the rainbow banners with block sentiment card as well.
ReplyDeletelove both cards, but especially love you tutorials and inspiration
ReplyDeleteThank you for the wonderful tutorial and I love the final result.
ReplyDeleteMelanie, you so rock. I love your work. You always come up with the most beautiful cards and your stamp sets are amazing. Thank you for all your work and dedication.
ReplyDelete~Emily~
Thanks for sharing the sponged backround on the first. Absolutely beautiful.
ReplyDeleteLOVE LOVE LOVE!!!I guess I should be buying that posterboard set!!! Love these cards sooo well done!
ReplyDeleteLove the sunset! Love what you did with the subway art - going to do that one for sure!
ReplyDeleteI really love the colors you chose - the way you made the first card was very inspiring! <3
ReplyDeleteYour cards are beautiful! I love the tutorials, and hope you keep doing them.
ReplyDeleteI always enjoy the picture tutorials and these cards are just beautiful pieces of art.
ReplyDeleteBeautiful cards especially the sponged background behind the trees.
ReplyDeleteMel. these cards are so great! Love all the colors.
ReplyDeleteBeautiful cards! Your backgrounds are always outstanding.
ReplyDeletepretty, pretty! I do love the single dot of white in the night sky!
ReplyDeletethanks
Holly
Love your Northwood set! The cards are lovely - appreciate your tutorial on how you put it all together! Thanks too for a chance to win!
ReplyDeletePaper Hugs,
Jan
Amazing sky Melanie - I can see Venus! And I love your sentiment and stamping on 2nd card, thinking about your son getting a bit older!
ReplyDeleteLove, love, love the tree card! Did I say love! lol
ReplyDeleteGreat cards, Melanie. So glad you 'spotted' Venus for us!
ReplyDeleteThank you for your tutorial and for these beautiful cards! I love your style!
ReplyDeleteOne word sums it up - BEAUTIFUL! I love the work I've seen with the Northwoods stamp set, and your's is no exception. You amaze with me your talent and creativity. Simply lovely!
ReplyDeleteOh My Gosh! That first card is judt breath taking!!!
ReplyDeleteAbsolutely gorgeous Melanie! Thank you for the tutorial!
ReplyDeleteI love the backgrounds. What a wonderful job. Thanks for sharing.
ReplyDeleteSuper gorgeous, as usual. Love all the colors, thanks for the inspiration!
ReplyDeleteBoth cards are great. Love your use of color and your stamps from yesterday!!
ReplyDeleteNice cards.
ReplyDeleteMelanie, you are such a talented artist! I adore everything you create!
ReplyDeleteLove the cards!! Thanks for the tutorial!
ReplyDeleteYour colors are so vibrant and beautiful. Enjoyed both cards.
ReplyDeleteI am loving your cards. I also am enjoying your videos very much.
ReplyDeletewow, what stunning colors.
ReplyDeleteI love your cards. The tree is my fav.
ReplyDeleteThanks for the tutorial for your first card! Love that card!
ReplyDeleteGorgeous cards, especially the outdoor scene. So soothing. Thanks for sharing.
ReplyDeleteBeautiful cards!
ReplyDeleteSimply gorgeous. Thanks for the tutorial.
ReplyDeleteFabulous work. Thank you for sharing.
ReplyDeleteDonna C.
Your cards are beautiful
ReplyDeleteKathleen
I absolutely the card with the trees. The night looks awesome.
ReplyDeletewow love this technique and the stamps are awsome! Makes me want to be outdoors!!!
ReplyDeleteBeautiful cards Melanie, even if your lighting is giving you fits!
ReplyDeleteSo vibrant and beautiful!
ReplyDeleteDawn
DeeGeeScraps at gmail dot com
Very gorgeous cards Melanie! Love the color combo on the second one.
ReplyDeleteMelanie, I just love your cards! Thanks for another very cool tutorial. The colors on the Poster card are so great, I am going to have to try that myself. I just have to say that the sentiment: Someplace for us......reminds ME of West Side Story, oh, I loved that movie, back then it was a big hit! Just thought I'd share that rather "dating" bit of info. LOL
ReplyDeleteLooking forward to more videos from you. You were great!!!
Fabulous cards.
ReplyDeleteHey, I like the new digs! lol Beautiful bold cards! Well done (of course!) TFS!!
ReplyDeleteGorgeous backgrounds! Love the stamp sets!
ReplyDeletewww.tastecraftiness.blogspot.com
Beautiful cards, Melanie! Thanks for sharing your style and techniques!
ReplyDeleteSuper stunning stamped background! Love them
ReplyDeleteNo fair, no fair, to keep us in suspense showing us how you did the card THEN show us the results. At least it kept me from having to go back and see the card after the directions. O well....the results are bee-u-teee-fuuull - I rreeeeally like your first card. Gotta try that one. I always enjoy alllll of your cards.
ReplyDeleteJean McGee
Great cards! I love the top one.... so beautiful!
ReplyDeleteDeniseB
love your backgrounds; beautiful cards.
ReplyDeleteFabulous! I love anything with trees on it!
ReplyDeleteKris in Alaska
funamom at yahoo dot com
Fabulous cards, Melanie! Your scene is so stunning - thank you for the tutorial! And your banner card is so bright and cheery!
ReplyDeleteThanks, Melanie, for showing how you did the background for the Northwoods card. It is gorgeous. I really liked how you used the different colors on the Poster Board sentiments card.
ReplyDeleteOMG, that background with Northwood is AMAZING
ReplyDeleteOMG, that background with Northwood is AMAZING
ReplyDeleteOMG, that background with Northwood is AMAZING
ReplyDeleteI want to climb into your Northwoods card and camp out in those woods under the stars. It looks so peaceful. Love how you added Venus - such a creative and special little touch.
ReplyDeleteFabulous cards. Thanks for providing the great tutorial for the trees. Love the colorful banners on the other card.
ReplyDeleteWhat great cards love those trees and the tut you did for us. Thanks so much for sharing.
ReplyDeleteLinda K.
Love the scene card, gorgeous!
ReplyDeleteThat is so UBER cool Mel....adding in Venus is such a creative touch!!! I have got to practice my sponging!!
ReplyDeleteAmazing!....as always!
ReplyDeleteI loved your cards. Can't wait to get my hands on A Year of Flowers 2!
ReplyDeleteLove the first card - the background is so beautiful, especially with Venus!
ReplyDeleteI love these cards. The first card is especially stunning, thanks for showing us how you made the background.
ReplyDeleteWill you look at the beautiful scene you created on your first card and love how you used the banner image on your second, wonderful use of color too!
ReplyDelete