I forgot, one last Stately Flowers 5 card from the release! Card base is Pure Luxury Tomato Soup, embossed with CB Grace's Frame. I used the matching cut file for the flowers and leaves, and Spellbinders Labels One and Decorative Labels One (isn't that puuuurty?) dies. I sponged the Labels One with Antique Linen Distressing Ink and added some adehsive nail heads to the corner.
Anyone know why I chose this particular quote for this set? :)
A woman who works with her hands is a LABORER; a woman who works with her hands and head, a CRAFTSMAN; but a woman who works with her hands, her head and her heart is an ARTIST. ~ Louis Nizer
Wednesday, October 24, 2012
Tuesday, October 23, 2012
Krafty Flower
Hello! Here is another card for Stately Flowers 5 at the release party!
I got several questions about what I did here. Cardstock is Gina K Pure Luxury Kraft, Black Onyx and Wild Dandelion. I love coloring on Kraft to achieve a certain look. Just keep in mind when selecting your shades that the colors will darken quite a bit when you go over darker cardstock than white. Also, a darker marker like this Putty Copic might be normally be too dark for a shadow on white CS, but it is perfect on Kraft, looking more like a W-3 or W-5. just trace the undersides of the image, easy peasy! To have the leaf sticking out the edge just trim on the edges of the leaf inside of where the outer edge of the mat will be cut by the die, top and bottom, then have this part sticking out above the die before running it through the machine. Such a cool trick! I love this ginormous image!
I can't remember now if we shared this clearly or not, but Theresa smacked me with a challenge throw down that I use eyelets somehow on one of my samples, I believe it was... the *day* before the release? (last release she hit me with the crimper) So she inspired the whole card with just that one prerequisite, can you believe? Anywho! After adding some yellow eyelets with my Crop o Dile to the corners of this Matting Basics B die cut (sponged with Antique Linen), I looped some copper metallic cord that I've had for ages through both corners and secured on the back with pop dots. (If I was going to throw on an embellishment I seldom use, I figured I'd best try to get a little creative with how I worked with them, or at least something a little less expected from me: copper, no tie or bow, around the corners, check, check, check!) Take that, Theresa! hee (By the way, has she posted HER eyelet card yet? I have to go see...)
Okay, I'll be honest, we are having our team inspiration hop for this set on Monday, and now that I've "shown you all my cards" (heh heh!)...what should I make for you?? I'm open to suggestions! :)
I got several questions about what I did here. Cardstock is Gina K Pure Luxury Kraft, Black Onyx and Wild Dandelion. I love coloring on Kraft to achieve a certain look. Just keep in mind when selecting your shades that the colors will darken quite a bit when you go over darker cardstock than white. Also, a darker marker like this Putty Copic might be normally be too dark for a shadow on white CS, but it is perfect on Kraft, looking more like a W-3 or W-5. just trace the undersides of the image, easy peasy! To have the leaf sticking out the edge just trim on the edges of the leaf inside of where the outer edge of the mat will be cut by the die, top and bottom, then have this part sticking out above the die before running it through the machine. Such a cool trick! I love this ginormous image!
I can't remember now if we shared this clearly or not, but Theresa smacked me with a challenge throw down that I use eyelets somehow on one of my samples, I believe it was... the *day* before the release? (last release she hit me with the crimper) So she inspired the whole card with just that one prerequisite, can you believe? Anywho! After adding some yellow eyelets with my Crop o Dile to the corners of this Matting Basics B die cut (sponged with Antique Linen), I looped some copper metallic cord that I've had for ages through both corners and secured on the back with pop dots. (If I was going to throw on an embellishment I seldom use, I figured I'd best try to get a little creative with how I worked with them, or at least something a little less expected from me: copper, no tie or bow, around the corners, check, check, check!) Take that, Theresa! hee (By the way, has she posted HER eyelet card yet? I have to go see...)
Okay, I'll be honest, we are having our team inspiration hop for this set on Monday, and now that I've "shown you all my cards" (heh heh!)...what should I make for you?? I'm open to suggestions! :)
Labels:
Copics,
Gina K Designs,
Spellbinders,
Stately Flowers,
Stately Flowers 5
Sunday, October 21, 2012
Inspriation from Janice Whiting
Hello! Have some absolutely gorgeous cards I have been meaning to share using Stately Flowers 4, designed by my lovely and talented friend Janice Whiting! These cards were so different in some ways than any other card I'd seen with the set, and I just felll in love with them!
This first one I really like how she used a KRAFT mat behind the flowers. Tone on tone with the card base, I think that looks super sharp! Gorgeous coloring, too!
This next card, I adore the colors she chose. It is such a god reminder ot me to think outside the box when selecting colors for flowers or butterflies: I'd never seen a butterfly like this, but do I want to now? Absolutely! So don't be afraid of coloring or coming up with combos that perhaps don't appear in the natural world to species. The blue and purple just took my breath away, and I also like and arrangement of images (the butterflies, by the way, ARE from Stately Flowers 4 but this violet is from Stately Flowers 1)
Finally, I love the botanical collagey feel of this last card, like opening a botanist's sketch book that a real butterfly just lit on! Bravo, Janice! Love how she trimmed out the God bless, too, such a nice detail!
What is your favorite among this bunch? (or rather, which one are you CASEing first?) :)
Be sure to check out Janice's blog where she has another sample with Stately Flowers 4 and leave her some love, as well as her wonderful StampTV gallery. Thanks for wokring your magic with ym lowers this month, Janice, and amany apolgies fo the delay in posting!
Hugs to you all! Hope you are having a wonderful weekend, and blessed Sunday!
This first one I really like how she used a KRAFT mat behind the flowers. Tone on tone with the card base, I think that looks super sharp! Gorgeous coloring, too!
This next card, I adore the colors she chose. It is such a god reminder ot me to think outside the box when selecting colors for flowers or butterflies: I'd never seen a butterfly like this, but do I want to now? Absolutely! So don't be afraid of coloring or coming up with combos that perhaps don't appear in the natural world to species. The blue and purple just took my breath away, and I also like and arrangement of images (the butterflies, by the way, ARE from Stately Flowers 4 but this violet is from Stately Flowers 1)
Finally, I love the botanical collagey feel of this last card, like opening a botanist's sketch book that a real butterfly just lit on! Bravo, Janice! Love how she trimmed out the God bless, too, such a nice detail!
What is your favorite among this bunch? (or rather, which one are you CASEing first?) :)
Be sure to check out Janice's blog where she has another sample with Stately Flowers 4 and leave her some love, as well as her wonderful StampTV gallery. Thanks for wokring your magic with ym lowers this month, Janice, and amany apolgies fo the delay in posting!
Hugs to you all! Hope you are having a wonderful weekend, and blessed Sunday!
Friday, October 19, 2012
Stately Flowers 5 Now Available
Good morning! Hope you are able to check out the release party threads (and enter the contests!) if you weren't able to make it last night! All the new products including Stately Flowers 5 (clear and rubber) and the matching Silhouette cut file are now available to purchase from Gina K Designs. Here is the full reveal of my set. Which image from this new set is your favorite?
Here is a card I shared at the party, simple, easy to mass produce, no coloring! Gina K Pure Luxury White, Cherry Red and Fresh Asparagus. Isn't this Spellbinders Framed Fancy Tags Two die cut gorgeous?
Here is the first version I made of this card, before I added the punched fancy corners. I go back and forth, loving the blinding white, but also the added color of the punches...! Which version do you prefer?
Have a fantastic weekend!
Here is a card I shared at the party, simple, easy to mass produce, no coloring! Gina K Pure Luxury White, Cherry Red and Fresh Asparagus. Isn't this Spellbinders Framed Fancy Tags Two die cut gorgeous?
Here is the first version I made of this card, before I added the punched fancy corners. I go back and forth, loving the blinding white, but also the added color of the punches...! Which version do you prefer?
Have a fantastic weekend!
Thursday, October 18, 2012
Illustrator Hop and Release Party Invitation
Good morning! The Gina K Designs team is readying for tonight's October release party and the illustrators are giving you another peek today at the new sets coming out this evening! Here's just a taste of what you'll be seeing from each of us. I really hope you will join us tonight for Gina's newest StampTV video featuring the new sets (and cardstocks, and embellishments, oh my!) and the contests, prizes, new samples and chatting with the teams and StampTv friends!
Here is my sample with the newest addition to my Stately Flowers series, Stately Flowers 5. I had to give you Oklahoma's Mistletoe in time for Christmas! Isn't that sweet? Change the color of the berries, and this little of sprig of leaves will add a lovely touch of nature to your cards year round.
Supplies: Gina K Pure Luxury Kraft, Red Hot Cardstock and Spellbinders Matting Basics B set.
Memento Cottage Ivy, Lady Bug, Espresso Truffle (for stamping image) and Copics YG03, YG23, YG67, and YG93. White Opal Liquid Pearls
This set also contains the flower South Dakota proudly claims: the Pasque Flower (also known as Pulsatilla, or Wild Crocus. Did you know Pasque means Easter?) Love the showy bloom with the prickly stems, a survivor that thrives gracefully in the wild! I used the matching Stately Flowers 5 cut file for the Silhouette Cameo on the flower, also available tonight.
Supplies: Gina K Pure Luxury Lovely Lavender, Wild Heather and White Cardstock.
Spellbinders Hexagons, Memento Tuxedo Black and Sweet Plum. Copics V06, V09, V17, Y06Y19.
White Opal Liquid Pearls
Can't wait for you to see the full reveal of Stately Flowers 5 tonight at 7 PM CDT! All new products will be loaded to the store at that time for you to get your shop on!

Now please hop with the rest of our illustrators for peeks and inspiration for ALL the new sets:
Gina K
Becky Oehlers
Beth Silaika
Melanie Muenchinger (you are here!)
Tami Mayberry
Theresa Momber
See you this evening at the party!
Tuesday, October 16, 2012
A to Z!
Good morning! Another special offering from CardMaker out this month: I got this beautiful special issue in the mail last week and it is super-sized packed full of techniques, embellishments, design elements and trends from A to Z! 112 projects on a whopping 148 detailed, full color pages. I got a LOT of ideas from this issue as well as seeing some products I was not familiar with (honeycomb paper?!) and now really look forward to trying them out!
So fun seeing lots of "my peeps" in there, plus terrific designs from the editors of CardMaker themselves! I have three cards in this issue: C for Chevron, D for Doily, and P for Punches!) My favorite submission is this card using Spellbinders Edgeabilities to create the chevron. See the magazine for step by step instructions. Greeting is from my Arranged with Love set.
Unfortunately I do not have an extra copy of this issue (and I am sooo keeping the one I have!), but it is one you will want to keep in your crafting arsenal! I love how they went from A to Z with naming all the different ways to dress up your cards, highlighting the classic tried and true ones and as well as ones we forget about or very inventive new things I hadn't seen before!
You can order this product (or download a digital version immdediately) from Annie's by clicking of the A to Z issue above. (and you'll see more pictures of projects featured inside at that link) Enjoy!
Monday, October 15, 2012
CardMaker November
This contest in now closed. Thanks to all who participated. The winner of the issue is
Verna Angerhofer who said...
I've never seen an issue of this magazine, but it certainly does
look intriguing to look at with lots of fantastic ideas. Love your card
too. I would love to win an issue.
October 15, 2012 10:56 AM
Congrats, Verna, please send me your snail mail address! :)

What a delight and early Christmas present to get the latest issue of CardMaker in my mailbox last week! So many gorgeous cards, and lots of fun projects by my peeps!!! Also, so many products I put on my "I need to check this out" list! One being what is used on these beautiful cover projects: does or does not that look like cork paper to you? Well, it's not, it's glitter paper!)
In addition to gorgeous Christmas and Hanukkah projects, you'll also find lots of idea for Thanksgiving. I have one, which can be an "anytime" design, using my Wild at Heart set. The magazine contains my template for inking the stamp with perfectly spaced lettering. :)
I'd never done anything like this with this stamp before, but love how it turned out! It's so fun to get inspired by a pub call and experiment with different things, love when they are successful like this. (As usual, it looks so much better with they take the photo, this is mine, hee!)
I'd love to give one away so you can see the gorgeous layout of this fantastic issue, the colors and design just blow me away! I'm lovin' their new look! Leave a comment below to enter, subscribers get two chances, so subscribe today if you haven't already! I'll post a winner Wednesday.
In addition to gorgeous Christmas and Hanukkah projects, you'll also find lots of idea for Thanksgiving. I have one, which can be an "anytime" design, using my Wild at Heart set. The magazine contains my template for inking the stamp with perfectly spaced lettering. :)
I'd never done anything like this with this stamp before, but love how it turned out! It's so fun to get inspired by a pub call and experiment with different things, love when they are successful like this. (As usual, it looks so much better with they take the photo, this is mine, hee!)
I'd love to give one away so you can see the gorgeous layout of this fantastic issue, the colors and design just blow me away! I'm lovin' their new look! Leave a comment below to enter, subscribers get two chances, so subscribe today if you haven't already! I'll post a winner Wednesday.
Saturday, October 13, 2012
Peeking Sunflowers...
Hello! Hope your weekend is off to a terrific start! Have you been enjoying getting some early peeks on Gina's blog for our new release next week? (click Gina's link to see more stamp previews, plus links to new projects from Tami and Theresa) Today I'm going to go ahead and show a card I just whipped together with my new sunflowers in Stately Flowers 5! Stately Flowers 5 and our other new Gina K designs stamp sets will be available for purchase Thursday night, October 18th at 7 PM CST. Hope you can come to our party!
This triple panel technique is so easy to do! Just make a mat stack of three layers, piled on top of each other (Pure Luxury Ivory) and stamp your images over the edges (Memento Rich Cocoa) Then cut and layer colored mats underneath (Gina K Dark Chocolate). Adhere layers with pop dots.
Here is a quick coloring tutorial (Apologies in advance for cutting the colored caps off in these pics, my camera kept zooming a in a little closer than what they frame showed!) The first step is laying down the light colors to each area: Y06 for petals, YG93 for the leaves, and E13 to the center.
Next add this beautiful golden yellow (Y19) near the center and tips of petals and in the folds. See how that deeper orange yellow tones down that too bright shade? Trace YG97 over the shaded areas in the image to darken the leaves and stems. This image is so easy to color, no need to guess where the shadows gom, they are built in and and the stamped image will darken any color you leay over it, so you need very few markers. This only used five!
Cut and adhere with pop dots over your mats.
Thank for visiting! As much as I love the sunflower from A Year of Flowers, this one is even more details and realistic and will work for so many things I want to make all year long. Looking forward to showing you more Thursday night!
By the way, thank you everyone who has been writing and inquiring about when the next Stately Flowers set would be coming out! It's almost here, just a few more days!
Hugs!
Labels:
Copics,
Gina K Designs,
Stately Flowers 5,
Tutorial
Friday, October 12, 2012
Sneak peeks...!
Hello! Sorry I haven been posting this week, what a crazy few days! (I mean, cah-razy!!) Anyway, I spied Gina is posting sneak peeks for our release next Thursday, and stamping for it, that is next on my list! Yep, it's time for the 5th installment of my Stately Flowers series! Do you know what states these sneak peek flowers represent and any guesses what else might be in the set?
Check Gina's Blog for a peek at Tami Mayberry's newest set as well, and the sneak peeks will continue the next several days! Awesome stamps and cut files this release, (plus some stuff I did not even *know* about until this morning), so excited!
Be back to share a little about some new exciting publications out on the newsstands, my copies are already getting worn out from paging through enjoying the inspiration!
Saturday, October 6, 2012
"Beginning to look a (Tiny* Bit) Like..."
This card uses the tub from Beyond Baskets and the Christmas topper from Basket Additions.
I often cut off the liner from this topper after stamping to make it more casual and it's perfect for this red pail. Instead of the handle or rope stamp, another fun addition to these containers is to make a wrap or handle by adding bakers twine, hemp or ribbon. I tied each end in a little knot and just attached each side to cut out with Mono Multi. Cardstock is Pure Luxury Ocean Mist, Fresh Asparagus, Red Hot and White. Embossing is Grace's Frame by Cuttlebug.
So, Christmas! There's a lovely bit of chill in the air for the first time this season, and instead of stamping today for WCMD (because I did a BUNCH this week!) I've been enjoying looking ahead a little to Christmas and bought a couple "just the right things" that were on sale online for friends, field a recipe to try for Christmas morning and printed out a gift list. I have been doing a lot of FLYLady the past month and am also working on putting together my Control Journal. Even without the printed lists the past few weeks, doing the missions and getting my house de-cluttered feels great. The place looks better than it has in a long time and I don't feel overwhelmed with all that needs to get done and what is undone. I will share more about this soon, as often as I can. She shares a lot more than just how to organize your home and your life, but how to de-clutter your thinking and get rid of all the guilt and misconceptions that goes along with it! I strongly recommend checking out her site and giving it a try. A great gift to yourself, family and home: let the organized person figure it all out for you!
Okay, more later, some gorgeous flowers coming up (my stamps, but not my designs, wait til you see!)
I often cut off the liner from this topper after stamping to make it more casual and it's perfect for this red pail. Instead of the handle or rope stamp, another fun addition to these containers is to make a wrap or handle by adding bakers twine, hemp or ribbon. I tied each end in a little knot and just attached each side to cut out with Mono Multi. Cardstock is Pure Luxury Ocean Mist, Fresh Asparagus, Red Hot and White. Embossing is Grace's Frame by Cuttlebug.
So, Christmas! There's a lovely bit of chill in the air for the first time this season, and instead of stamping today for WCMD (because I did a BUNCH this week!) I've been enjoying looking ahead a little to Christmas and bought a couple "just the right things" that were on sale online for friends, field a recipe to try for Christmas morning and printed out a gift list. I have been doing a lot of FLYLady the past month and am also working on putting together my Control Journal. Even without the printed lists the past few weeks, doing the missions and getting my house de-cluttered feels great. The place looks better than it has in a long time and I don't feel overwhelmed with all that needs to get done and what is undone. I will share more about this soon, as often as I can. She shares a lot more than just how to organize your home and your life, but how to de-clutter your thinking and get rid of all the guilt and misconceptions that goes along with it! I strongly recommend checking out her site and giving it a try. A great gift to yourself, family and home: let the organized person figure it all out for you!
Okay, more later, some gorgeous flowers coming up (my stamps, but not my designs, wait til you see!)
Friday, October 5, 2012
World Card Making Day Special!
Are you ready for a great deal? In honor of Wold Card Making Day this weekend, Gina K is running this fantastic special Saturday and Sunday: select one of the four free stamp sets above FREE with any purchase of $35 or more in the Gina K Designs store! Best bang for your buck: buy three stamp sets and get the Free with Three set plus one of these four sets PLUS free shipping, that is almost $40 worth of stamps for free plus free shipping to you on all the fun stuff you order!
The sets she has chosen are perfect for the fall and winter holidays coming up! If you already have these four, consider what a great gift one of them would make for a stampy, crafty friend. :) No limit to how many free sets you can pick up, but each order of S35 or more must be placed separately to qualify for one of these 4 sets.
Enjoy shopping!
The sets she has chosen are perfect for the fall and winter holidays coming up! If you already have these four, consider what a great gift one of them would make for a stampy, crafty friend. :) No limit to how many free sets you can pick up, but each order of S35 or more must be placed separately to qualify for one of these 4 sets.
Enjoy shopping!
Thursday, October 4, 2012
Harvest of Blessings
Eek, Beyond Baskets clear version sold out! Thanks so much, really glad you are loving these new containers and options! :) Hope it will be back in stock shortly, but until then, the rubber version IS available. Since each image in Beyond Baskets has a straight edge on the top, it is easy to line up even the rubber images with the toppers, however, lining up the words or piecing together a sentiment with several words is easier with the clear. just something to consider when ordering!
Here is (I think!) the last card I shared at the party, using the tub stamped on Pure Luxury Grass Green with the sunflower topper from Holiday Basket. I really like making the tub a solid cardstock or patterned paper without any coloring, like one of those cute painted or printed pails. DP is from the Gina K Sun Kissed Autumn. A Grass Green shade is not in this particular print but I decided I wanted a little more contrast here than matchy matchy, but they are all still earthy tones. I love using this little rope on the bucket or the tub (or with the wagon for that matter, sample coming soon!)
Card also use Pure Luxury Honey mustard, White and Kraft.
TIP: When adding the rope, glue only the end to the sides of the container so the middle is free, adding some nice, realistic dimension to your card.
Coming up, some questions and answers, "Stately" inspiration, and a really great special you won't want to miss!!!
Wednesday, October 3, 2012
Inspiration Hop, Day 3: Primitive Blessings & Seasonal Labels
Good morning! The Design Team for Gina K. Designs welcomes you to our final day of the Inspiration Blog Hops! Gina and the Design Team will inspire you with many beautiful ideas four our newest stamp sets, and as you hop through their blogs, make sure to leave a comment on each of them because we will choose a few random comments and those stampers will each win a Gina K. Designs Grab Bag that could have anything from stamps, to paper, to embellishments! To see the list of winners check the Big News forum at Stamp TV a couple of days after the hops!
I used the Silhouette cut file to cut out my Seasonal Label, stamped in Memento Bamboo Leaves and Rhubarb Stalk. Fun two step for adding the sentiment of choice and more color! The label is layered onto a Lacey Circle die cut and white doily. I added some Pure Luxury Good as Gold punched flourishes to tie in the gold embossed trees from Joyful Holiday. I love this swirly tree as a background! Dress it up with adhesive pearls to mimic the blingy stamped label.
Gina K - Illustrator Primitive Blessings & Seasonal Labels
Thanks for hopping with us!
I used the Silhouette cut file to cut out my Seasonal Label, stamped in Memento Bamboo Leaves and Rhubarb Stalk. Fun two step for adding the sentiment of choice and more color! The label is layered onto a Lacey Circle die cut and white doily. I added some Pure Luxury Good as Gold punched flourishes to tie in the gold embossed trees from Joyful Holiday. I love this swirly tree as a background! Dress it up with adhesive pearls to mimic the blingy stamped label.
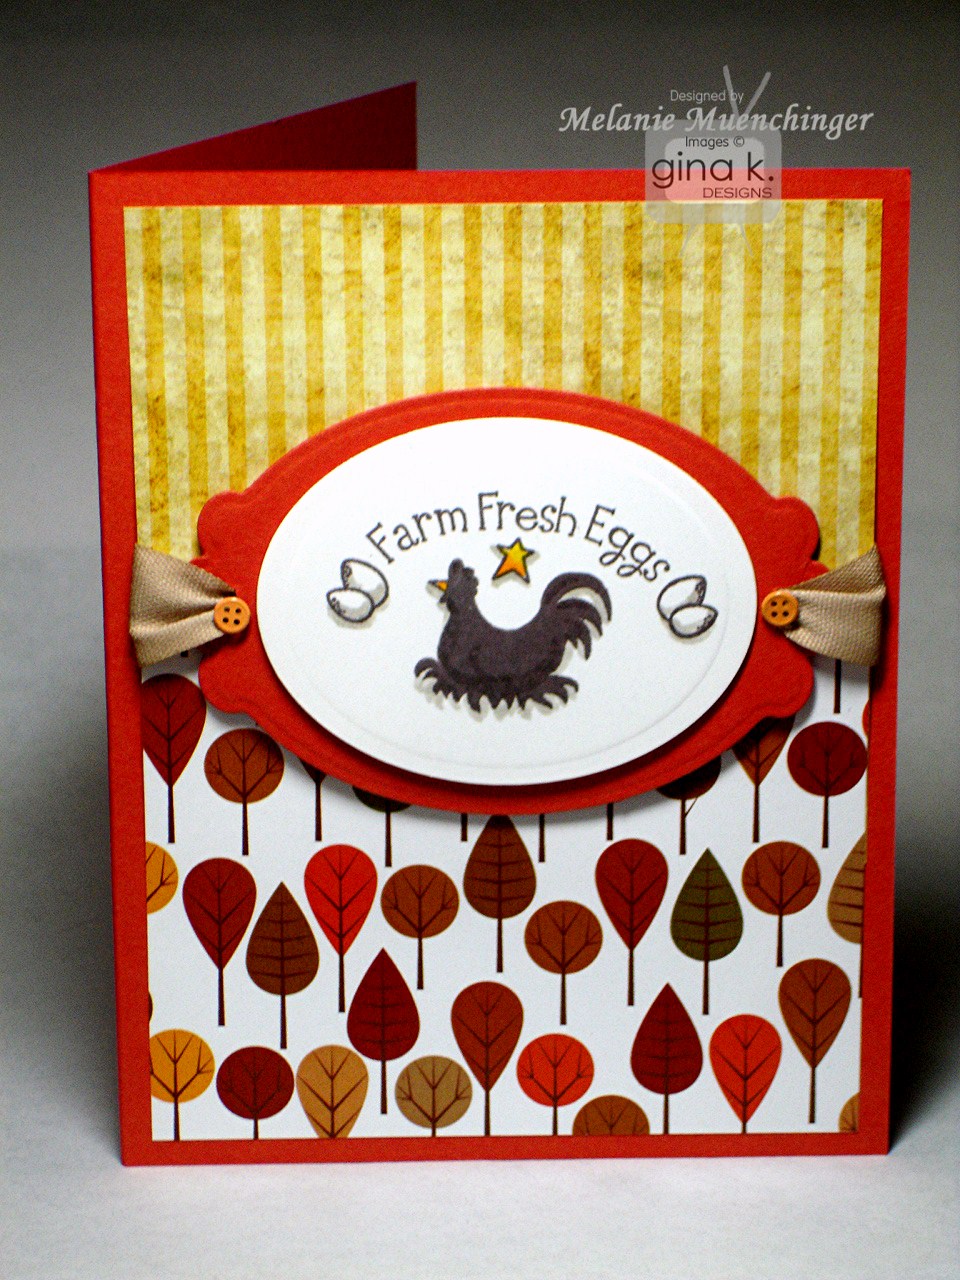
This "Farm Fresh" image from Primitive Blessings
is a perfect thank you for our neighbors who have a few chickens in
their "urban garden" and brings us eggs sometimes. I had to use an Oval Nestabilities (to represent an egg of course!) and matted it on a Labels 10.
Cardstock is Pure Luxury White and Tomato Soup. DP is Gina K Casual Friday and Sun Kissed Autumn. I pinched slits in the end of the Label die cut and added a bit of twill from a past StampTV kit and some button brads to embellish.
Now please enjoy visiting the rest of our design team:
- Carolina Buchting
- Cathy Tidwell
- Deb Felts
- Emily Giovanni
- Giovana Smith
- Jimmi Mayo
- Lee Murphy
- Lori McAree
- Melanie Muenchinger
- Sharon Harnist
- Suzanne Dean
- Tami Mayberry
- Theresa Momber
- Tina Gilliland
- Vicki Dutcher
- Becky Oehlers
- Beth Silaika
Thanks for hopping with us!
Labels:
Blog Hop,
Free wih Three,
Gina K Designs
Tuesday, October 2, 2012
Inspiration Hop, Day 2: Take Note, Wicked, and You Say Goodbye and I Say 'ello
Good morning! The Design Team for Gina K. Designs welcomes you to another fabulous Inspiration Blog Hop! Gina and the Design Team will inspire you with many beautiful ideas four our newest stamp sets, and as you hop through their blogs, make sure to leave a comment on each of them because we will choose a few random comments and those stampers will each win a Gina K. Designs Grab Bag that could have anything from stamps, to paper, to embellishments! To see the list of winners check the Big News forum at Stamp TV a couple of days after the hops!
These note cards in Tami Mayberry's "Take Note" set are so fun for the kids! I saw the happy and sad face and decided to show my son he made the "nice list" this year. (But I'll wait til the week before Christmas to let him know just in case, squeeze out some more good behavior!) I had some of this fun DP from last year to layer under it and showed the boys' names checked off! (I didn't have the heart to say any real person we know was naughty, so I put "Mr. Krabs" from...do you know?) :) Last I trimmed and punched out some choice bits from Fresh Asparagus CS embossed with the Cuttlebug Congrats folder. ("so proud" and "you did it!") I hope William likes....Base is Kraft and mat is Cherry Red.
The "You Say Goodbye and I Say Ello" cut file is so cute with Becky Oehler's images, and when colored or paper pieced, they look already matted! The cut file is also handy for flipping the word bubbles when you want them going a different direction for your design. Note I didn't stamp the word bubble for "Bonjour", just flipped the cut out from the file.
The "You Say Goodbye and I Say Ello" cut file is so cute with Becky Oehler's images, and when colored or paper pieced, they look already matted! The cut file is also handy for flipping the word bubbles when you want them going a different direction for your design. Note I didn't stamp the word bubble for "Bonjour", just flipped the cut out from the file. I used a Decorative Edgeabilities on the lacy patterned paper, and then used the tiny pieces that fell out to make some hearts (dabbed with red Copic). Cardstock is Pure Luxury White, Kraft and Black Onyx.
Check out the rest of the design team creation for more inspiration:
Gina K
Beth Silaika – Illustrator Wicked
Becky Oehlers – Illustrator You Say 'Ello
Tami Mayberry – Illustrator Take Note
Have a great day!
These note cards in Tami Mayberry's "Take Note" set are so fun for the kids! I saw the happy and sad face and decided to show my son he made the "nice list" this year. (But I'll wait til the week before Christmas to let him know just in case, squeeze out some more good behavior!) I had some of this fun DP from last year to layer under it and showed the boys' names checked off! (I didn't have the heart to say any real person we know was naughty, so I put "Mr. Krabs" from...do you know?) :) Last I trimmed and punched out some choice bits from Fresh Asparagus CS embossed with the Cuttlebug Congrats folder. ("so proud" and "you did it!") I hope William likes....Base is Kraft and mat is Cherry Red.
The "You Say Goodbye and I Say Ello" cut file is so cute with Becky Oehler's images, and when colored or paper pieced, they look already matted! The cut file is also handy for flipping the word bubbles when you want them going a different direction for your design. Note I didn't stamp the word bubble for "Bonjour", just flipped the cut out from the file.
The "You Say Goodbye and I Say Ello" cut file is so cute with Becky Oehler's images, and when colored or paper pieced, they look already matted! The cut file is also handy for flipping the word bubbles when you want them going a different direction for your design. Note I didn't stamp the word bubble for "Bonjour", just flipped the cut out from the file. I used a Decorative Edgeabilities on the lacy patterned paper, and then used the tiny pieces that fell out to make some hearts (dabbed with red Copic). Cardstock is Pure Luxury White, Kraft and Black Onyx.
Absolutely adorable, Becky!
Next, Beth Silaika's Wicked silhouettes are perfect for creating spooky scenes! I started with Pure Luxury White cardstock and sponged on Memento Cantaloupe ink. I clear embossed the star pattern and the sponged over Rich Cocoa at the top and bottom.
Create a full moon by masking as are with a circle cut out and sponge on more ink. last stamp greeting, fence and spookies. Add rhinestones on the ghost and make cat eyes. Finally, Yowl at the moon! Such a fun set!Gina K
Beth Silaika – Illustrator Wicked
Becky Oehlers – Illustrator You Say 'Ello
Tami Mayberry – Illustrator Take Note
Have a great day!
Labels:
Becky Oehlers,
Beth Silaika,
Blog Hop,
Gina K Designs,
Tami Mayberry
Monday, October 1, 2012
Inspiration Hop, Day 1: Beyond Baskets and Joyful Holiday
Good morning! The Design Team for Gina K. Designs welcomes you to another fabulous Inspiration Blog Hop! Gina and the Design Team will inspire you with many beautiful ideas four our newest stamp sets, and as you hop through their blogs, make sure to leave a comment on each of them because we will choose a few random comments and those stampers will each win a Gina K. Designs Grab Bag that could have anything from stamps, to paper, to embellishments! To see the list of winners check the Big News forum at Stamp TV a couple of days after the hops!
First up, we have my new Beyond Baskets set . These rustic and whimsical containers coordinate with seven of my previous Gina K Designs sets, plus many more in your stamp collections! The wheelbarrow with its one wheel just demanded some motion, so I easily created this interactive card by cutting out the wheelbarrow, poking a hole through the center of the wheel, and sticking pop dots to the back of the wheel and on the wheelbarrow but WITHOUT removing the backing from the pop dots on the other side, so it only sticks to the back of the image. This just gives it support and pushes it away from the card itself so it can move freely, but not swing loose after you put the brad though the mat.
The wheelbarrow stays propped up on the popped up blessings tag when not "in use", hee hee, just give it a little lift! Gardening topper is from Basket Additions 2. (Like I have a garden, ha! We do have a few herbs, though...basil anyone?) But I like how the Beyond Baskets' greetings allow to me to say ...from my kitchen ...garden, or ...home, which is great for all sorts of tags and packaging for foods and other homemade with love gifts! Card uses Pure Luxury White, Fresh Asparagus, Cherry Red and Kraft.
Here is a sample I made using the new wagon and a topper from the first Basket Additions. Now I know Valentine's Day is months away., but I really like this particular image with the candy, bear, and cards for an anytime, pampering, "love ya" stamp! I made this as thank you for some sweet gifts LEE made for me, because you know if she had a wagon, that's how she'd roll! ;-)
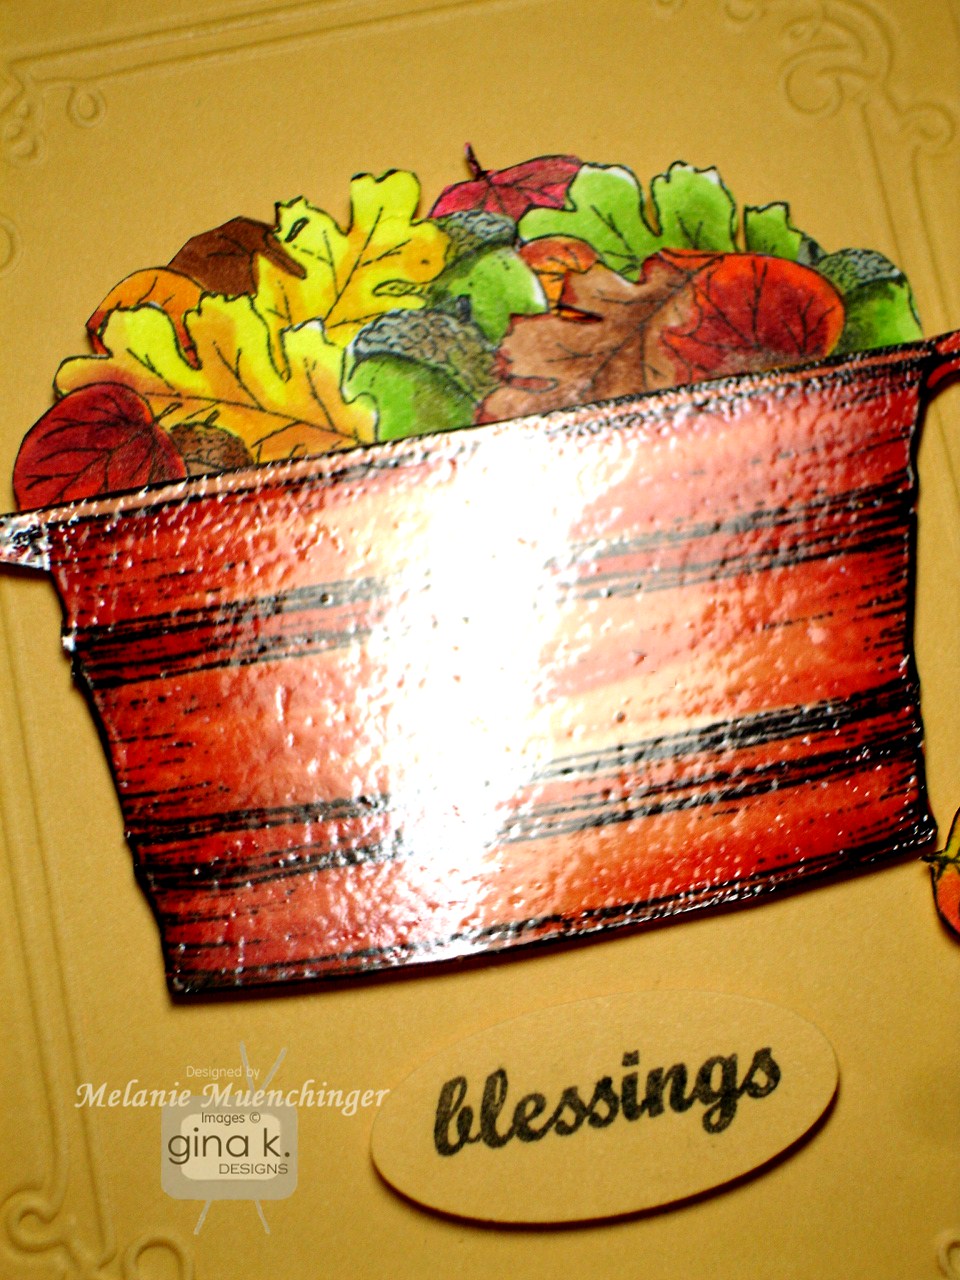
Last, I wanted to show one more idea if you don't have any of the previous Basket or Basket Additions sets. So many ways to fill these masked with other stamp images, piled up punches, paper flowers, etc, but here i filled up the tub (colored to look like copper using YR61 and E08) with the leaf and acorn border from the popular A Year of Borders set, trimmed to layer into the tub, to make a pretty fall card.
Cardstock is Pure Luxury White Sweet Corn, and Pumpkin Spice. I used adhesive nail heads at the corners of the embossed CB Grace's Frame (I get a lot of use out of this folder)
To add some shine, I smacked my Versamark pad onto the tub before adding the leaves and embossed it with clear EP, which you can really see when I tilted it toward the light! Fun to give the image this smooth appearance and texture, just like shiny metal.
Hope you enjoy this set and all the possibilities! Have fun getting creative with them!
Next we have Theresa Momber's Joyful Holiday. I love how she provided images for coloring as well as bold silhouettes, which allow you to create a gorgeous Christmas card like the one below with just two ink pads and two cardstocks!
I love how the white on white design turned out! The cut files make some really intricate, beautifully cat and dimensional images for mass production a breeze! Begin by stamping the bows at different heights along the cardstock panel. Next stamp on some mistletoe. Add the ornaments in Memento Rhubarb Stalk and Bamboo Leaves. Pop some up for dimension. Mat on Cherry Red. Stamp mistletoe on card base, add stamped mat, and finally add cut mistletoe with pop dots.
Accent with adhesive pearls and Ruby Red Liquid Pearls and allow to dry. I did have to snip out a tiny part of my popped up mistletoe there at the bottom, because I accidentally squeezed out too much Liquid Pearls in one cluster of berries and they ran together! (Nope, not starting over, the rest looked fab!) Awesome set, Theresa!
Now please enjoy visiting the rest of our design team:
First up, we have my new Beyond Baskets set . These rustic and whimsical containers coordinate with seven of my previous Gina K Designs sets, plus many more in your stamp collections! The wheelbarrow with its one wheel just demanded some motion, so I easily created this interactive card by cutting out the wheelbarrow, poking a hole through the center of the wheel, and sticking pop dots to the back of the wheel and on the wheelbarrow but WITHOUT removing the backing from the pop dots on the other side, so it only sticks to the back of the image. This just gives it support and pushes it away from the card itself so it can move freely, but not swing loose after you put the brad though the mat.
Here is a sample I made using the new wagon and a topper from the first Basket Additions. Now I know Valentine's Day is months away., but I really like this particular image with the candy, bear, and cards for an anytime, pampering, "love ya" stamp! I made this as thank you for some sweet gifts LEE made for me, because you know if she had a wagon, that's how she'd roll! ;-)
Last, I wanted to show one more idea if you don't have any of the previous Basket or Basket Additions sets. So many ways to fill these masked with other stamp images, piled up punches, paper flowers, etc, but here i filled up the tub (colored to look like copper using YR61 and E08) with the leaf and acorn border from the popular A Year of Borders set, trimmed to layer into the tub, to make a pretty fall card.
Cardstock is Pure Luxury White Sweet Corn, and Pumpkin Spice. I used adhesive nail heads at the corners of the embossed CB Grace's Frame (I get a lot of use out of this folder)
To add some shine, I smacked my Versamark pad onto the tub before adding the leaves and embossed it with clear EP, which you can really see when I tilted it toward the light! Fun to give the image this smooth appearance and texture, just like shiny metal.
Hope you enjoy this set and all the possibilities! Have fun getting creative with them!
Next we have Theresa Momber's Joyful Holiday. I love how she provided images for coloring as well as bold silhouettes, which allow you to create a gorgeous Christmas card like the one below with just two ink pads and two cardstocks!
Accent with adhesive pearls and Ruby Red Liquid Pearls and allow to dry. I did have to snip out a tiny part of my popped up mistletoe there at the bottom, because I accidentally squeezed out too much Liquid Pearls in one cluster of berries and they ran together! (Nope, not starting over, the rest looked fab!) Awesome set, Theresa!
Now please enjoy visiting the rest of our design team:
- Melanie Muenchinger - Illustrator Beyond Baskets (you are here, thanks for visiting!)
- Theresa Momber - Illustrator Joyful Holiday
Labels:
Beyond Baskets,
Blog Hop,
Gina K Designs,
Theresa Momber
Subscribe to:
Posts (Atom)