A woman who works with her hands is a LABORER; a woman who works with her hands and head, a CRAFTSMAN; but a woman who works with her hands, her head and her heart is an ARTIST. ~ Louis Nizer
Thursday, March 31, 2011
Bling Flowers
The Doodle!!
Wednesday, March 30, 2011
Guest Designer : Melissa Cash
Tuesday, March 29, 2011
I love you..I'm sorry
Monday, March 28, 2011
Spellbinders Blog Hop
Saturday, March 26, 2011
Winners!
Maria Levine said...
Beautiful samples!!! LOVE your new sets! OMG, don't know which i like better. I always loved all your floral sets so if I have to pickone I'd go with the Spring Basket. But I can see how awesome the two can go together! EEKK! Thanks for a chance to win.
March 25, 2011 10:12 AM
Scrapacat said...
You know I have to go with Basket Blessings. Those bunnies... CUTE overload! I love both of her cards! As for the stamp set, I would use these images to create scrapbook pages about my two rescued twins. Heavenly goodness, Mel! ♥ky
March 25, 2011 10:13 AM
Friday, March 25, 2011
Designing Friend: Melissa Bove (and Blog Candy!)
Check out the beautiful prints on this bunny card, they are all so delicate and muted, work perfectly together. The deep pink ink she chose to stamp the basket liner really makes that part pop! She also arranged several of the single tulips around, stamping each in pastel colors and filling with coordinating inks and touch of glitter is such a beautiful look!
Wednesday, March 23, 2011
Inspiration Hop Day 4: StampTV Kit "Springtime Silhouettes"
I'm not sure if I've ever put these colors together before, but Emily Giovanni's new 's Grunge Damask quarter sheet in this shade of peach really spoke to me, and is so unexpected with the red and black, which is sometimes the best way to create an impact! The grunginess and texture in the patterned flourish I thought would be gorgeous with the "Bring the Bling" flourish (quickly becoming one of my favorite stamps!)and the distressed beauty of the butterfly image. I stamped it in Vivid Brick on Pure Luxury Ivory and then cut it out and bent the wings for dimension. I embossed three little bling dots on each wing to tie in the embossed trail and have the black details bounce around the card.
Here's a close up to show you all the details and script in the butterfly and a bit of the shine on the black embossing. Sentiment is also from the kit and stamped directly onto the DP.
Enjoy hopping around for more inspiration with this new STV Kit, I'm confident you'll agree it is the most beautiful one yet! I know I will be creating LOTS more samples with the other images very soon and I hope you will come back to see what I make!
PS Thanks again SO much for all your sweet comments this week and love for the bling! I can't wait to see it start hitting the STV gallery more when your packages arrive. I WILL be taking a few days off from using it I promise, don't want to bling you down! ;) (but then I will be back to using it soon becuase I am addicted! and have another tutorial in mind, coming soon!) :)
Tuesday, March 22, 2011
Inspiration Hop Day 3, "Perfect Pennants", Cute as a Bug", and "Lovely Labels 3"
First ink up the large flourish in both Antique Linen and then Vintage Photo rolled on the edges and stamp into both corners of your ivory mat. Clean your stamp and ink the flourish up again in Versamark and stamps again in both corners, offset from the first flourishes so they branch out the opposite way, but will still have some overlap. As you can see, I left a teensy bit of the dark ink on my Versamarked flourish. That's okay. Gives it a nice patina! Add clear embossing powder and heat.
I used a glitter pen to highlight the wings and doubled my pop dot stack under the bee to give him some extra lift! Cardstock is Pure Luxury White, Turquoise Sea, and Wild Dandelion. (Didn't rub this card with the anti-static pad before embossing either obviously, I'm going to say that's a dusting of pollen trailing behind, yeah, that's the ticket!!)
Please go check out the rest of our teams blogs for more inspiration with these three great sets!
Monday, March 21, 2011
Inspiration Hop, Day 2: "Bring the Bling", "Warm with Love", "Make a Splash"!
First I stamped the one of the large flowers in Versamark on my Innocent Pink mat. This rounder flower is a little more "cutesy" than the pointy petal flower. Then I stamped the smaller version of the flower inside, see how perfectly it nests? Then, I stamped the large bling flourish in the open areas, turning the stamps as I went. You could leave it like this, but I'm still going! :)
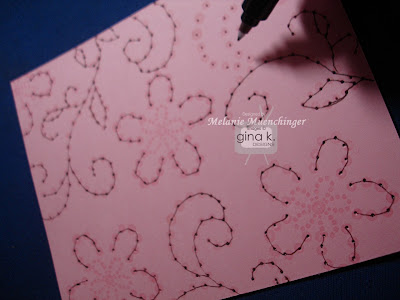
Last I adhered some buttons in to the flowers centers and on the vine, then added a beaded oval I'd sponged with pink and a greeting from the "Springtime Silhouettes" Stamp TV kit. I created the layer flowers the same way I did my mat above and then cut around the outside and popped up over the oval. Originally I intended for this to be a baby card, the faux stitched mat looked like beautiful girly quilting, but since I don't know anyone due with a girl, I turned it into a thank you! :) An extra step you could take before adding the button embellishments to take the card up another notch would be to emboss it with a flowery or swirly Cuttlebug folder...
I shaded the swan with BV31 and BV23 to blend with the lavenders in my papers and floral prints and popped it up over the sponged circle. I stamped my small "Bring the Bling" flourish above and below the die cut and then dropped Liquid Pearls over the center of each dot. Allow several minutes for the card to dry FLAT to avoid smearing. Don't they look like real, tiny pearls? I also added some tiny adhesive flowers to finish the project. Love how this project turned out!
Have to share an old joke that is stuck in my head ever since I saw these images:
What did one octopus say to the other octopus?
"I wanna hold your hand, hand, hand, hand, hand, hand, hand, hand."
hee hee
Now please go check out more samples from our talented Gina K Designs team!
Sunday, March 20, 2011
"Bring the Bling" Tip Sheet
So many ways to bling it!! A lot of "busy" bling may not be your style, but a few thoughtfully placed dots on a card are like throwing on a pair of earrings to make you look elegant and pulled together before heading out the door! They complete the look! We will have a BLOG HOP tomorrow with the Gina K Designs team for this set and I can't wait to see all the ways they've used it! :) Until then , I hope this gets your creative juices flowing! I may come back to this post and add pics of the different looks you can achieve using the different techniques for your reference, but until then, here we go!
Ink up any of these images with Versamark and stamp. Leave "as is" for a subtle watermark or add embossing powder and heat for shiny dimension. Powders are available with shiny, sparkly, matte or distressed finishes, try them all! Metallic powders like silver and gold look like brads or nail heads. Clear or colored powders or tinsels with shimmer in them look like clear or colored rhinestones.
Have dimensional bling in any coloring inking up the bling stamps with Versamark then inking on a colored pad and stamping. Add clear powder and heat, your colored ink will show through.
Stamp in Versamark and use the dots as a guide to carefully dot/drop on Crystal Lacquer or Liquid Pearls. The lacquer allows the color of the cardstock to show through, the liquid pearls will be opaque.
Stamp in colored ink and drop Crystal Lacquer over it for shiny, dimensional colored dots.
Stamp in white onto vellum for a dry embossed look.
Stamp in Versamark onto colored paper for a dry embossed look.
Get a jar of Sticky Stuff powder to use with your Versamark and expand the possibilities! Ink up the image with Versamark, pour on the sticky stuff powder and heat like you would when you emboss, you now have sticky dots that you can add flock, glitter, foil leaf, colored sand, etc.
Use the three single big, medium, and little dots in the corners of mats, frames and labels like an accent or brad, or line them up in different orders on your block to go around a curves, add to the end of another flourish in the set to change the shape, etc.
The long die cut swirls, lines and flourishes have a lot of flexibility! Vary the look by curving the image slightly when you put in to on your acrylic block and stamp.
The straight line is perfect to underline or lead to a sentiment or image. It can also be a flower stem or the string to hand an ornament or punch, get creative!
The curvy or scalloped bling looks gorgeous on the flap of an envelope or the edge of a mat on your card front of inside. Tim around the outside edge of the dots with your scissors to enhance those curves for an ornate, blinged border or shaped card edge.
Stack the borders to make more complicated ones, example, the line with scallops below it. Use them to enhance your ribbons: stamp the scallops once and then flip it over and stamp again about a half inch above it. Adhere ribbon in between the scalloped borders.
Stamp them onto solid ribbons to make patterned ones.
Stamp the "S" curves end to and to make a new border, vary the size to change up the look, big, small, big small. You can also create new whimsical border s with just the flowers or hearts, mixing the sizes.
Adding some single bling or tiny flourish at the end of a greeting gives it more flair or can fill out some space around the sentiment within your mat or die cut frame, where you just a need a little "something".
The large flower is open in the middle to add the bling swirls in the middle in a different color or finish. The smaller flower with the roudn petlas also fits inside. You can also add a button or large brad.
Change the look of the large or small flourish by inking up only the parts you want with a marker and stamping. This way you can eliminate the curls, leaves on the sides if you desire.
Use markers to color different dots in the image different colors (direct to stamp) before stamping. Add extra variety by ink up the image in one color and then swiping a slightly darker marker along the very edge or slightly rolling onto a darker pad. This will the outside edges of the bling even more shadowed and dimensional.
After stamping in a colored ink, you can touch up the bling by going over them with gel, glaze or stardust pen. Just put a tiny dot or crescent opposite the highlight, or draw a quick circle around the highlight. You can do the same with the fine point of a colored marker. Enhance stamped colored bling using a Copic Spica or Sakura glitter pen.
Stamp the small and large leaves around the edges of the flourishes or straight or scalloped borders in places that enhance and balance out your layout. Pop up the blingy flower images over it, or adhere Primas, stamped cut out flowers, rolled flowers etc.
The flourishes make a beautiful butterfly, bird, or bug trail and can add whimsy and beauty to any mat or patterned paper. Stamp them onto your mat and layer die cut from over them, with the swirls and flourishes peeking out around the edges.
Clear emboss the flourishes on cardstock or patterned papers and then sponge distressing inks over them for a vintage,weathered look, your dots will magically appear through the ink in reverse!
Stamp the images onto acetate or vellum cardstock and then use the the little highlight in the center of each to pierce through, place a mouse pad or craft pad underneath when doing so. Now you have a piercing template you can reuse again and again, and the best part, it's reversible! Now you can pierce a mirror image of every single swirl and flourish by flipping the piece over, too cool!
You can also stamp onto your paper, piece through and the flip the cardstock over to a pierced look.
Use the piercing for real stitches with embroidery thread or do faux stitching by quickly tracing over the dots with a pen.
Stamp the images onto designer paper to add detail and customize for you theme or to coordinate with your stamped focal point.
Make bold, graphic looking backgrounds by stamping the different images in one to three different colors onto white white or colored cardstock, makes a very fresh, happy background with burst of color in seconds!
Stamp the smaller images like the flowers, leaves and hearts onto colored cardstock or patterned papers and cut outside the dots to make blingy embellishments.
See you tomorrow for our hop and more inspiration!
Saturday, March 19, 2011
A Tisket, a Tasket...
She cut strips of the flower paper she created from her project the other day to make these layered bows! the artistry is in the details and these delicate touches (and the contrast of the pink to the blue and green so the project isn't so mathcy-match, it also ties in thoe yummy raspberry wrappers!) is SO inspired! My tip: If you don't have time to colors all the borders in, just stamp in a colored ink like powder blue and then spend your time coloring a little tag like this for it. No, it won't be *quite* as awesome as this but you'll still have a beautiful little presentation! Don't not attempt something this fun because you think it will take too long! ;)
"The basket was made from 8.25x8.25" of paper. I stamped the butterflies all around the sides of the basket and coloured them with copics BG10 and YG03. Added a little Diamond stickles on the butterfly images. The little bows were made from the stamped papers with the flower borders from yesterday. I didn't have any Easter eggs (which I think would be perfect) so I filled them with my fave chocolates."
Thank you Kary for working your magic again with this set and showing us how you can take a handful of yummy chocolates to another level and create a handmade gift that has people saying "Wow"! How adorable would this little basket be to store other things in when the Ghiradelli is gone? (I know I couldn't throw it away!) Kary made another beautiful project using the butterflies on a card, using the SCRAPS from this project, please check it out here!
Friday, March 18, 2011
"Stencilled Silhouettes" and "Celebrate in Style"
The first is "Stencilled Silhouettes", bold images that are beautiful with the Direct to Stamp technique, get out your markers! :) This set is free this month only with the purchase of three stamps sets valued at 19.95 or above! Today I made two very simple CAS cards, these stamps make such crisps pop of color on a clean white sheet of Pure Luxury!
Next up is "Celebrate in Style", this mini set is free with ANY $35 purchase this month! You get this adorable frock on dressmaker form (so cute and trendy!) and a greeting that works for almost any occasion! I stamped the dress onto Basic Grey Lemonade DP and then again on vellum so I could add another layer of the skirt underneath. I didn't have any fabric or lace on hand, but in real life the vellum looks very gossamer and girly! :)
Lemon Drop layer is stamped with my "Bring the Bling" border, I tapped the stamp onto my Versamark pad before inking it up with cranberry ink, and then stamping. This layer of Versamark allows clear EP to stick to the image so after heating you can have glossy, dimensional embossing, just like real bling! (Be sure to do the Versamark FIRST so you don't get colored ink on your pad! ) I used the stamped border as a guide to free cut around it creating a fancy edge.
Both sets here at "What's New?"! Please enjoy more inspiration with these stamps from our talented Gina K Design Team!
Thanks for hopping with us! I'd love to hear from you what you think of all the new sets! :)
Thursday, March 17, 2011
Tonight's the Party! Sneaky peeky!
So what stamp is mine?? (hint, not the greeting, not the swan!) I am SO excited to share my latest set with you and all it can do, so many techniques, fun products to go with, it will be a "go to" set that stays out on your desk and will have all your cards dressed to impress and stepping out in style!
Something ELSE new for the party tonight, more videos of Gina and the new stamps in action, (I am pins and needles to see!) so this party we are having for our 2 year Stamp TV anniversary is sure to be a night to remember! It's shorter party but action packed so I really hope you can peek in! Store opens one hour earlier for shopping!
Who all's coming?? See you there!! :)
Tuesday, March 15, 2011
Special Guest Appearance by...
Kary's creation details:
"I wanted to show how pretty the border flowers are, and how one can use it to make your own pattern paper. I cut a strip of white cardstock 3 inch wide, and stamped the flowers diagonally. Then I did some colouring with copics ( I used R81, R83 & R85 for the flowers and YR02 for the flower centre, & YG03 & YG17 for the leaves). The 3 rolled flowers are also made from the stamped piece of paper. "
I am just bewitched by these beautiful rolled flowers: the stamping inside makes for perfect coordination and just takes the whole project up a notch beyond if they were just solid color, I love! (And did you jot down that marker combo, I'm in heaven!)
Fantastic design, Kary, thank you again! Be sure to leave Kary some love! I *believe* we may even be getting a bonus project from her tomorrow! :)
*How are you liking all the snippets? Figured out whose is whose? ;)
Sunday, March 13, 2011
Spellbinders Blog Hop
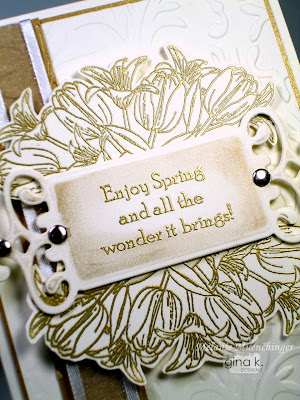
Here is a card I made with one of the Fancy Tag Dies. These beautiful tags are often the inspiration for the entire card, the elegant flourished and intricate details make it easy choose paper and images to create a gorgeous, coordinated project and really add flair to any sentiment! I embossed a greeting from "Basket Blessings" in gold into the center of the die and then rubbed some metallic paste over the die before removing it, I love using these dies like stencils, just makes the beautiful details in the embossed edges pop even more.
I embossed my bunch of tulips and lilies from "Spring Basket", stamping one on ivory cardstock then flipping the stamp over to stamp below and create this rounded, wreath effect. Cut out and mounted under the tag die cut, it looks like a beautiful medallion, I love the way the flower bunches frame the sentiment.
Thank you again, Spellbinders for the Grand Calibur! For someone like me who is a constant collector of Nestabilities, this machine and streamlines the cardmaking process and gets me using all these beautiful dies more often! Love it!