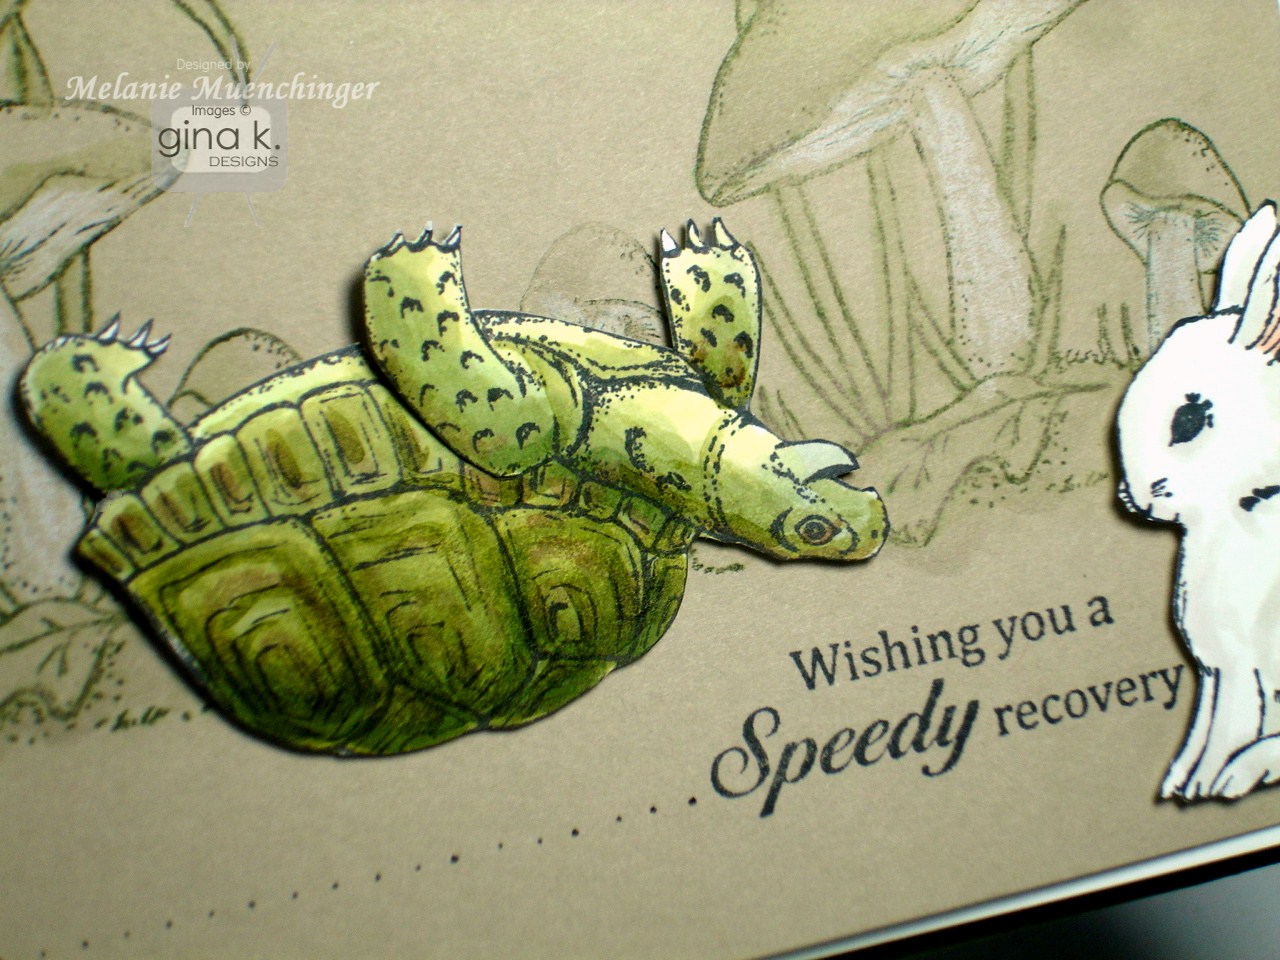
Hope you're having a hoppy, er, happy day!
A woman who works with her hands is a LABORER; a woman who works with her hands and head, a CRAFTSMAN; but a woman who works with her hands, her head and her heart is an ARTIST. ~ Louis Nizer
Saturday, March 12, 2011
I Get By with a Little Help
Hope you're having a hoppy, er, happy day!
Friday, March 11, 2011
StampTV Color Challenge 15
Today's Color Spotlight challenge is White, Fresh Asparagus and Soft Sand. These colors were perfect for an idea I'd had a couple weeks ago, I'd already colored and cut out the turtle from Theresa's "Little Critters" for it. The "speedy recovery" sentiment made me think of when turtles get flipped over and have to right themselves again. (TIP: If you're going to have him upside down on your project, be sure you color him that way, shell facing down so the highlights will be on top and the shadows beneath.) Anyway, when I put him on the card, I was afraid that to some, especially with that greeting, he might look like he was dead, yikes! (boy, wouldn't that make the "speedy recovery" seem snarky!!) Not *quite* what I was going for...Be sure to use the tag STVCSP15 when you upload your creation using these colors to the STV gallery.
Thursday, March 10, 2011
Operation Write Home
Wednesday, March 9, 2011
Guest Designer Melissa Cash
Tell us about yourself! Family, pets, where you live, work, etc:
I have been married for almost 25 years (on May 10) to David and we have two grown boys. Jim is 24 and Jon will be 20 in June. I am so lucky to live near one of the most beautiful places on earth, Yosemite National Park and I have worked/teach classes at my local stamp store. I love animals and have two terrier mix dogs(Abby and Wags, both are rescues) I volunteer for my local SPCA when I can. My life is full of many blessings.
Describe your style/what you think you do best:
I would say my style is pretty mainstream. I love to use images that are timeless and can be used for many occasions.
FAVORITE TECHNIQUE: Layering, layering and layering!
COLORS/COLOR COMBO:
Just about anything paired with green makes me happy. I use a lot of pinks, greens, aquas and browns.
FAVORITE EMBELLISHMENTS:
Rhinestones, ribbon and flowers
FAVORITE GINA K SET BY MELANIE:
Hmmm, this is a hard one. Right now I am loving Spring Basket, but I also love A Year of Flowers and Pressed Flowers too! Heck, I love them all.....who am I kidding? (her first Spring Basket sample is pictured below)
FAVORITE GINA K SETS (FROM ANY ILLUSTRATOR)
All of them! Too many to decide.
CRAFT SUPPLIES I CAN’T LIVE WITHOUT:
Copics, Gina K. PL White, Black and Kraft cardstocks, Tonic Trimmer and Nestabilities dies.
I’VE BEEN STAMPING FOR (HOW LONG):
About 20 years. Yep, I have been around along time.
I GET MY INSPIRATION FROM:
First, I am inspired by nature and the beautiful colors of nature. Second, I am inspired by the many different blogs I peruse each day. There is so much talent in the stamping world. I am also inspired by different stamping challenges, sometimes a challenge is just what I need to spark my creativity.
Tell us about your FIRST stamping experience!!
It was in the fall of 1990 and I was at a little gift shop and they were doing a demo on embossing. They were embossing bats with black EP on brown paper bags. That was all it took, I was hooked. I bought the bat stamp, ink, embossing powder and a Milwaukee heat gun (which I still have and use 20 years later). Funny thing about this, is that I don't really care much about Halloween, but I bought that little bat anyway!
Tell us about your most MEMORABLE stamping experience!!
Hmmm, this is a tough question. We went on a stamping cruise 11 years ago and were pretty disappointed. On the way home from the cruise we decided to create a retreat of our own. This year (last weekend in April) will be the 10 anniversary of The Great Yosemite Stamp Escape. I think it is one of the greatest experiences because I have met some wonderful instructors and stampers over the years. Stampers really are amazing people!
THE MOST IMPORTANT THINGS I’VE LEARNED ABOUT STAMPING/CARDMAKING ARE:
Stampers/cardmakers are some of the most kind, loving and supportive people you will ever meet.
SOME OF MY STAMPING/CRAFTING GOALS ARE:
I would also love to be on a design team(s) someday. My goal is to continue teaching people the craft that I love. I would love to travel and teach.
ADVICE FOR BEGINNERS:
1. Don't think you need to have every stamp, tool, embellishment that is on the market. Take it slow and find your niche.
2. Don't give up and don't every think your work isn't "good" enough.
3. Have fun!
FAVORITE THING TO MAKE THAT AREN’T CARDS:
Little boxes and gifties.
SOME OF MY STAMPING/CRAFTING ACCOMPLISHMENTS:
1. Seeing my work in a magazine. I think I have been published about 10 times in some of the different magazines. Remember way back when Take 10 magazine first came out? I had a card on the cover, I was on cloud nine. I haven't submitted much since then....weird huh?
2. Teaching classes. I am so fortunate to have an amazing stamp store minutes from my house I teach a couple of classes a month.
3. Being on the Center Stage Team and doing design work has been a complete joy for me.
CHALLENGES I LIKE TO PARTICIPATE IN:
Sketch and color challenges are my favorite. I have files and files of sketches that I refer back to for inspiration all of the time.
TELL US SOMETHING ABOUT YOURSELF THAT MIGHT SURPRISE US!
1. I have been fortunate to meet Paula Deen (the amazing Southern cook) two times. Once at her cooking school and once at a benefit dinner at her home.
2. I have a travel bug, my hubby says I have one foot in the road at all times. My motto is "have passport, will travel"
3. I don't like clowns..they are scary.
WHAT I DO WHEN I’M NOT STAMPING:
I like to spend time with my family, read and travel when I can.
A FAVORITE QUOTE:
The better part of one's life consist of his friendships~Abraham Lincoln
I hope you enjoyed learning a little more about Melissa as much I did! One thing I am sure of, someone who has that as their favorite quote must be a true blue friend to others! :) Now let's go see a "Spring Basket" project from Melissa on her blog, I can't wait to see what she's dreamed up! And while you're there, please "follow" this talented lady, her cards are gorgeous, and you hard it from the woman herself: 20 years of stamping experience AND a paid stamping instructor, we could all learn something! ;)
Have a great day!
Tuesday, March 8, 2011
Wow! Sweet Deal on Menu Planning Service I Use
For anyone who does know how to cook but would like to save time, add variety to their repertoire, or who maybe isn't confident with cooking or meal planning, I can't recommend it enough. Cooking dinner for my family is one of my favorite things to do each day, It has matured me, enriched me, organized me, and I really DO feel like a Domestic Goddess now. :) That's "me" above, looking domestic and "Sew Pretty" ;)Oh yeah, and the KIDS are eating so much better too, that's important LOL!)
See the deal here:
$14 for a 6-Month Subscription to Meal Planning from The Six O’Clock Scramble ($30 Value)
Back later with some projects, Jonathan is back at school today, woo hoo! :)
Monday, March 7, 2011
STV Sketch Spotlight 16

Be sure to sure the tag STVSKSP16 when you upload you new creation with the sketch to the StampTV gallery! I hope you play along and good luck winning the free stamps!
Sunday, March 6, 2011
We Have an Ear Infection
Hope you had a good weekend, we got to enjoy a lot of fun family time eysterday and a birthday party before sickness found us again!
Saturday, March 5, 2011
Play with Your Food!

The first purchase I made there, which we use every day, are these Food Face plates! The kids love em, it's all about presentation getting them to try new foods! I was so happy when she started carrying the GIRL Food Face a few months later, yup, I have one!


The list of things I want that are just so over the top fun is long: Onion Goggles(no more tears!) , Mini Cupcake Maker, Ice Cream Ball, Cherry Chomper Cherry Pitter, etc! Having some of their fun, safe utensils has really helped me enjoy being in the kitchen more and gets the kids involved, which is always a good thing!
Follow this link to check out the deal and purchase if you are interested!
Friday, March 4, 2011
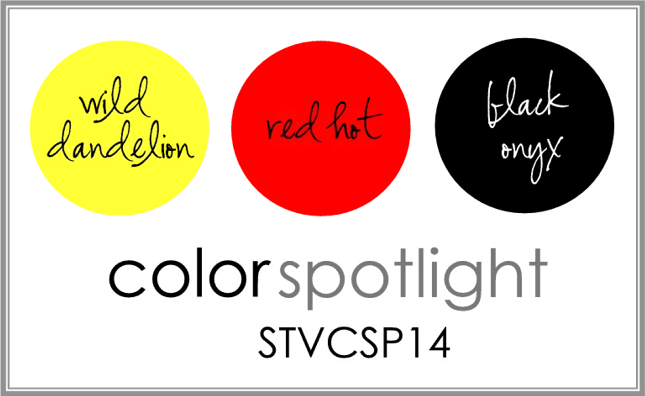
StampTV Color Spotlight #14
You know I love red and black and throwing in a gorgeous sunny yellow like Wild Dandelion makes such a vibrant, cheerful card! I paired it with the daisy grouping from "Spring Basket" and Cuttlebugged the Dandelion layer with Victoria.Thursday, March 3, 2011
Words of Encouragement
Wednesday, March 2, 2011
Two movie tickets thru Fandango.com!
Check it out! :) Offer ends today!
PS I'll be back to update you on my S2H replay, it arrived a couple days ago!
Tuesday, March 1, 2011
Fondue!
Although William still can't read very much, his random guessing usually puts him in second place for most correct; this year he tied with Paul with 8 and I came out on top with 12, only seen a few myself this year but did read a bit of the buzz beforehand...
William is well and back at school but now JONATHAN has been out the last two days, came down with fever starting Saturday, can you believe? Fortunately, his temp hasn't been too high and he has has few other symptoms so we've just been watching a lot of "Watch Instantly" movies on Netflix together on a blow up air mattress in my office and resting. I did manage to make a card for this week's color challenge this morning, though, plus a quickie "Where Your Heart Is" project I will post soon, a card but not, you'll see! :)
Monday, February 28, 2011
STV Sketch Spotlight 15
These windows inspired me to do some little "Basket Blessings" bunny vignettes and split the little "peek-a-boo" sentiment into three parts using a marker to ink up the stamp and cleaning it after each stamping word. Hide and PEEK!! :)Sunday, February 27, 2011
"What Are Words"
"Can you really think of a better medicine for depression than have the handsome talented love of your life sing a song about how devoted they are to you? Then take it a step further and have that same man go on national TV and talk about you and sing that song? I certainly can't. In fact, all the pills and therapies Juliana's had up to this point have not amounted to the quality of improvement this single event has had on her emotional state. When she heard the song she said, clear as bell,"This is the best I've heard him sound. He's singing about me, right?" (My note: if you have not read more about them before, her speech has been very difficult to understand since the accident and she hardly spoke at all before Chris auditioned; so sweet, Chris was quoted in an interview saying her new found desire to talk was from Steven Tyler's "magic kiss!) She cried when she watched the video and asked to go on Facebook... ASKED...so she could comment on his song and video. She is so incredibly proud of him as we all are but we are seeing it on Juli and that visibility is overwhelming us all.
If you have not yet heard the song you are missing out on one of the most emotional experience so Juli's recovery. It is the affirming evidence of all the prayers that have been said for Juli, Chris, and our whole family."
Read the full post here. Download the song on itunes, let's get it in the top 10!
Saturday, February 26, 2011
"Spring Basket" and "Basket Blessings" Tip Sheet
Stamp the basket onto scratch paper and cut out to use as a mask. This way you can cover your pre-stamped basket and then stamp images over the top, then remove to look like they are inside. To save time on your mask, just cut the top edge since this is where you most likely will be needing to mask anyway! :)Stamp out the bouquet arrangements on scratch paper and do a careful trim around the bottom only. This allows you to stamp the flowers, cover them with your mask and stamp the basket over it. When you remove the mask it will look like the flowers are spilling over the edge.
Stamp, cut out and pop individual flowers to layer over the bunches for a fuller look.
Use the bouquets on their own as borders. Turn them so the curved edge is on the outside so they can curve around a circle or oval die cut.
Stamp the bouquets on the inside of your card and/or the flap of your envelope for complete coordination with you card front.
Snip the bouquets apart so you have several sizes of each type of flower to work into your card layout in any way you choose.
Use some of the individual flowers that match the bouquet you choose to stamp into your basket, leaving them out around the bottom of the basket, like you have not finished arranging them or like one fell out, a beautiful, casual look!
Put two of the same bunches opposite each other so they can "frame" up a greeting, like the mirror image top and bottom of a label.
Stamp the flowers collage style over plain, colored cardstock or patterned paper to create gorgeous floral backgrounds.
These flowers can be used with almost any stamping/coloring technique, have fun!
Trim the basket down to make it shallower or have straighter sides. Removing the very top fluted" part makes a more "masculine" looking or less Easter specific basket.
Make petite arrangement with the single flower elements. The single flowers make a beautiful little accent whenever you need a little something on your card. same for the tiny leaves, work like little flourishes.
Enjoy mixing the small single flowers with the larger "A Year of Flowers" images.
You can also use the "Buds and Vases" flowers in the basket.
Use the woven handle at the top center to the basket or have two hanging diagonally to either side, meeting in the middle.
Use a little brad to accent the handles.
Tie a little bow at the top of the handle or at the bottom.
Take a hobby blade and cut some vertical slits through the middle of the basket. Thread some narrow ribbon through and then tie, it will look like it is woven through the reeds.
Pull colors from your color scheme or DP to color a few bands of the reeds in the same color for a very customized, matchy basket!
Flower Soft makes beautiful filler/Easter grass! It also makes beautiful pollen for the flower centers!
Have fun going through your stamp images to see what else can go into the masked basket!
Invert the basket and have something hiding, peeking out underneath and use the peek-a boo greeting from "Basket Blessings".
Use the different borders from "A Year of Borders" to make a beachy basket full of shells, basket full of fall leaves etc!
Use the different greetings from "Basket Blessings" with "Spring Basket" to make flower basket cards fro any occasion: baby, birthday, bridal etc!
Not just for brown: use soft pastels in spring for a dyed basket, earthy colors for natural or fall baskets, reds and greens or even metallic colors for painted holiday baskets etc.
Emboss the basket in gold or silver and color for a gilded look.

Tip the basket on its side to change your layout and have stamped images spilling out.
All the animals can be used on their own, or placed in the basket. use you basket mask to make them look they are stamped inside. Or stamp the animals first then cut out your basket and pop it over it for a more dimensional look.
Have fun piecing the ruffle with patterned papers like a liner. This will make your basket snuggly soft for those stuffed animals!
The stuffed animals are super fun to paper piece. try using two coordinating patterns on an animal to really emphasize it's different parts. or use on patterned paper and then go over certain section, example ears or trunk with a darker colored marker, this will look like second coordinating print.
Add dimension to your paper piecing by tracing around the edges with a marker in a similar color to create shadows.
To place the stuffed animals in the basket, trim around the trunk on either side and around the floppy rabbit ear, then slide down into the basket, this allows the little limbs to hang over.
Use the peek-a-boo sentiment with these animals as well as your other stamps and have just the top of the image showing, then do a reveal inside the card like they are popping out.
Stamp the images for inside the basket onto a tag that you can pull up out of the basket to reveal the full image, peek-a-boo!
Stamp the chicks and eggs more than once so you can cut out and color extra eggs to fill up your basket or Easter layout. Feel free to trim one or both chicks off your stamped images or omit inking them with a marker to suit your layout. have fun mixing the chicks and bunnies together.
Use a pale yellow and a dark yellow to color the chicks and give them a fuzzy dimensional look.
Stamp the animals in row a row or fill up an entire mat in a light shade or watermark to create a cute matching or baby theme patterned paper to go with your colored image. "Blessing Borders"! ;)
Use a marker, colored pencil to draw a few simple blades of grass below and around the bunnies and eggs and chicks to make a charming little outdoor scene on your project without using the basket.
Nestle the bunnies and chicks just under some hand cut paper grass (trimmed like fringe) or die cut grass border.
Have fun giving the bunnies patches, making ears the ears or feet different colors, etc. They are very easy to add shadows to, leave white and trace around sides with grey or color with grays black or browns and trace the edges a shade darker than the body color.
Try stamping the animals on velvet paper for fuzzy texture and cut out.
After stamping the bunnies, snip them apart so they can be in different position in different places on the card or used alone depending on the expression you need, smiling or giggling!
Invert the ruffle to look like a tissue paper liner standing up and place your flowers above that.
See what else your ruffle can be! The valance of a window for a tall, scenic card, the covering over a small table to you could rest a vase of stamped flowers on, etc.
Use Fun Flock or Flower Soft on the chicks and bunnies tails. Try tiny pom poms on the bunnies.
Enjoy coloring the decorated eggs with colors from your color scheme. One egg was left plain so you can paper piece it.
Take cues from the eggs to find patterned papers that will look good for mats with it: plaids, stripes, flowers, polka dots, etc.
Accent mats with the daffodils or make floral backgrounds. Use them with the stems and leaves from "Spring Basket". Or layer them over the bunches in "Spring Basket" for lush, mixed bouquets.
Add dimension to the daffodils by stamping them twice then cutting out the center part of one to put up on a pop dot over the other image, the center will now look dimensional.
Make cut tags with all the tiny greetings using your punches and die cut,s they will fit most any shape.
Create adorable Easter gifts and projects using the images as tags or embellishments to decorate little boxes, bags or Easter baskets.
That's all I have for now! I hope this was helpful to get your creative juices flowing! Coloring tutorials and samples to support all these tips and ideas coming soon! :)